3rd Party Tracking
- IAS: Campaign Tracking & Process Overview
- 3rd Party Verification Platforms
- Exploring Banner/IBV/Native Integrations within 3rd Party Verification Platforms
- Exploring Rich Media Integrations within 3rd Party Verification Platforms
- IAS: Video and Display Trackers & Glossary
- The Attention Funnel Explained
- IAS: Report Builder - Agency account
- MOAT
- Banners/IBV/Rich Media & IAS measurement
- Troubleshooting and Trackers Configuration Guides
- Troubleshooting guide for 3rd party trackers
- Adform creative tag implementation (updated)
- Sizmek Tags
- VAST video & IAS measurement
- Measurement marketplace
IAS: Campaign Tracking & Process Overview
Overview
Integral Ad Science (IAS) is an American technology company that provides solutions for the verification of digital advertising. This article provides an overview on workflow and the roles of both agencies and the Eskimi platform in the provision and implementation of IAS trackers:
Campaign Setup and Optimisation Workflow
|
Steps |
Clarification |
Responsibilities |
|
Step 1: Associate Eskimi DSP and Eskimi Media Partner with the IAS account.
*This step needs to be completed once for each agency's IAS account. If the account was already associated before, move to step 2.
|
With Eskimi now integrated into IAS as a DSP, clients can easily request association with their IAS account for streamlined tracking and optimization. By linking Eskimi DSP and Eskimi media partner with the agency's IAS account, all future tags created for Eskimi DSP will automatically include DSP internal macros. This facilitates tracking metrics per custom segments provided by the DSP, enhancing campaign optimization.
To initiate the association process, clients can reach out to IAS support using the following request:
"Hello, We would like to associate Eskimi DSP (ID: 77) and Eskimi media partner (ID: 9688) with our team/account." |
Client / Agency |
|
Step 2: Create IAS Tag
*Ensure that the selected type of tag aligns with campaign goals and supports the measurement of KPIs. For further details on tags, refer to the provided article.
|
Scenario 1: Tags that do NOT require Eskimi AdServing or future wrapping (display monitoring tags, impression 1x1 pixel tracker video)
Scenario 2: Video tag that requires Eskimi AdServing and future wrapping with IAS tags (Wrapped Video)
|
Client / Agency |
|
Step 3: Provide information about Brand's KPIs for IAS and Brand requirements |
To ensure that the campaign effectively meets its KPIs, alignment on KPIs and requirements is crucial. Therefore, the agency/client is responsible for providing such details, including brand safety guidelines and campaign IAS KPIs, to the Ad Ops Team in the email thread together with other campaign details. |
Client / Agency |
|
Step 4: Provide IAS trackers to Eskimi AdOps |
The agency/client is responsible for providing accurate IAS trackers, ensuring their reliability and relevance for campaign KPIs measurement. |
Client / Agency |
|
Step 5: Correct implementation of the tag |
Eskimi AdOps is responsible for the correct implementation of IAS trackers, maintaining consistency across diverse campaigns |
Eskimi DSP AdOps |
|
Step 6: Setup of daily auto-reporting |
The agency/client will receive campaign data in IAS reports within 48 hours from the campaign start time, at which point it is possible to export the IAS report. It is the agency's responsibility to either set up auto-reporting or provide consistent reporting containing mandatory information for campaign optimization to the Eskimi AdOps team at adops@eskimi.com. The provided report should include data for the total campaign per day, as well as data per apps/sites or placement_id macro. For more detailed report information, please refer to the instructions provided in this article. |
Client / Agency |
|
Step 7: Check reports daily and optimise for IAS KPIs |
Eskimi offers the capability to optimise campaigns based on client KPIs using insights from IAS reports. Here's an outline of the optimisation process and requirements:
|
Eskimi DSP AdOps |
|
Step 8: Troubleshoot
*Applied only when there are significant discrepancies between Eskimi DSP vs IAS report. |
Upon checking reports and identifying discrepancies, the following actions need to be taken in the established order until the root of the issue is identified:
|
Eskimi DSP AdOps / Client / Agency |
Disclaimer: Eskimi's Accountability - Eskimi assumes no responsibility for discrepancies or issues in measurement capabilities found in IAS reports if they originate from areas under the control of the agency/client. While Eskimi may provide support and suggestions in various scenarios, the ultimate responsibility lies with the agency/client based on designated areas of responsibility. Therefore, Eskimi cannot be held liable for compensation related to such circumstances.
FAQ
Does Eskimi support IAS trackers?
Yes. Eskimi supports monitoring pixel trackers, as well as monitoring creative tags. Eskimi also supports blocking tags that prevent showing the ad visuals in forbidden content.
Do you have the ability to optimise the campaign based on viewability?
Yes. We track viewability metrics in our internal reports, and with this data campaigns can be optimised accordingly. However, it's also important for us to receive IAS reports to monitor any discrepancies and optimise the viewability of IAS data, as the measurement technologies are slightly different.
Do you have the ability to optimise the campaign based on brand safety?
Yes. To optimise, we'll need a report from IAS based on which optimisation will be done. Because Eskimi isn't measuring Brand Safety KPIs internally.
How can we track viewability with IAS trackers in banner and video campaigns?
Video IAS measurement - In order to capture Viewability data when running a VAST campaign, each video must be wrapped within an IAS tag. This tag, within IAS, is referred to as Multimedia Tag Monitoring. It's important to note that employing this tracker might result in the exclusion of certain traffic, as only video traffic compatible with VPAID/OMID will qualify for viewability measurement.
Display IAS measurement - Viewability data can be gathered by implementing the tracker in the form of a Javascript tag.
How Eskimi can optimise IAS KPIs?
We need daily reports from IAS, based on which we will create a black-list/ white-list and apply them to the campaign as optimisation. Here are the instructions about expected segments in the IAS report.
3rd Party Verification Platforms
Exploring Banner/IBV/Native Integrations within 3rd Party Verification Platforms
Introduction
In the dynamic landscape of digital advertising, where capturing and retaining users' attention is paramount, the role of third-party verification platforms has become increasingly vital. Advertisers and publishers alike have sought ways to ensure the transparency, viewability, and brand s afety of their online campaigns. However, beyond their fundamental functions lies a lesser-known yet innovative aspect that is pois ed to revolutionise the industry - the integration of creative wrapping. In this article, we delve into the practical implications how Banners/IBV/Native ads executed through Eskimi should be wrapped into a 3rd party verification platform.
Banner, IBV, Native Wrapping Process for Ad Operations Team
-
Begin by uploading the client's creatives through the creative setup page.
-
Set up a campaign using the newly uploaded creatives.
-
Access the preview page of the campaign.
-
Right-click on the creative and select "Inspect Element", or navigate to the developer's tools.
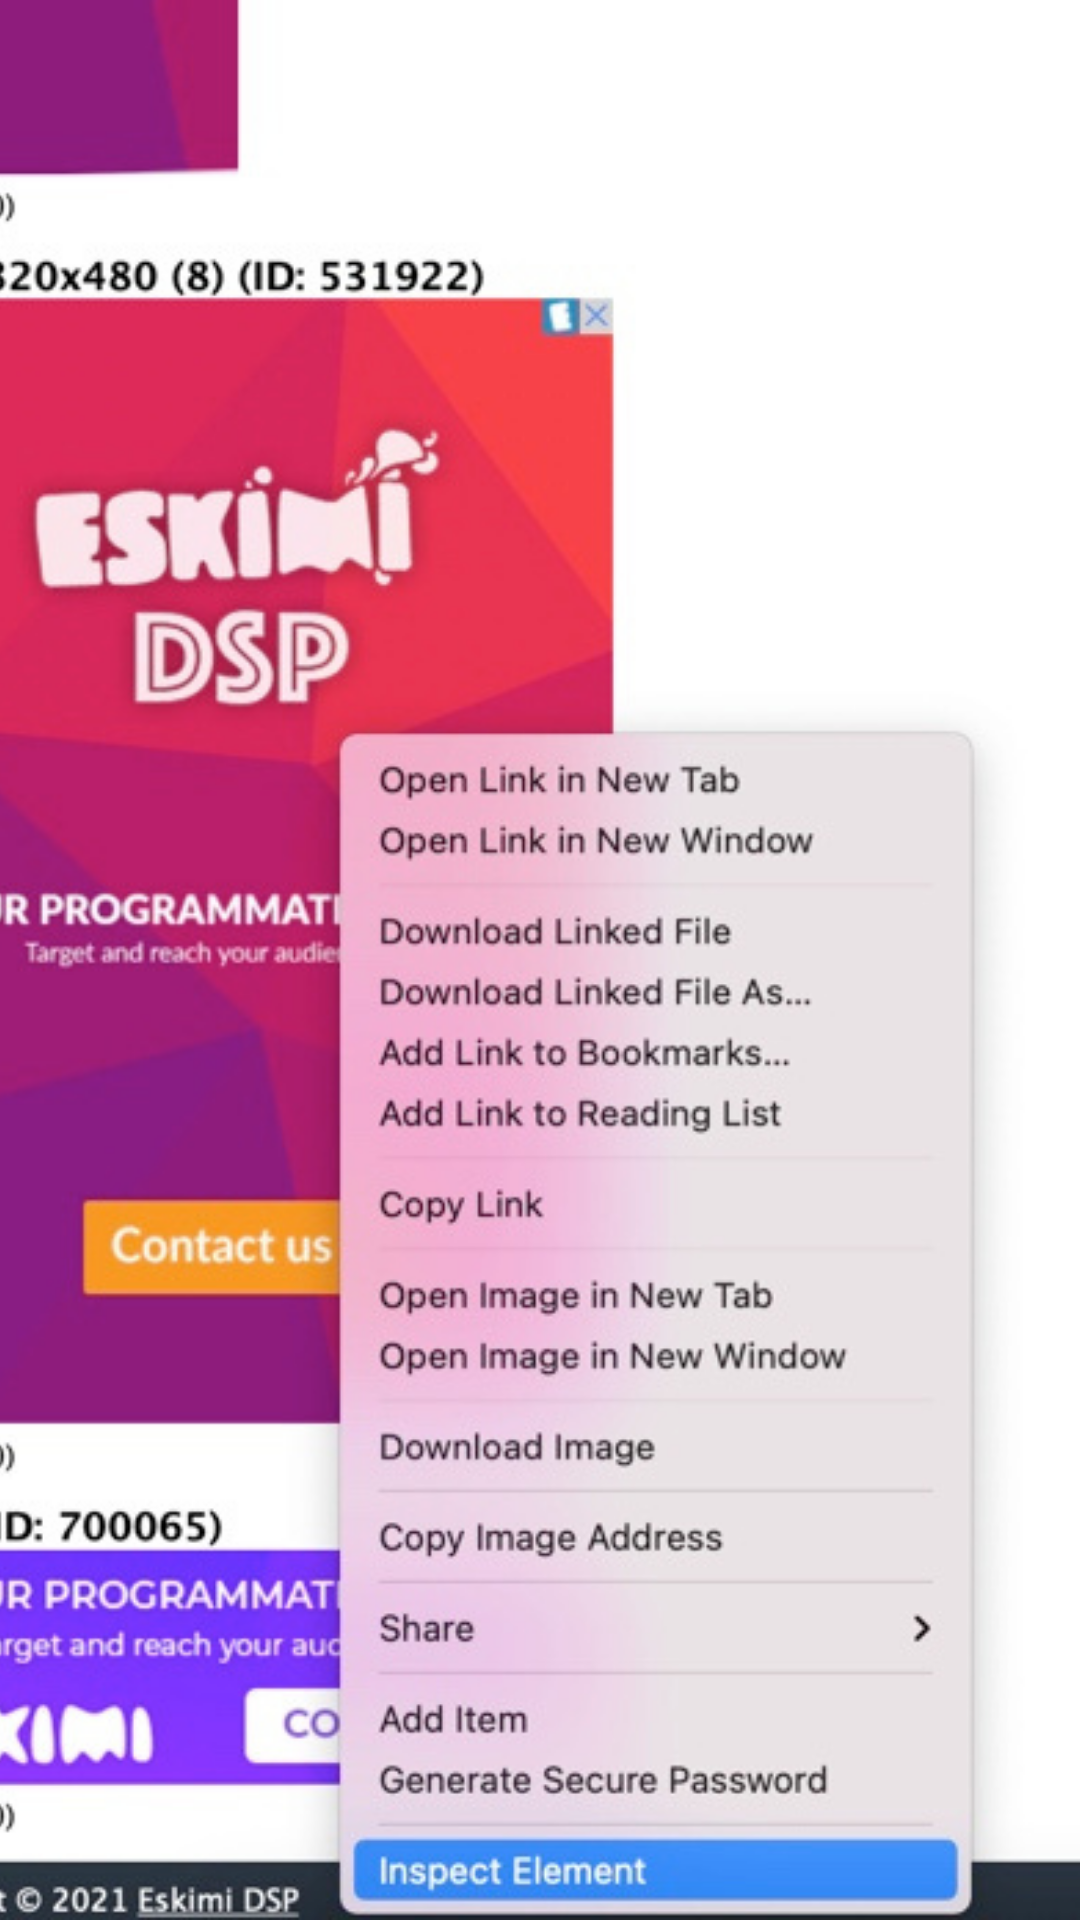
5. Locate the <img src= tag within the code and copy the URL associated with it. Paste the URL into an Excel spreadsheet or a notepad for future reference.
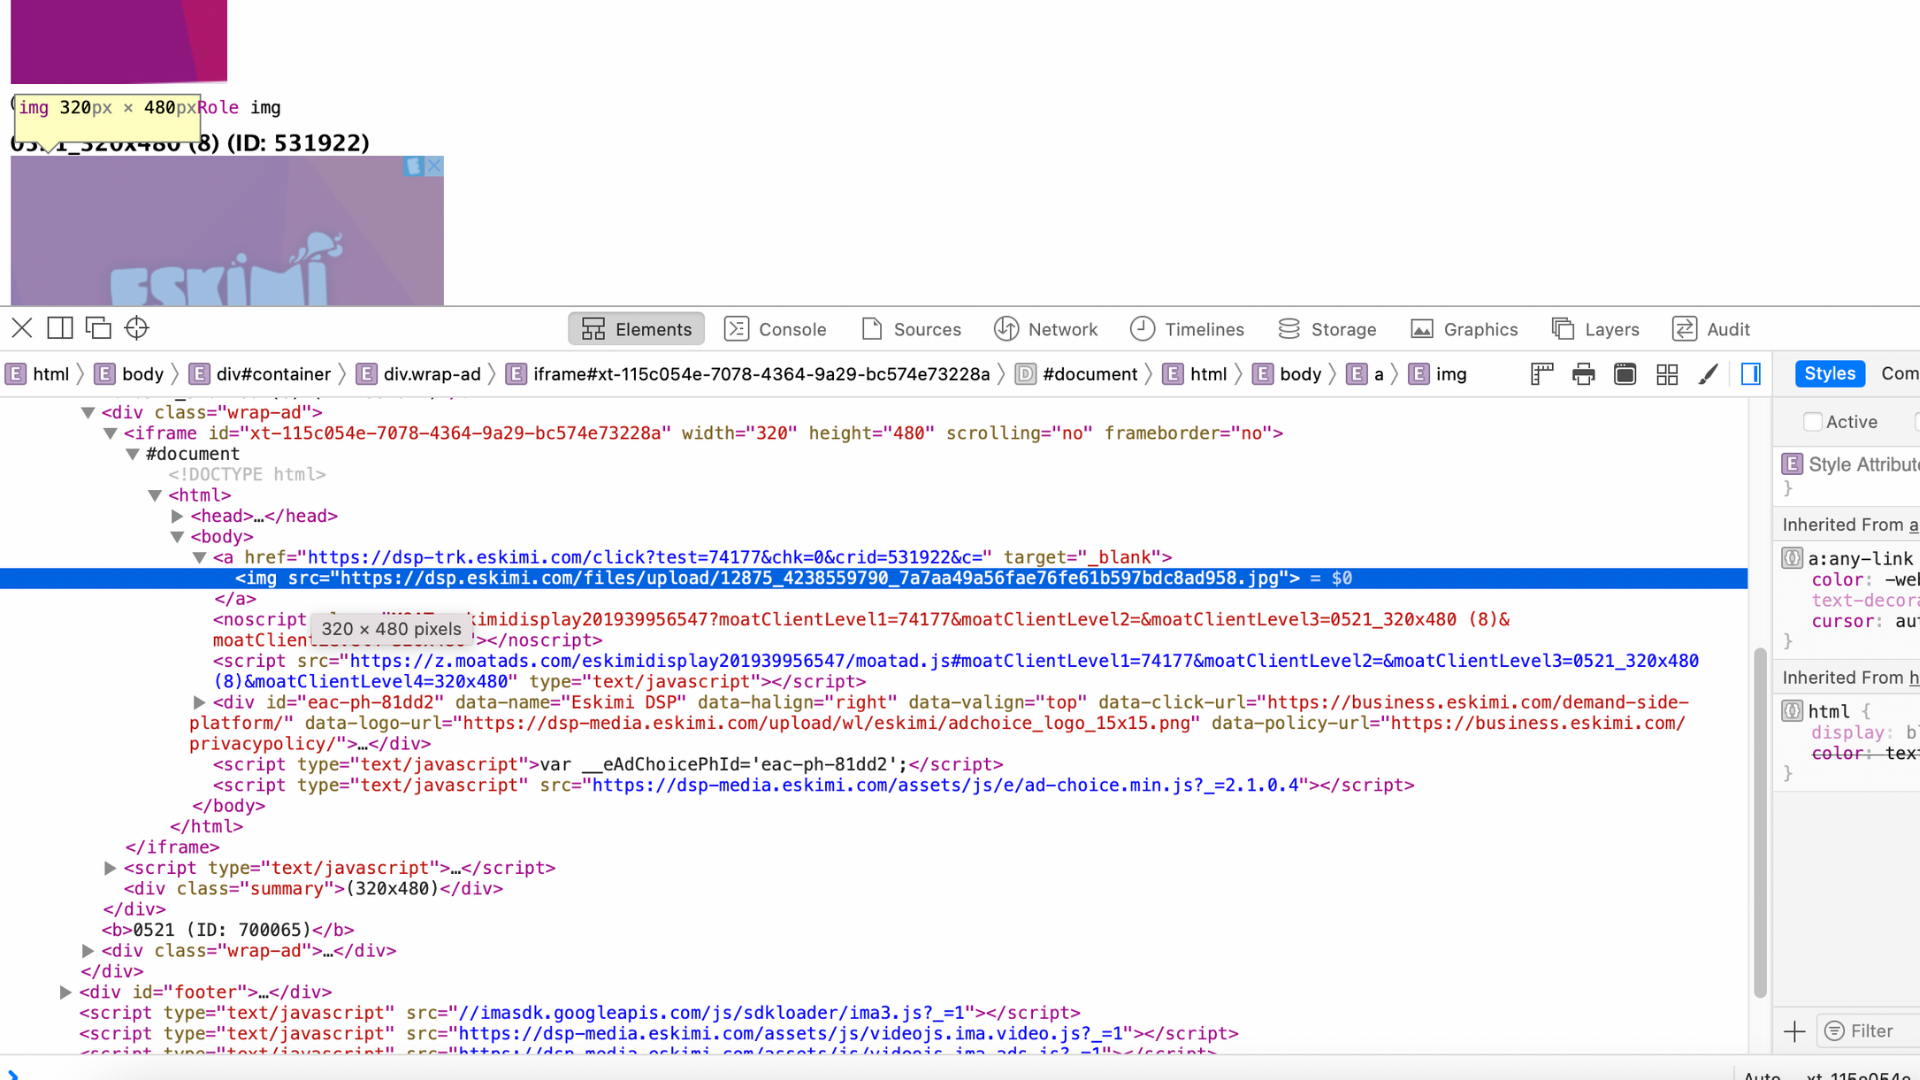
6. Replace "dsp.eskimi.com" in the image file URL with "dsp-media.eskimi.com". This step is crucial to ensure the proper functioning of the dashboard when re-uploading the wrapped creatives.
7. Place the modified image file into a JavaScript tag, following the format:
<a target="_top" href="{CLICK_URL}"><img src="[changed image file]" width="300" height="250" /></a>-
Adjust the width and height attributes according to the specific creative size.
-
Repeat the above steps for all the creatives associated with the campaign.
-
Review the creatives either by yourself or by seeking input from your colleagues.
-
Ensure your final file resembles the following example: Example Link
-
Share the completed Excel file containing the wrapped creatives with the 3rd party platform team.
-
The 3rd party support team will integrate the shared tags into their own tag, which may take between 1-3 working days depending on the platform.
-
Once you receive the wrapped tags, upload them to the creative setup and launch the campaign according to the client's requirements.
Exploring Rich Media Integrations within 3rd Party Verification Platforms
Introduction
In the dynamic landscape of digital advertising, where capturing and retaining users' attention is paramount, the role of third-party verification platforms has become increasingly vital. Advertisers and publishers alike have sought ways to ensure the transparency, viewability, and brand s afety of their online campaigns. However, beyond their fundamental functions lies a lesser-known yet innovative aspect that is pois ed to revolutionise the industry - the integration of creative wrapping. In this article, we delve into the practical implications how Rich Media ads executed through Eskimi should be wrapped into a 3rd party verification platform.
Rich Media Wrapping Process for Ad Operations Team
-
Begin by uploading the Rich Media zip through the creative setup page.
- Copy all the JavaScript which was updated with necessary Eskimi trackers.
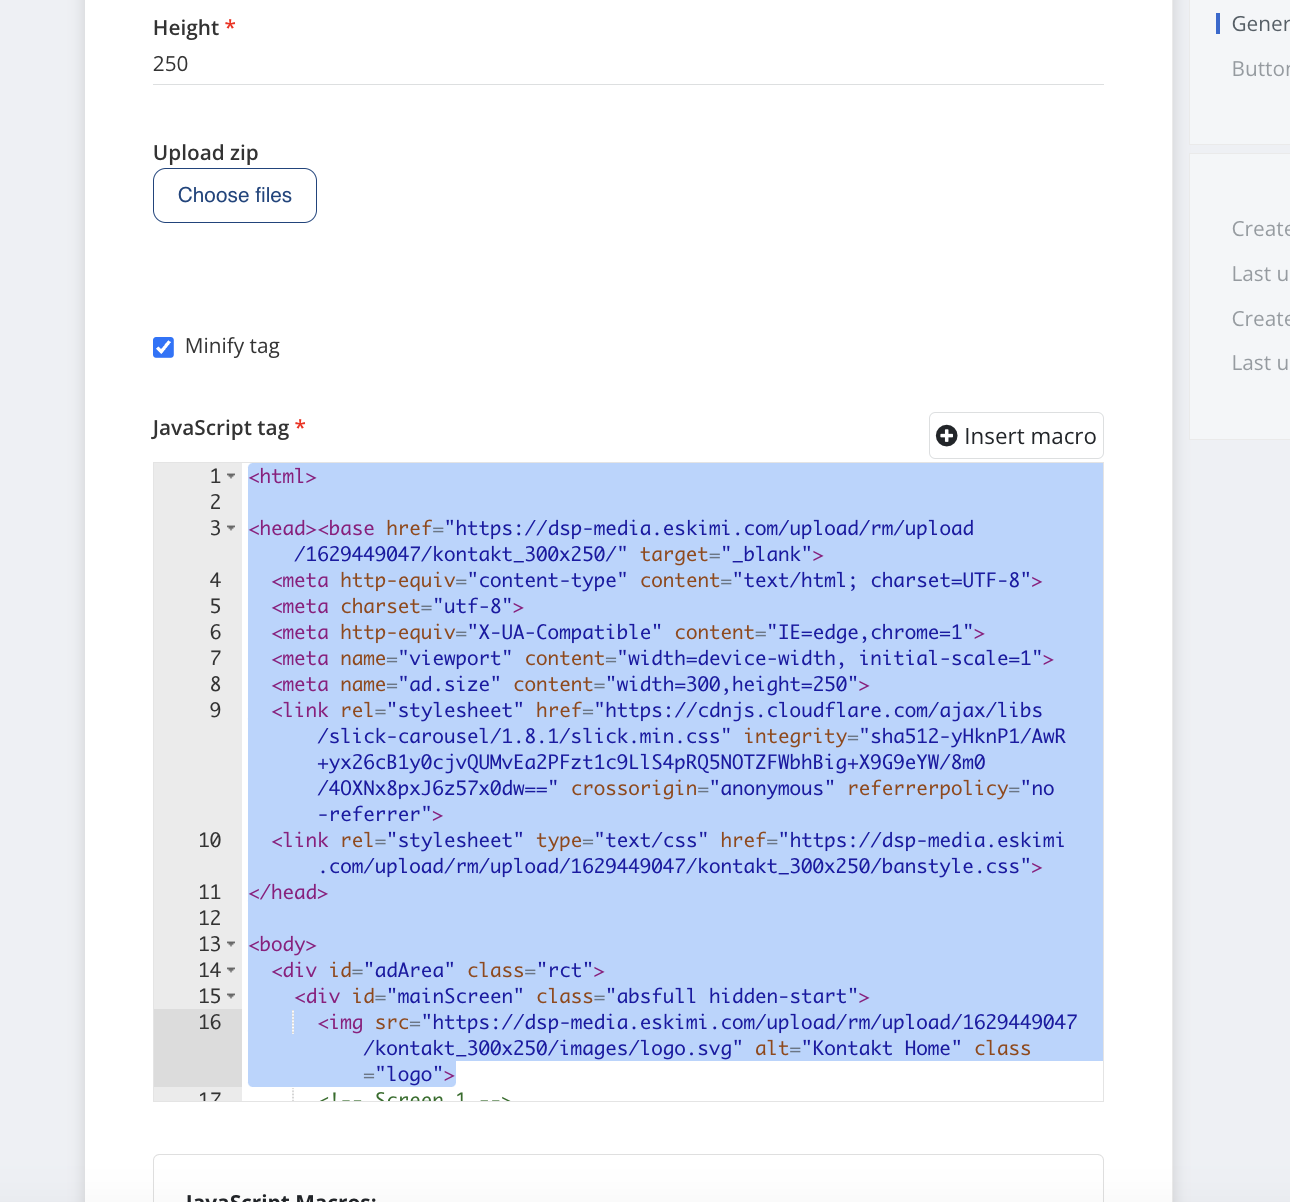
3. Paste the JavaScript code to and Excel or notepad.
4. Repeat the above steps for all the creatives associated with the campaign.
5. Review the creatives either by yourself or by seeking input from your colleagues.
7. The 3rd party support team will integrate the shared tags into their own tag, which may take between 1-3 working days depending on the platform.
8. Once you receive the wrapped tags, upload them to the creative setup and launch the campaign according to the client's requirements.
IAS: Video and Display Trackers & Glossary
Trackers for Video:
| IAS Solution | Explanation | Requirements | Measure Viewability | Measure Invisible URLs | Measure Impressions | Measure Brand Safety |
| Multimedia Tag Monitoring (Wrapped Video) | Video tracking tag that will work across desktop, CTV, mobile & in-app. Can measure viewability, set to not block | Requires a VPAID or OMID player/publisher support & 3rd party ad serving | Yes | Yes | Yes | Yes |
| Multimedia Tag Blocking (Wrapped Video) | Video tracking tag that will work across desktop, CTV, mobile & in-app. Can measure viewability, set to block | Requires a VPAID or OMID player/publisher support & 3rd party ad serving | Yes | Yes | Yes | Yes |
| Unified Video 1x1 Pixel | Video tracking tag that will work across desktop, CTV, mobile & in-app. Cannot measure viewability or block | Requires a VAST player & 3rd party ad serving | No | No | Yes | Yes |
Ensuring accurate measurement of viewability and other metrics with IAS requires using Wrapped Video Creative. This is because certain metrics, such as those measured by JavaScript (JS), cannot be captured using the traditional 1x1 pixel. At the same time, the VAST video format also doesn't support a separate JS impression tracker, so Multimedia Tag Monitoring is necessary, wrapping the video within the Creative Tag for accurate measurement. However, in cases where the goal is to measure pure impressions to verify discrepancies, a 1x1 pixel (impression tracker) is sufficient. This tracker, known as "Unified Video Pixel" can be employed for such purposes.
Additionally, It's essential to use VPAID/OMID-compatible video inventory to enable IAS to measure viewability effectively. However, remember that inventory compatible with VPAID/OMID may limit the overall supply available to the campaign.
Trackers for Display:
| IAS Solution | Explanation | Measure Viewability | Measure Invisible URLs | Measure Impressions | Measure Brand Safety |
| Blocking Creative Tag | Display tags with blocking. Requires JS support | Yes | Yes | Yes | Yes |
|
Monitoring JS |
Display tags without blocking. Requires JS support | Yes | Yes | Yes | Yes |
|
Monitoring 1x1 pixel |
Display tags without blocking. | No | No | Yes | Yes |
Viewability measurements are possible with JavaScript tags only. However, some publishers or exchanges might not support this format. In such cases, viewability measurement by IAS wouldn't be possible. Nevertheless, 1x1 monitoring pixels can be utilized for display creatives. By using this type of tracker, IAS would be able to measure impressions to verify the total amount of served impressions.
IAS Articles:
User Guide - Tag Manager - a comprehensive guide on how to create different Tags using an IAS self-service account
Multimedia Tag - overview of Multimedia tag capabilities, it is creation and limitations.
IAS Tag Structure - overview of the different structures of IAS Tags.
Glossary:
| Term | Definition |
| Total Tracked Ads |
The number of ads IAS processed. |
| Eligible Ads For Viewability Measurement |
The number of all unblocked ads that are invalid traffic (IVT) free and served in a JavaScript environment where Viewability measurement is possible. |
| Measured Ads |
The total number of ads in the campaign with all detected invalid traffic removed, where IAS was able to collect viewability data. In some ad environments, technical limitations can prevent ads from being measured for viewability or audibility by IAS. |
| Measured Rate (out of Ads) |
The percentage of Measured Ads out of Eligible Ads for Viewability or Audibility Measurement. |
| Viewable Impressions | The number of unblocked viewable impressions in the campaign with all detected invalid traffic removed, where at least 50% of the ad was in view for 1 continuous second for display (2 continuous seconds for video). |
| Viewable Rate (out of measured ads) |
The percentage of Viewable Impressions (at least 1 pixel of the creative rendered on screen; 50% in view for 1 continuous second - display; 2 continuous seconds - video; a 30% or more rule applies to large creatives that are at least 242,500 pixels.) out of unblocked Measured Ads with all detected invalid traffic removed. |
|
Eligible Ads for Invalid Traffic Detection |
Excludes all ads where signals to make an IVT determination are missing. Note: This metric has been updated to no longer include test impressions, which was previously reported as GIVT and represents a trace amount of overall GIVT impressions. Test impressions will still be included in our calculation for Total Tracked Ads. |
| Eligible Rate For Invalid Traffic Detection |
The percentage of Eligible Ads for Invalid Traffic Detection, out of all ads IAS processed (Total Tracked Ads). |
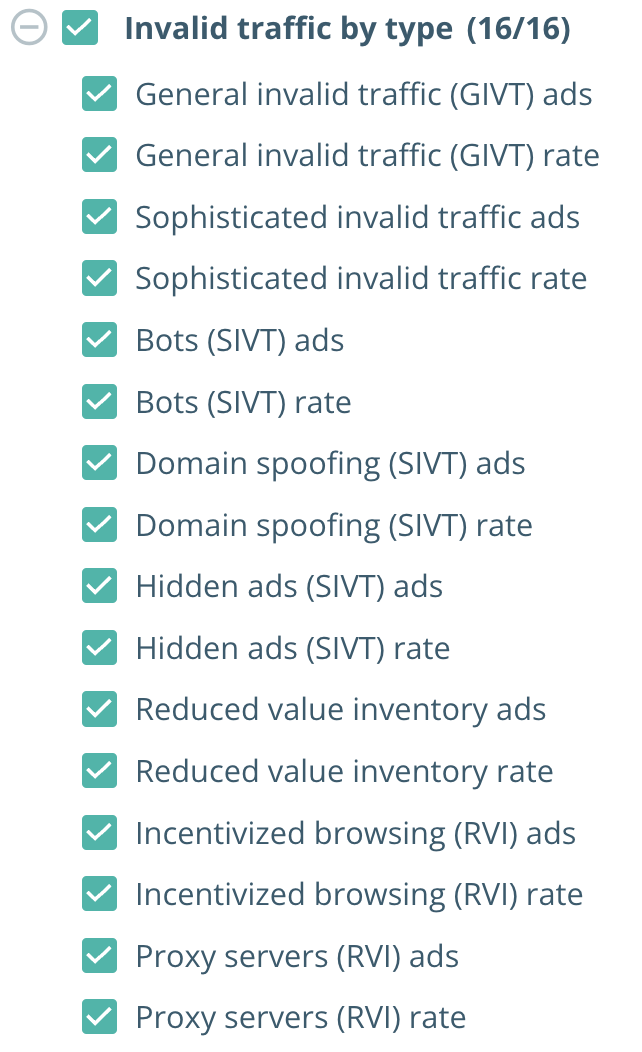
| General Invalid Traffic (GIVT) Ads |
Traffic that failed to meet ad quality criteria filtered through and caught by known IP and bot lists (ex: Google web crawlers). |
| General Invalid Traffic (GIVT) Rate |
The percentage of ads that IAS detected as GIVT, out of all ads processed by IAS. Traffic that failed to meet ad quality criteria filtered through and caught by known IP and bot lists (ex: google web crawlers). |
| Sophisticated Invalid Traffic (SIVT) Ads |
Traffic that failed to meet proprietary and sophisticated invalid traffic detection criteria. Examples of failed traffic can include: hijacked devices, ad tags, or creative; adware; malware; and misappropriated content. |
| Sophisticated Invalid Traffic Rate |
Percentage of traffic that failed to meet proprietary and sophisticated invalid traffic detection criteria out of Total Tracked Ads. |
| Bots (SIVT) Ads |
The number of ads that IAS detected as bots. A malicious software application that runs automated tasks over the internet, usually to make a profit by falsely mimicking real human activity. |
| Bots (SIVT) Rate |
The percentage of ads that IAS detected as bots, out of all ads processed by IAS. A malicious software application that runs automated tasks over the internet, usually to make a profit by falsely mimicking real human activity. |
| Domain Spoofing (SIVT) Ads |
Ads that are low quality inventory disguised as high-quality legitimate-sites, or send incorrect referrer information to hide their identity. |
| Domain Spoofing (SIVT) Rate |
The percentage of ads that are low quality inventory disguised as high-quality legitimate-sites or send incorrect referrer information to hide their identity, out of all ads processed by IAS. |
| Hidden Ads (SIVT) |
The number of ads that IAS detected as Hidden Ads (SIVT). Ads that have no chance of ever being seen by humans. Types of hidden ads include: pixel stuffing, ad stacking, ads clipped by iframes, zero opacity ads, off-page ads, ad truncation, and hidden ads embedded in ads. |
| Hidden Ads (SIVT) Rate |
The percentage of ads that IAS detected as Hidden Ads (SIVT), out of all ads processed by IAS. Ads that have no chance of ever being seen by humans. Types of hidden ads include: pixel stuffing, ad stacking, ads clipped by iframes, zero opacity ads, off-page ads, ad truncation, and hidden ads embedded in ads. |
| Reduced Value Inventory (RVI) Ads |
Traffic which IAS flagged as being generated in a way counter to the advertiser’s interests. Possible examples include the use of incentivized browsing and "proxy servers". |
| Reduced Value Inventory Rate | The percentage of Reduced Value Inventory (RVI) Ads, out of all ads processed by IAS. |
| Incentivized Browsing (RVI) Ads |
The act of interacting with ads for payment or benefits, usually not by an advertiser-targeted audience |
| Incentivized Browsing (RVI) Rate |
The percentage of ads that IAS detected as Incentivized Browsing (RVI), out of all ads processed by IAS. The act of generating traffic and/or engaging with ads on ad-supported sites by human users, in exchange for payment of some other, typically financial, benefit. |
| Proxy Server (RVI) Ads |
The number of ads that IAS detected as Proxy Servers (RVI). A computer network service that uses indirect network connections to sometimes enable bots to hide their true identity and location. |
|
Proxy Server (RVI) Rate |
The percentage of ads that IAS detected as Proxy Servers (RVI), out of all ads processed by IAS. A computer network service that uses indirect network connections to sometimes enable bots to hide their true identity and location. |
| Total Eligible Ads For Brand Safety |
The number of ads IAS processed across all publishers that have opted into brand safety measurement. This metric includes all detected invalid traffic (General Invalid Traffic and Sophisticated Invalid Traffic). |
| Passed Ads |
The number of ads that IAS passed for invalid traffic, brand safety, custom keywords, custom URL, geo, invisible URL, or target language. |
| Pass Rate |
The percentage of ads that IAS passed for invalid traffic, brand safety, custom keywords, custom URL, geo, invisible URL, or target language, out of all ads IAS processed. |
| Failed Ads |
The number of failed ads for invalid traffic, brand safety, custom keywords, custom URL, geo, invisible URL, target language, or your Brand suitability profile. These ads may or may not be blocked. |
| Fail Rate |
The percentage of ads that IAS failed for invalid traffic, brand safety, custom keywords, custom URL, geo, invisible URL or target language, out of all ads IAS processed. These ads may or may not be blocked. |
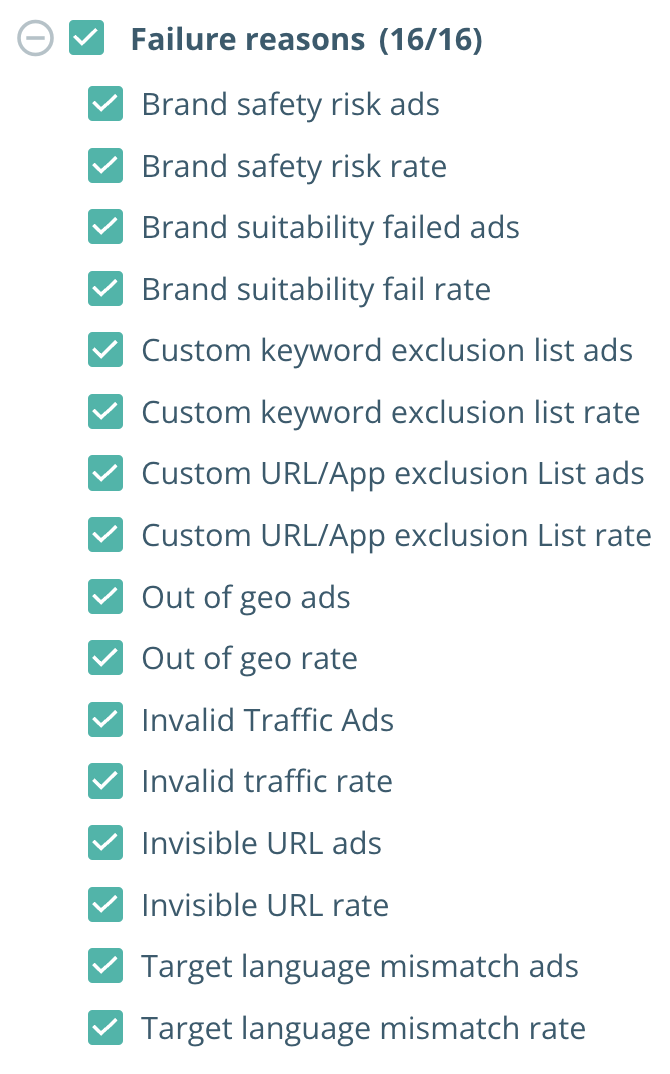
| Brand Safety Risk Ads |
The number of ads that didn't meet your brand safety threshold. |
| Brand Safety Risk % |
The percentage of ads that didn't meet your brand safety thresholds, out of Total Eligible Ads for Brand Safety. |
| Brand Suitability Failed Ads |
Ads marked as failed for your Brand suitability profile. |
| Brand Suitability Fail % |
Ads marked as failed for your Brand suitability profile, out of Total Eligible Ads for Brand Safety. |
| Custom URL/App Exclusion List Ads |
The number of ads marked as failed for custom URL/App Exclusion List. |
|
Custom URL/App Exclusion List Rate |
The percentage of eligible ads marked as failed for your custom URL lists, out of Total Eligible Ads for Brand Safety. |
| Out of Geo Ads |
The number of ads marked as failed for being served outside of the target geo . |
|
Out of Geo Rate |
The percentage of ads marked as failed for being served outside of the target geo, out of Total Eligible Ads for Brand Safety. |
| Invalid Traffic Ads |
The number of ads that IAS detected as invalid traffic. |
|
Invalid Traffic Rate |
The percentage of ads that IAS detected as invalid traffic, out of all ads IAS processed. |
| Invisible URL Ads |
The number of ads marked as failed because IAS did not detect the top level page where the ad was served. |
| Invisible URL % |
The percentage of ads marked as failed because the top level URL was undetectable, out of Total Eligible Ads for Brand Safety. |
| Target Language Mismatch Ads |
The number of ads marked as failed for language-targeting. |
|
Target Language Mismatch % |
The percentage of ads marked as failed for language targeting, out of Total Eligible Ads for Brand Safety. |
A whole Glossary with updated info is available in the IAS HelpCenter - check here for more info
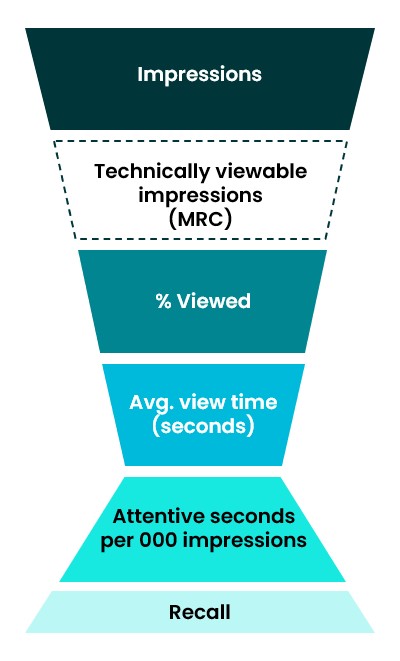
The Attention Funnel Explained
The top of the funnel checks if an ad appeared on the screen, even if only a small part of it was visible for a brief moment. Viewability standards determine if an ad meets the minimum requirements to be considered viewable, but these standards can be arbitrary and may not reflect actual viewing. Attention measures if people actively look at the ad.
-
Impressions - count of impressions detected by Lumen tag in the campaign.
-
Measured Impressions - count of impressions with successful attention prediction based on the Lumen model.
-
Viewable Impressions - count of impressions where 50% of the ads' pixels were on screen for at least 1" (display) or 2" (video).
Eyes-on dwell time measures how long people spend looking at an ad, even if it's not all at once. For example, if you watch the first and last two seconds of an ad, that counts as four seconds of attention. Attention data is averaged across all viewers and ads, providing an overall measure of how likely ads are to be viewed and how long they are looked at. Lumen combines the average likelihood of viewing with the average dwell time to calculate "attentive seconds per thousand impressions," which helps compare attention across different ad formats and platforms.
-
Total View Time (seconds or hours) - the total duration that Lumen models predict the ad impressions will have been viewed for. "Viewing" here involves eye gaze on the ad. This metric records the total amount of visual attention the ads received.
-
Total Viewable Time (seconds or hours) - the sum of the duration when viewable impressions had 50% of the ad's pixels on the screen (i.e. impressions not reaching 'Viewable' criteria are treated as 0). Viewable duration is capped at 180 seconds for each impression.
-
Average View Time - the average amount of time an ad was viewed per measured impression.
Avg. View Time = (Total View Time / Viewed Impressions) -
View Rate (% Viewed)
% Viewed = (Viewed Impressions / Measured Impressions) -
Measured Rate (% Measured)
% Measured = (Measured Impressions / Impressions) -
Average Viewable Time (seconds) - the average amount of time an ad was viewable per impression.
Avg. Viewable Time (Seconds) = (Total Viewable Time (Seconds) / Viewable Impressions) -
% Viewable
% Viewable = (Viewable Impressions / Impressions) -
Attention Per 1000 Impressions (APM) - the aggregate amount of ‘eyes on’ visual attention received per 1000 impressions.
APM (Attention Per 1000 Impressions) = (% Viewed * Avg. View Time) * 1000
Or
APM (Attention Per 1000 Impressions) = (Total View Time / Measured Impressions) * 1000 -
Cost Per 1000 Seconds (aCPM)
aCPM = Total Cost / Total View Time (Seconds) * 1000
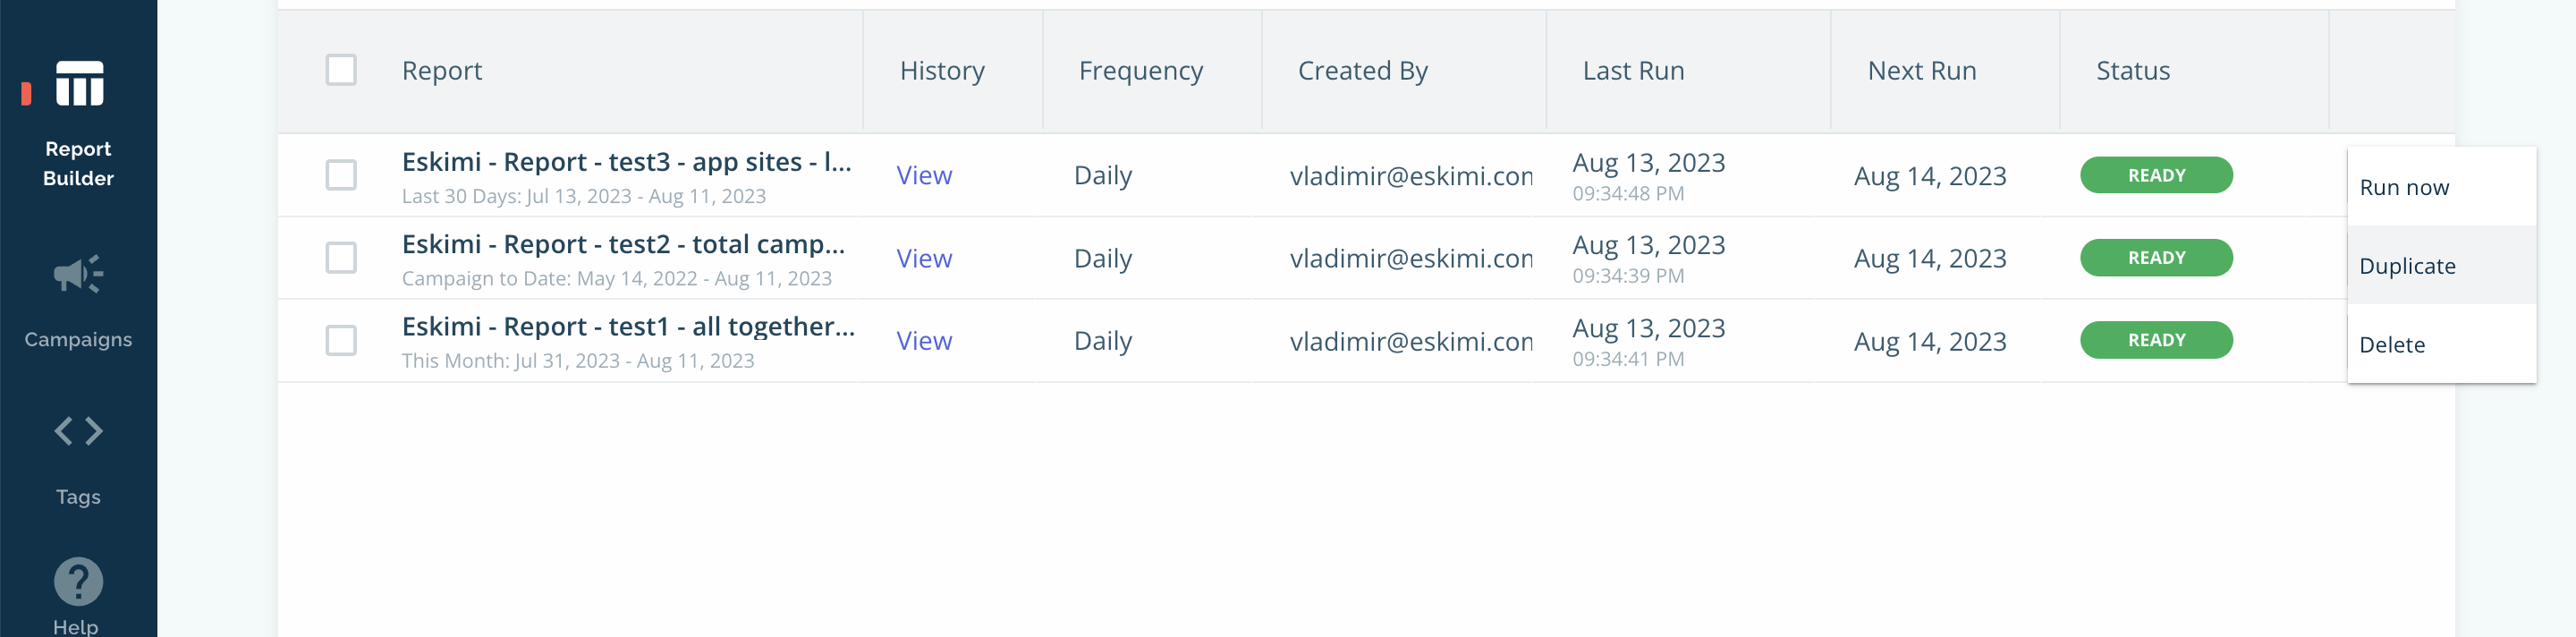
IAS: Report Builder - Agency account
Introduction
In this article it is described regarding auto-report set up from IAS (Integral Ad Sience) vereficator. Both reports are needed in case to be able to proceed with needed optimisation of campaign. Which is crucial for reaching good campaign KPIs and troubleshoot on data descripency that usually appears due to different methodology of measurement between DSP and 3rd party verification.
Total report per campaign - this report is needed for the evaluation of campaign performance, and troubleshoot discrepancy of measured stats. Report should include campaign or/and placement as main segment split. It also should include all important KPIs and be established for period from the start till the end day of campaign.
Report per domains/apps - this report is needed for KPIs evaluation across different sites/apps and helps to optimise campaign for reaching better KPIs by excluding site and apps with lower performance. This report should include dates, campaigns and show last 30 days stats.
Keep in mind that it is possible to prepare auto-report only when campaigns measured some ads. Otherwise, you will not able to select needed campaigns for your report. Therefore, Plan to prepare auto-report on the 3rd day after campaigns started, as it takes up to 48h for IAS to collect data on their side.
Total campaign report step-by-step set up guide
1. First of all open your IAS account and go to "Build New Report" menu
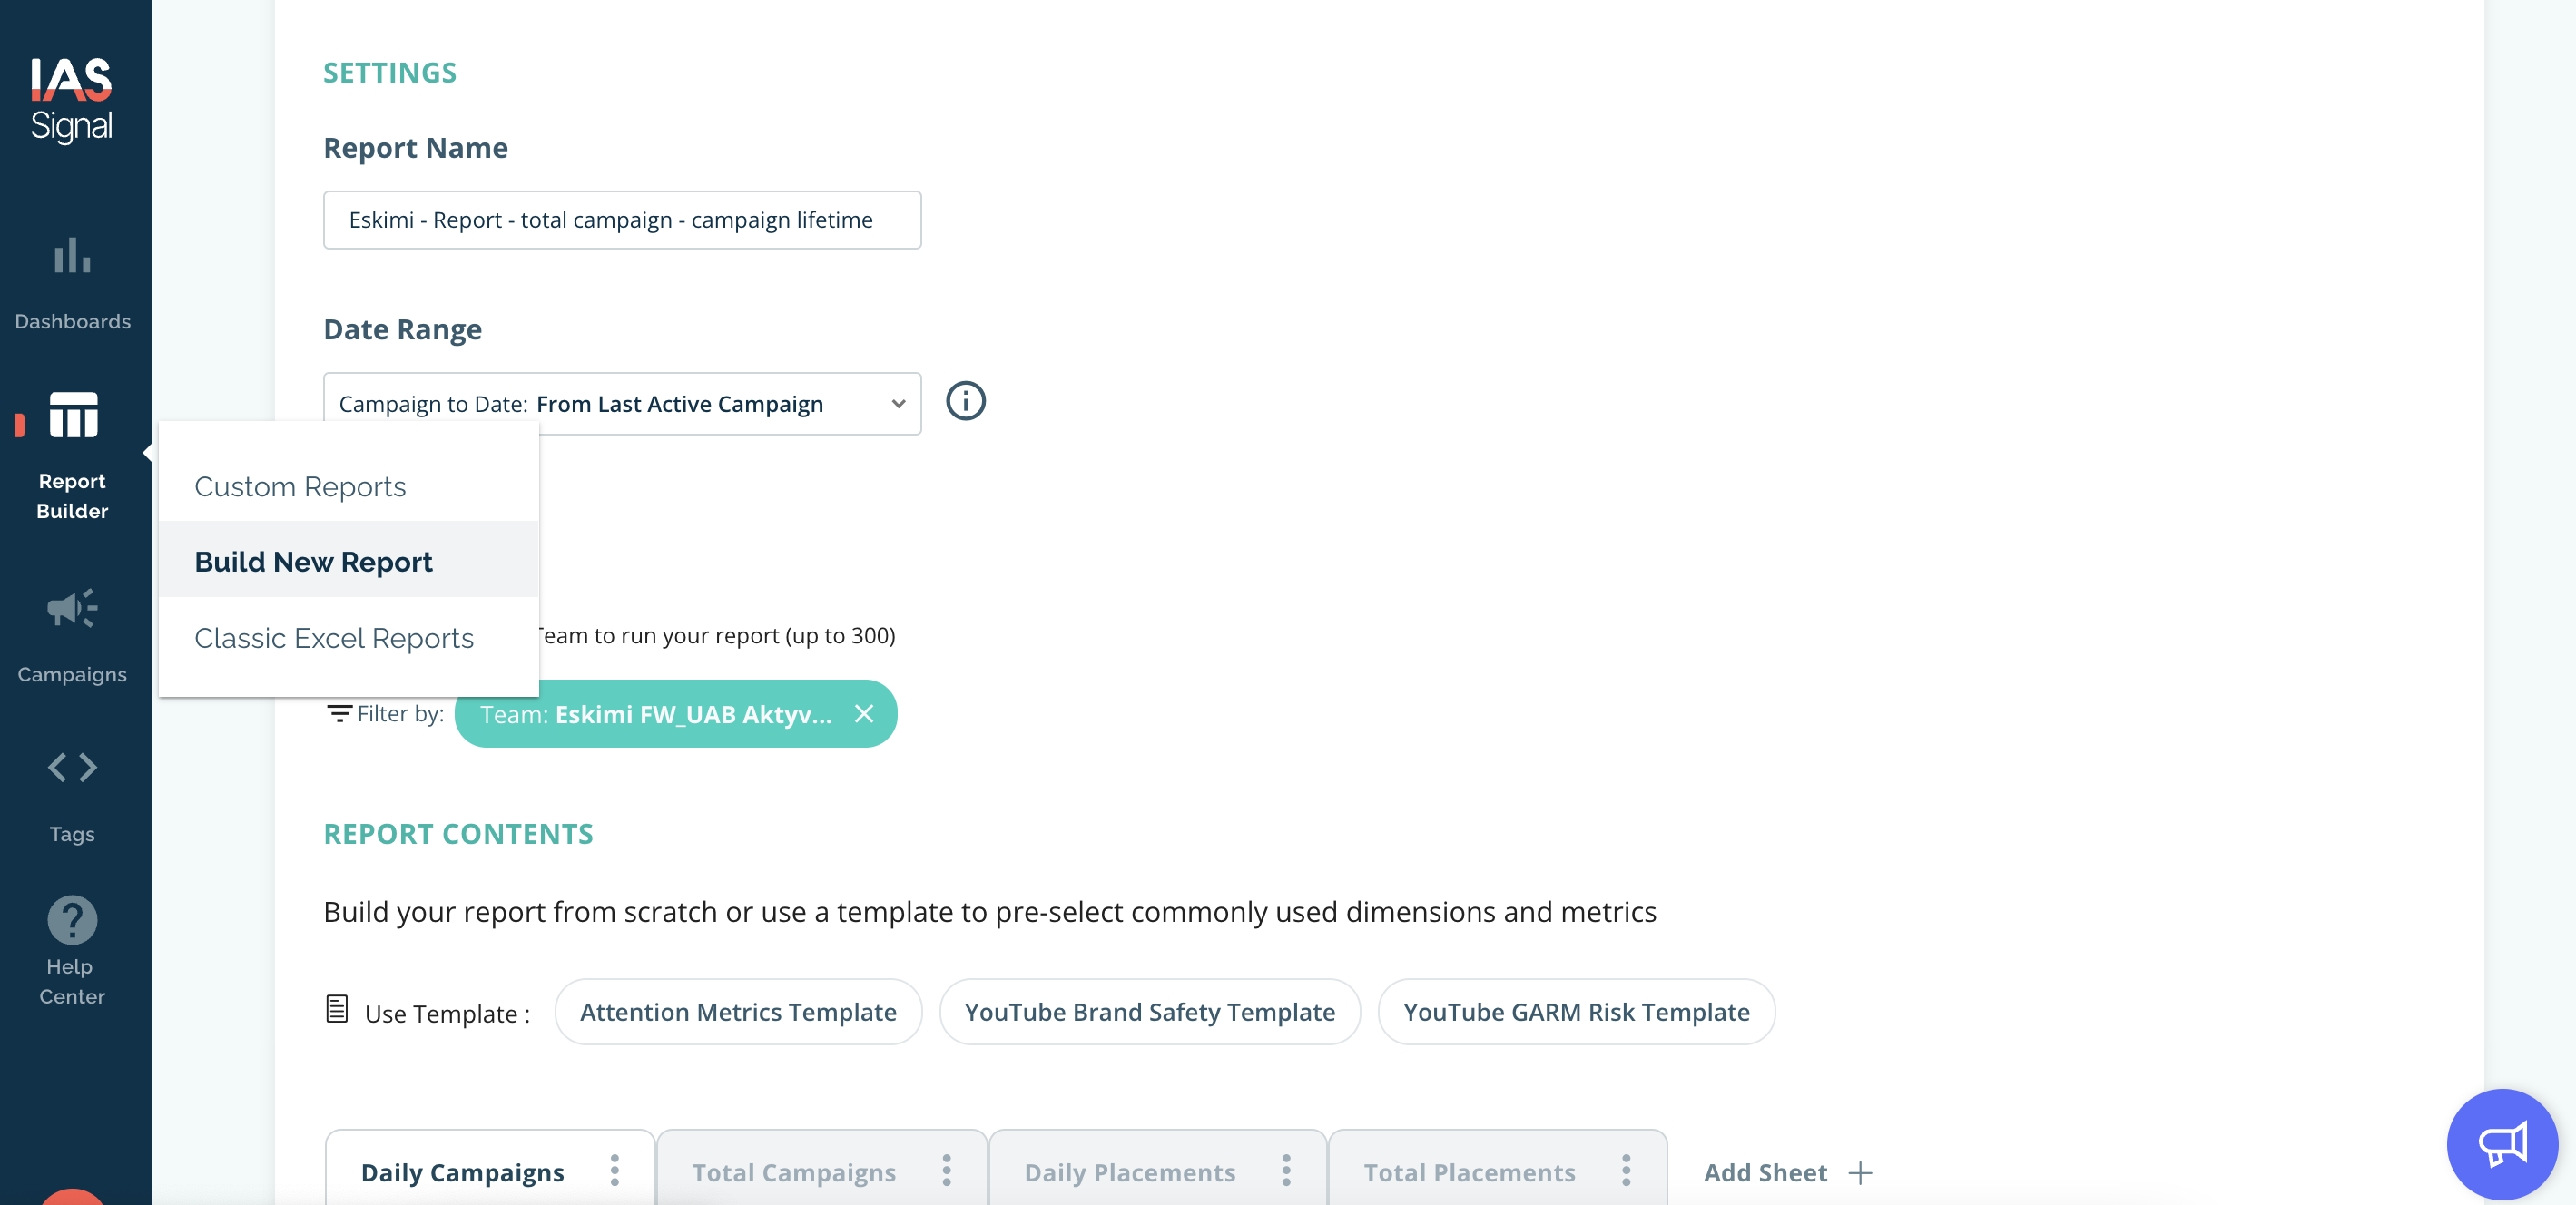
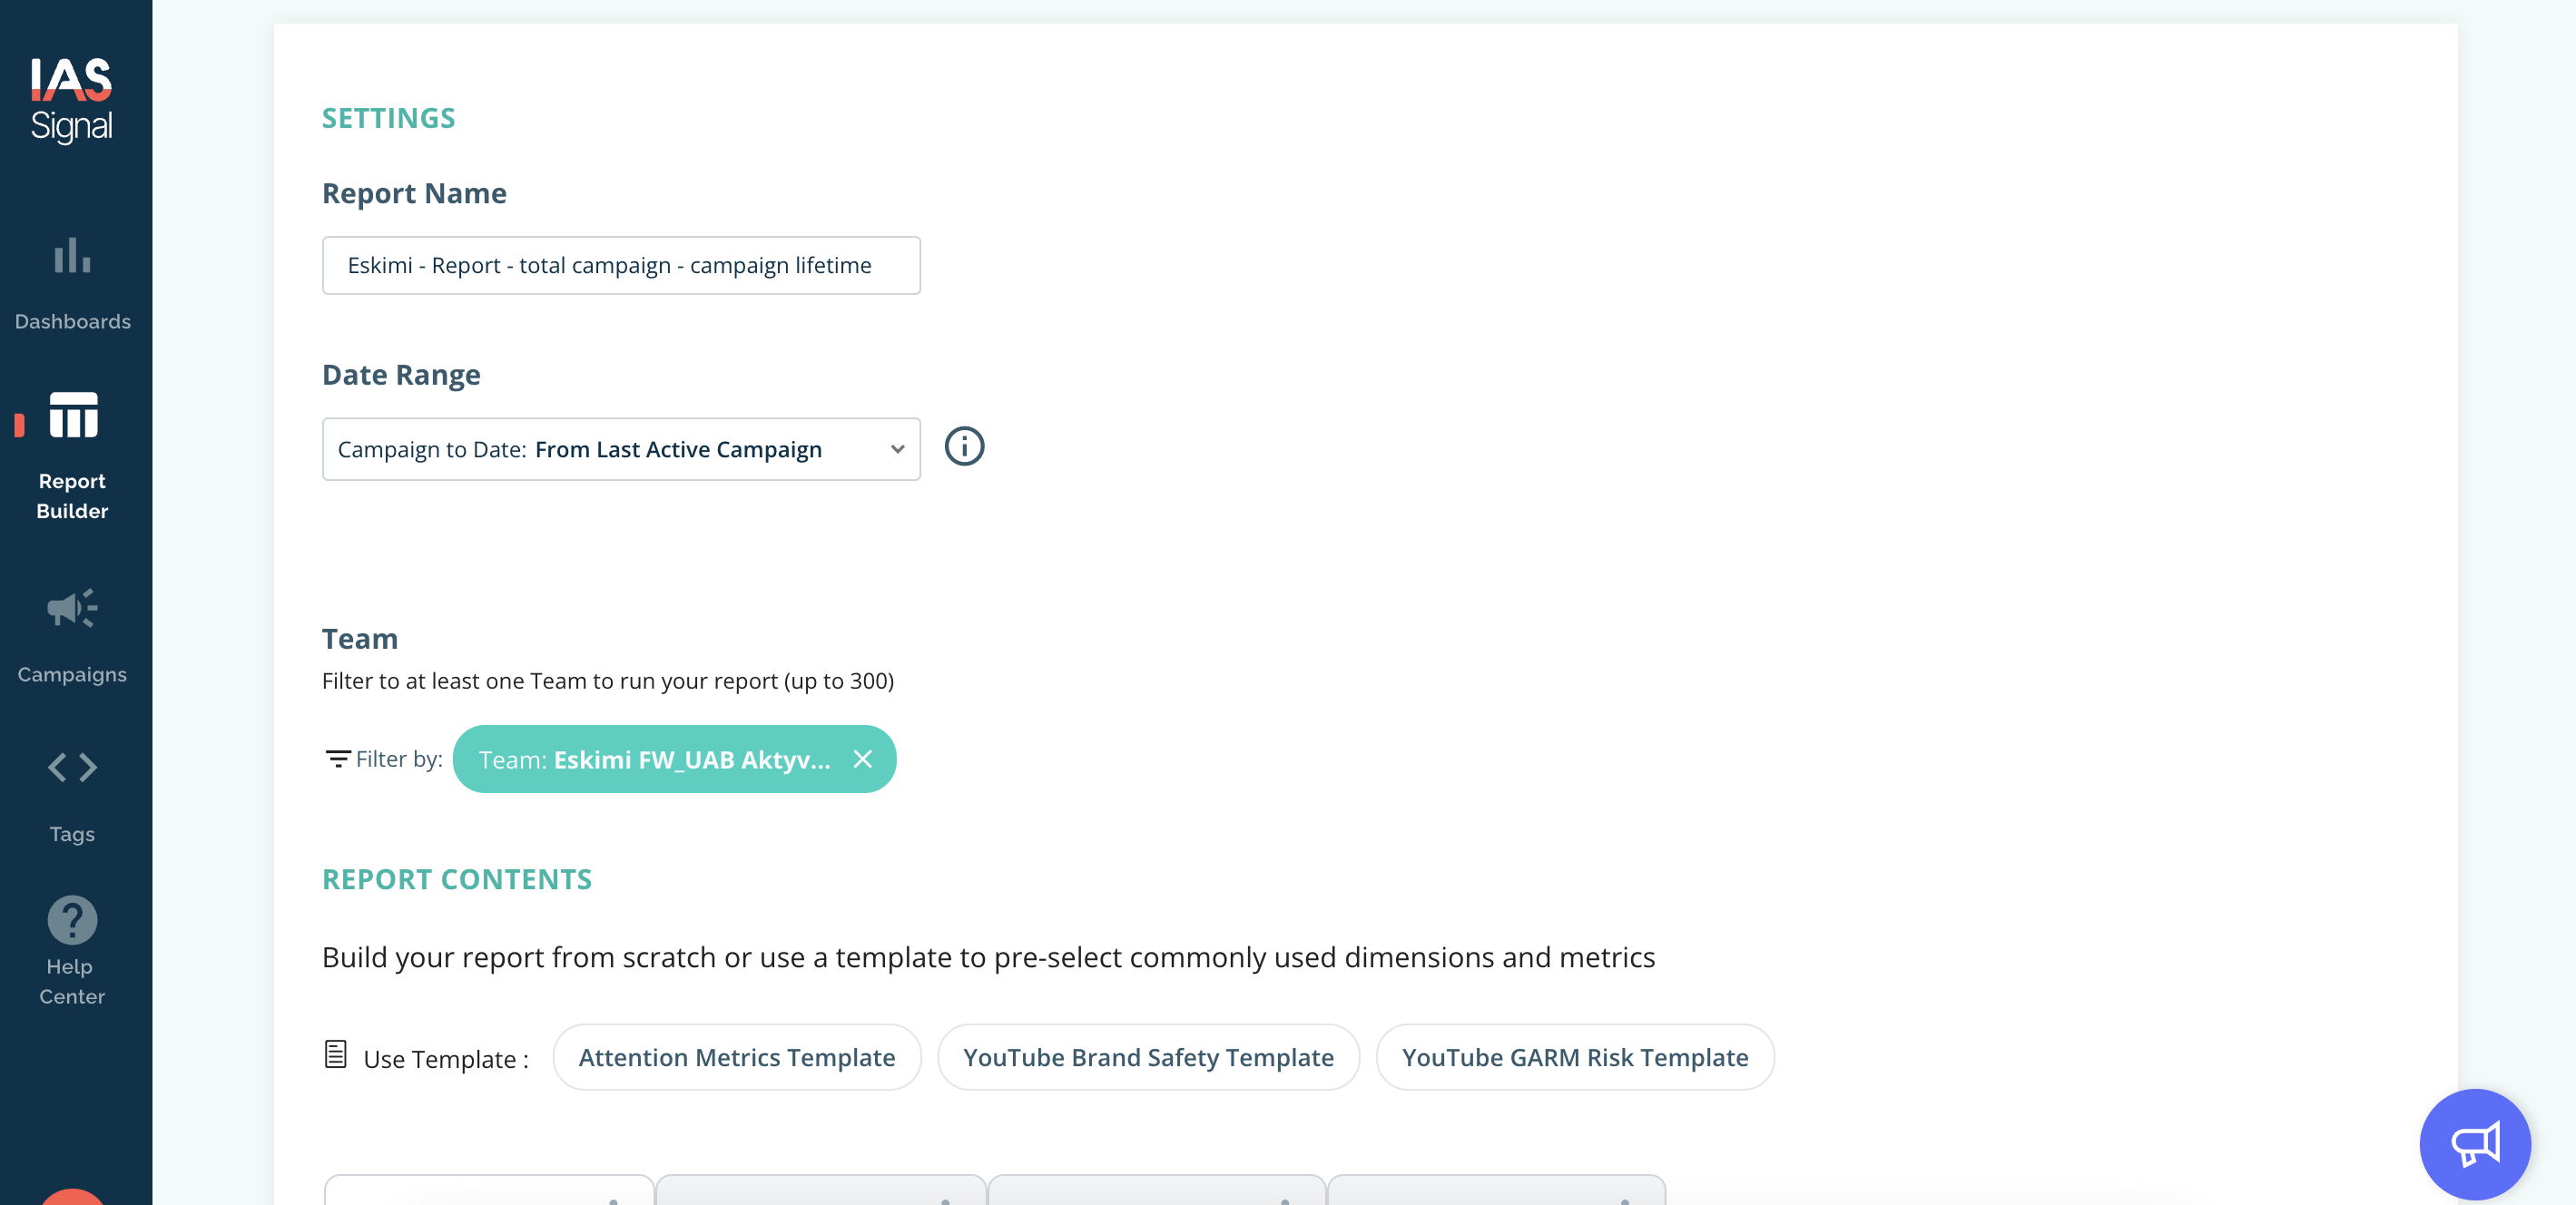
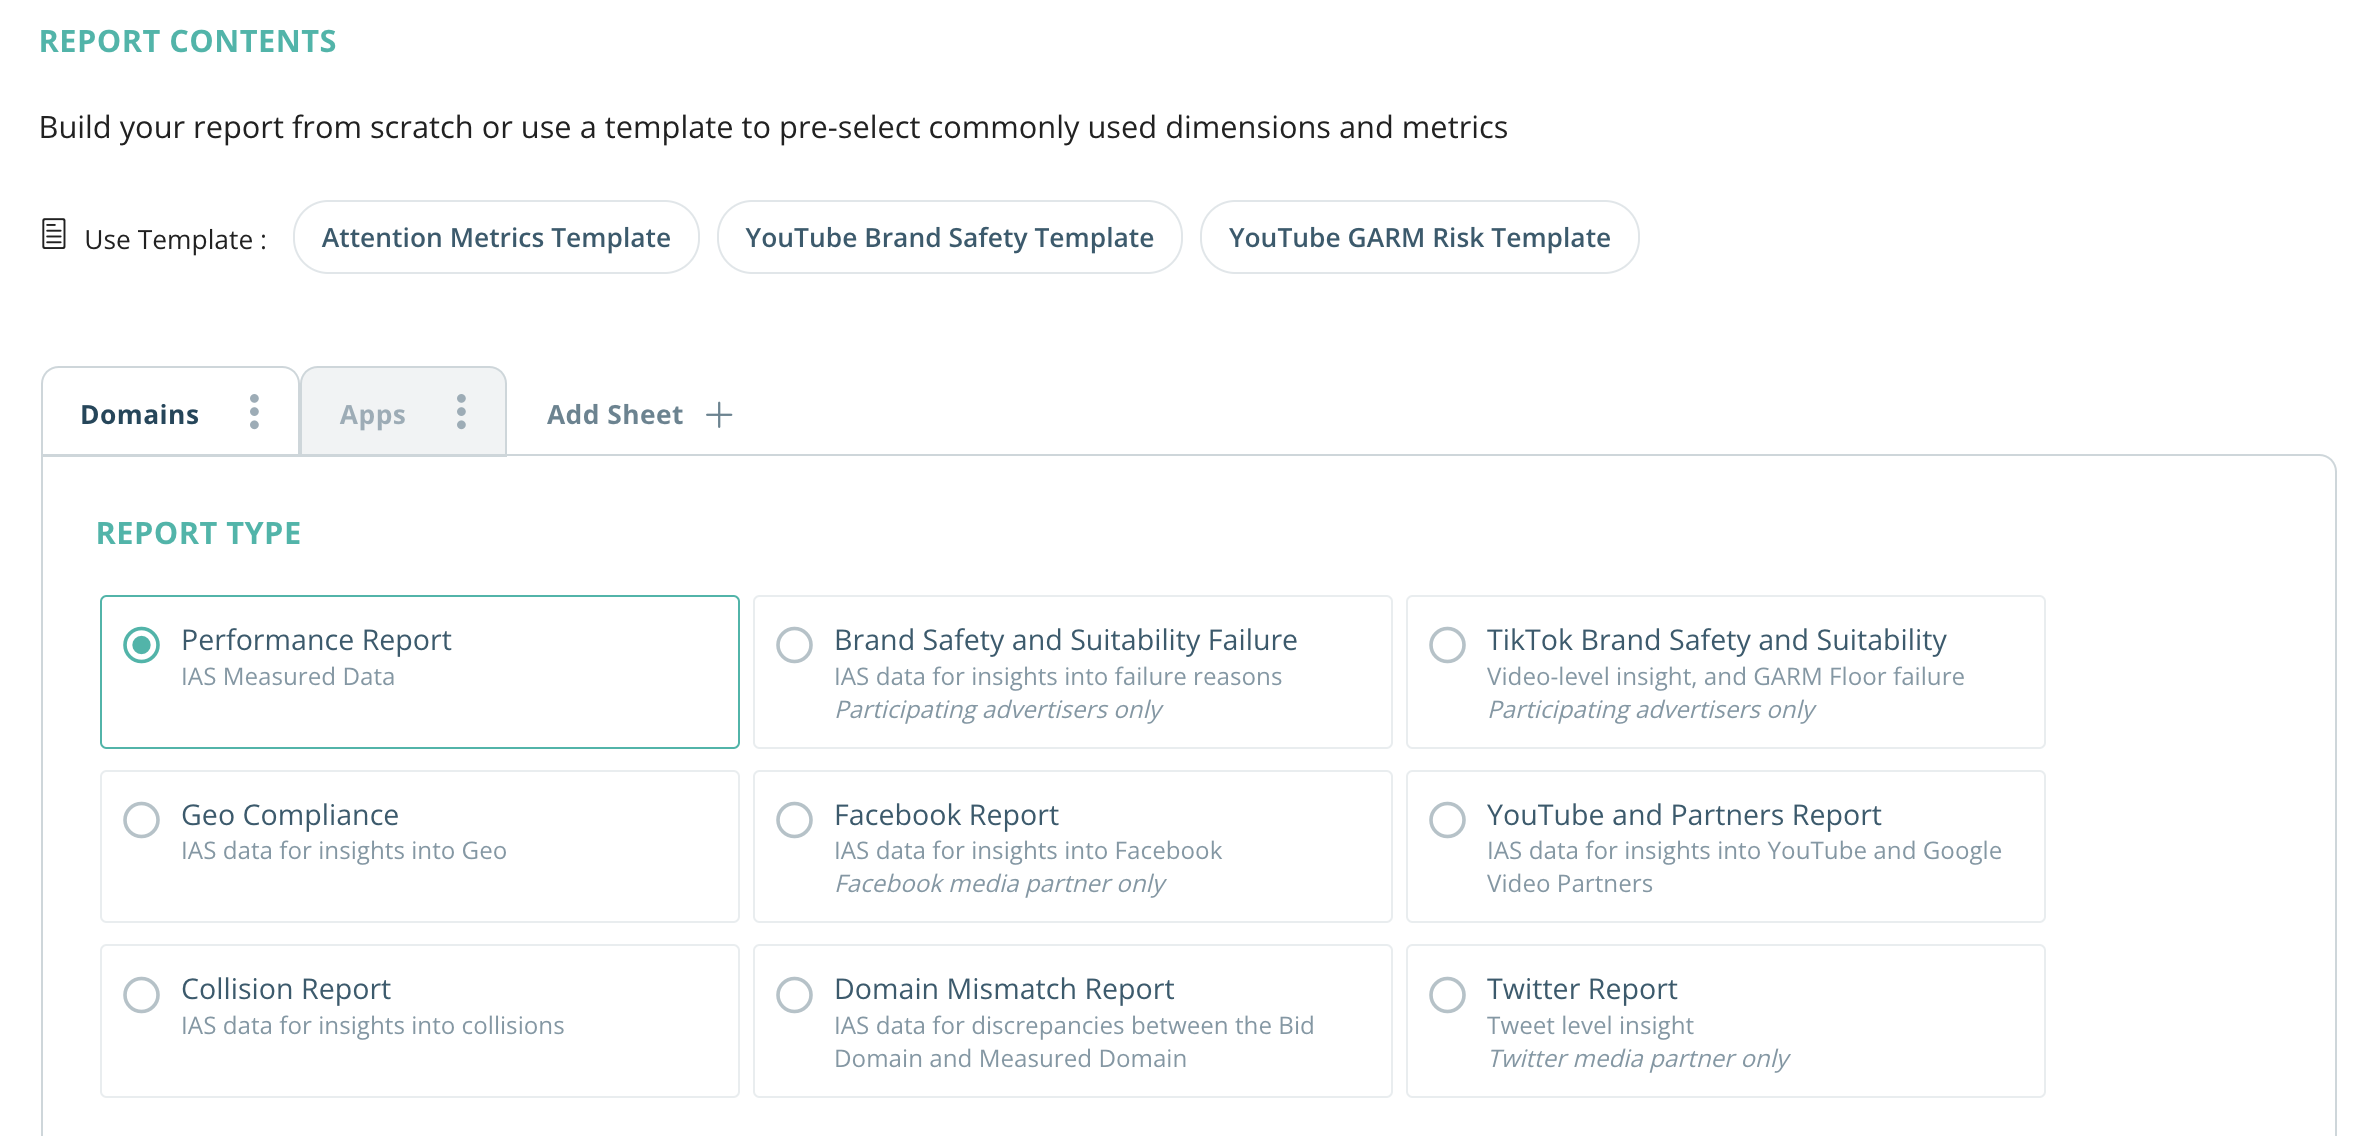
3. In Report Type section you will need to create 4 different sheets as it is shown on the screen below. You can name sheets accordingly "Daily Campaigns", "Total Campaigns", "Daily Placements", "Total Placements". Each sheet will be presented in same xls file which will be generated automatically. Start with one sheet creation, select "Performance Report" and scroll down till "Dimensions" section.
Tip 1: Create 1 sheet at first, for example "Daily Campaigns". And move to next steps. Later on the sheet might be copied so it will simplify process of creation as you will not need go from the scratch on all next steps for each separate sheet.
Tip 2: If you are using separate tracker per each placement, then create reports per placements as well, so it will be 4 sheets in total. However if you are measuring performance per campaign level, it would be enough to create only 2 sheets which is "Daily campaigns" and "Total campaigns"

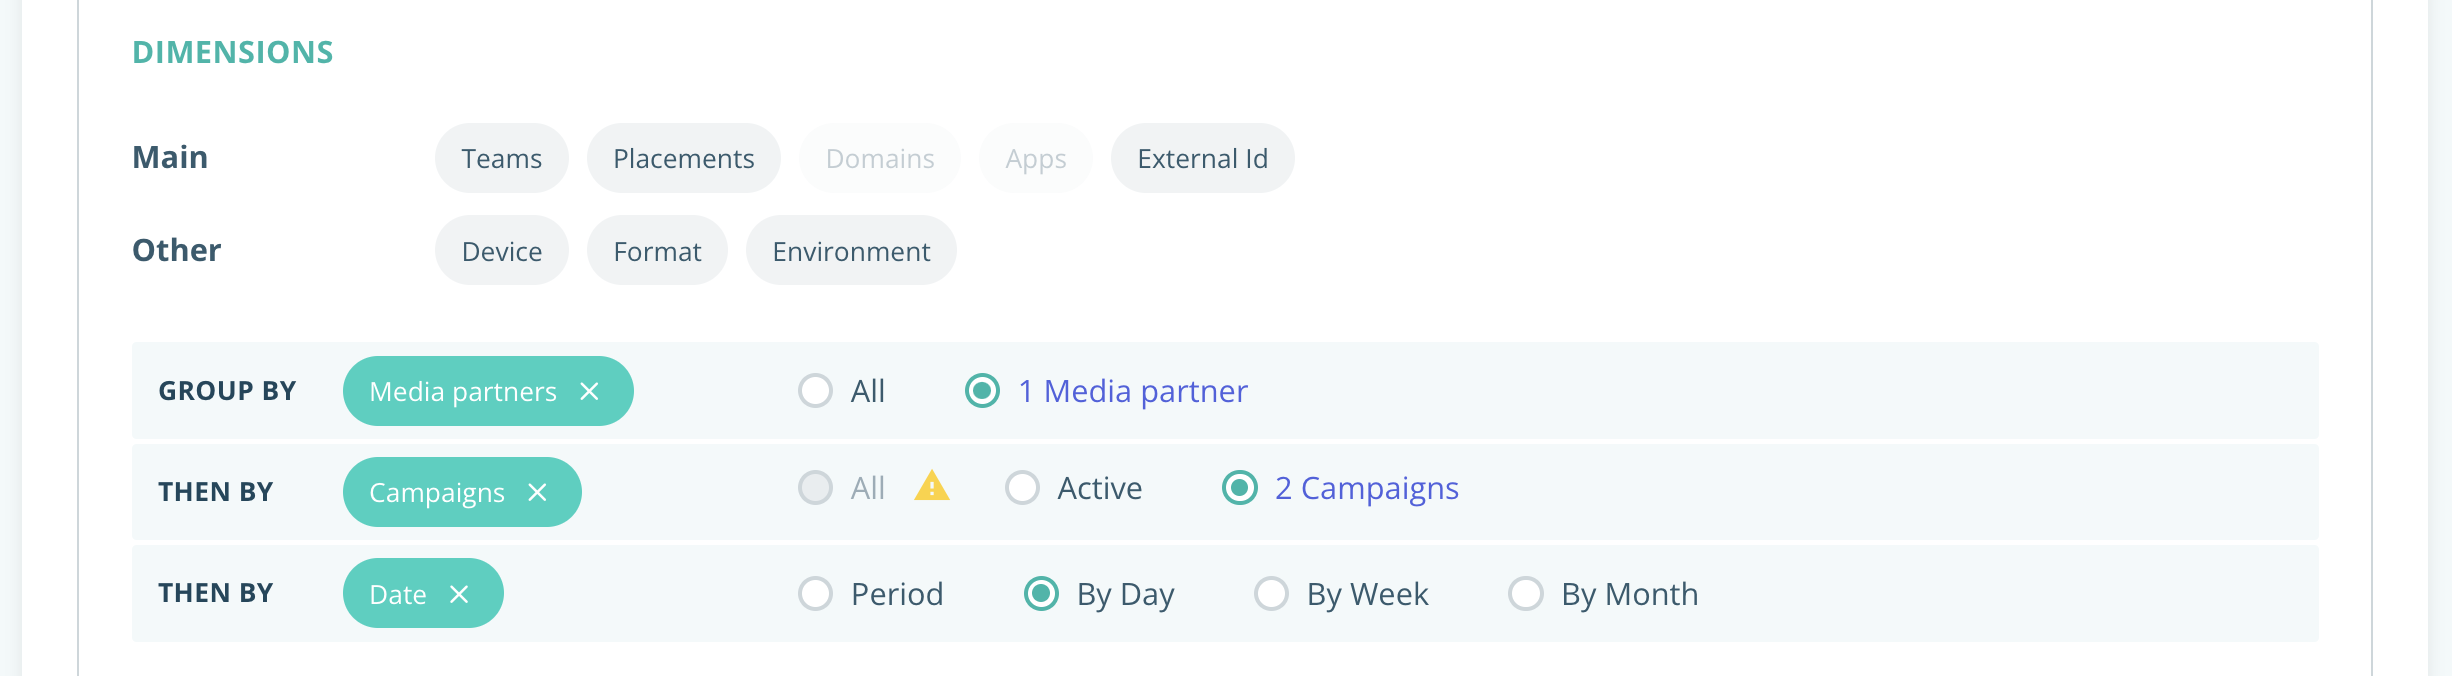
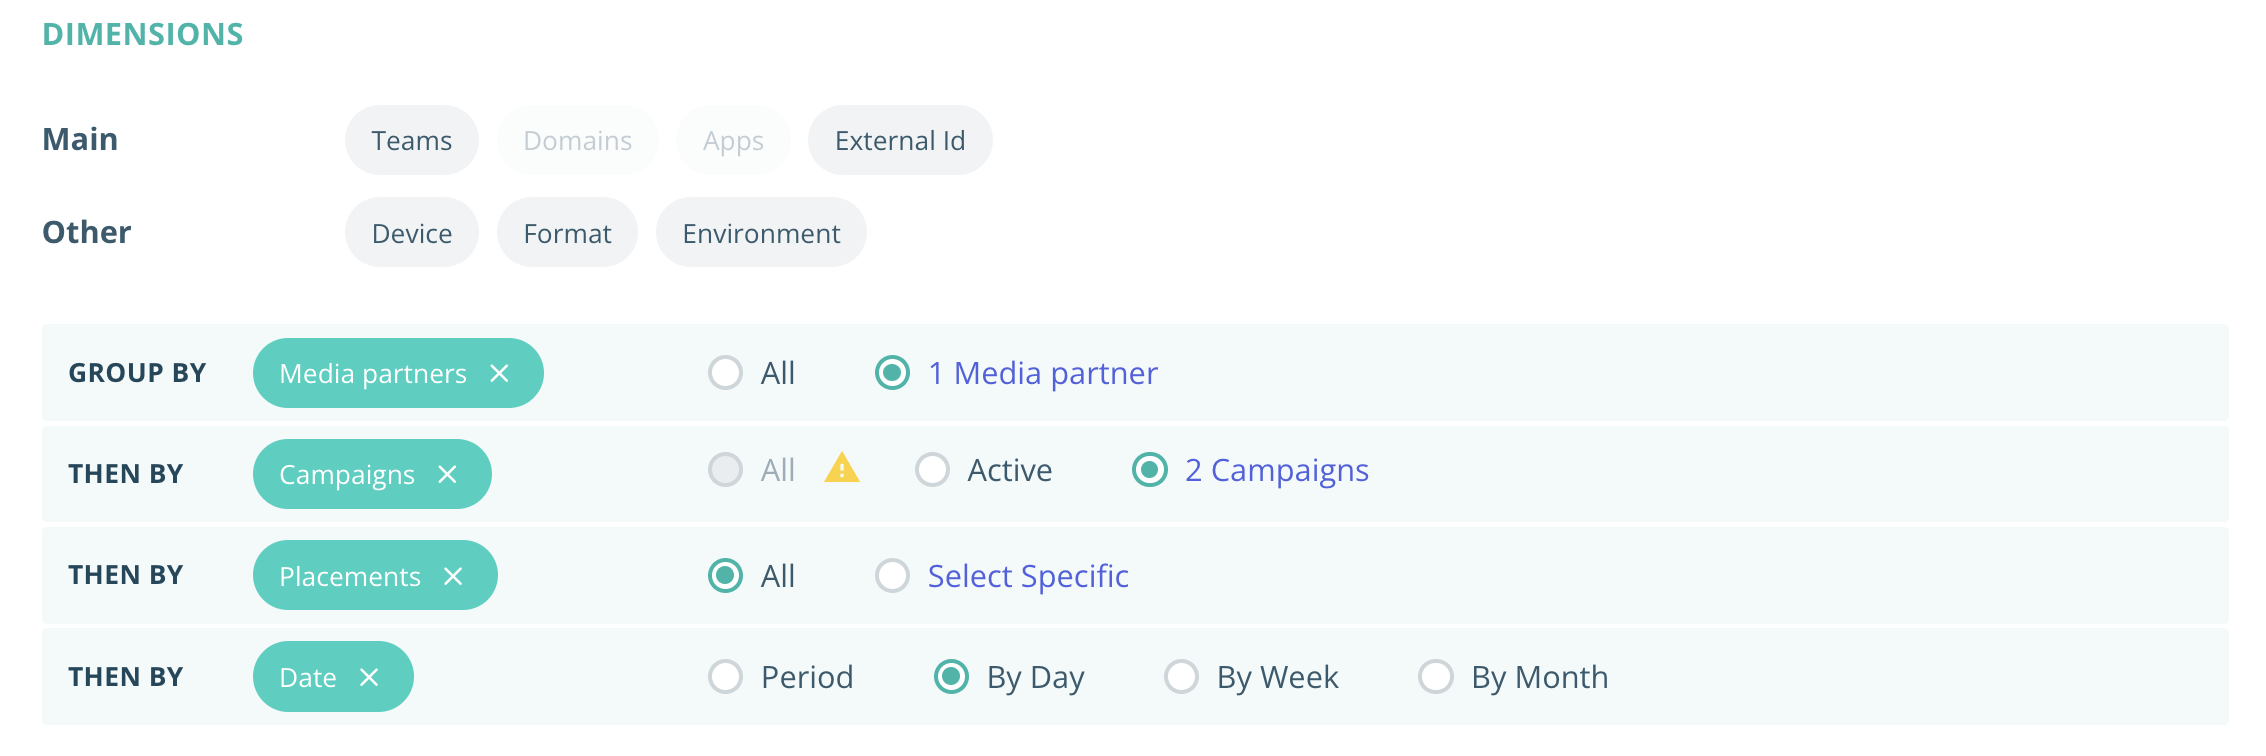
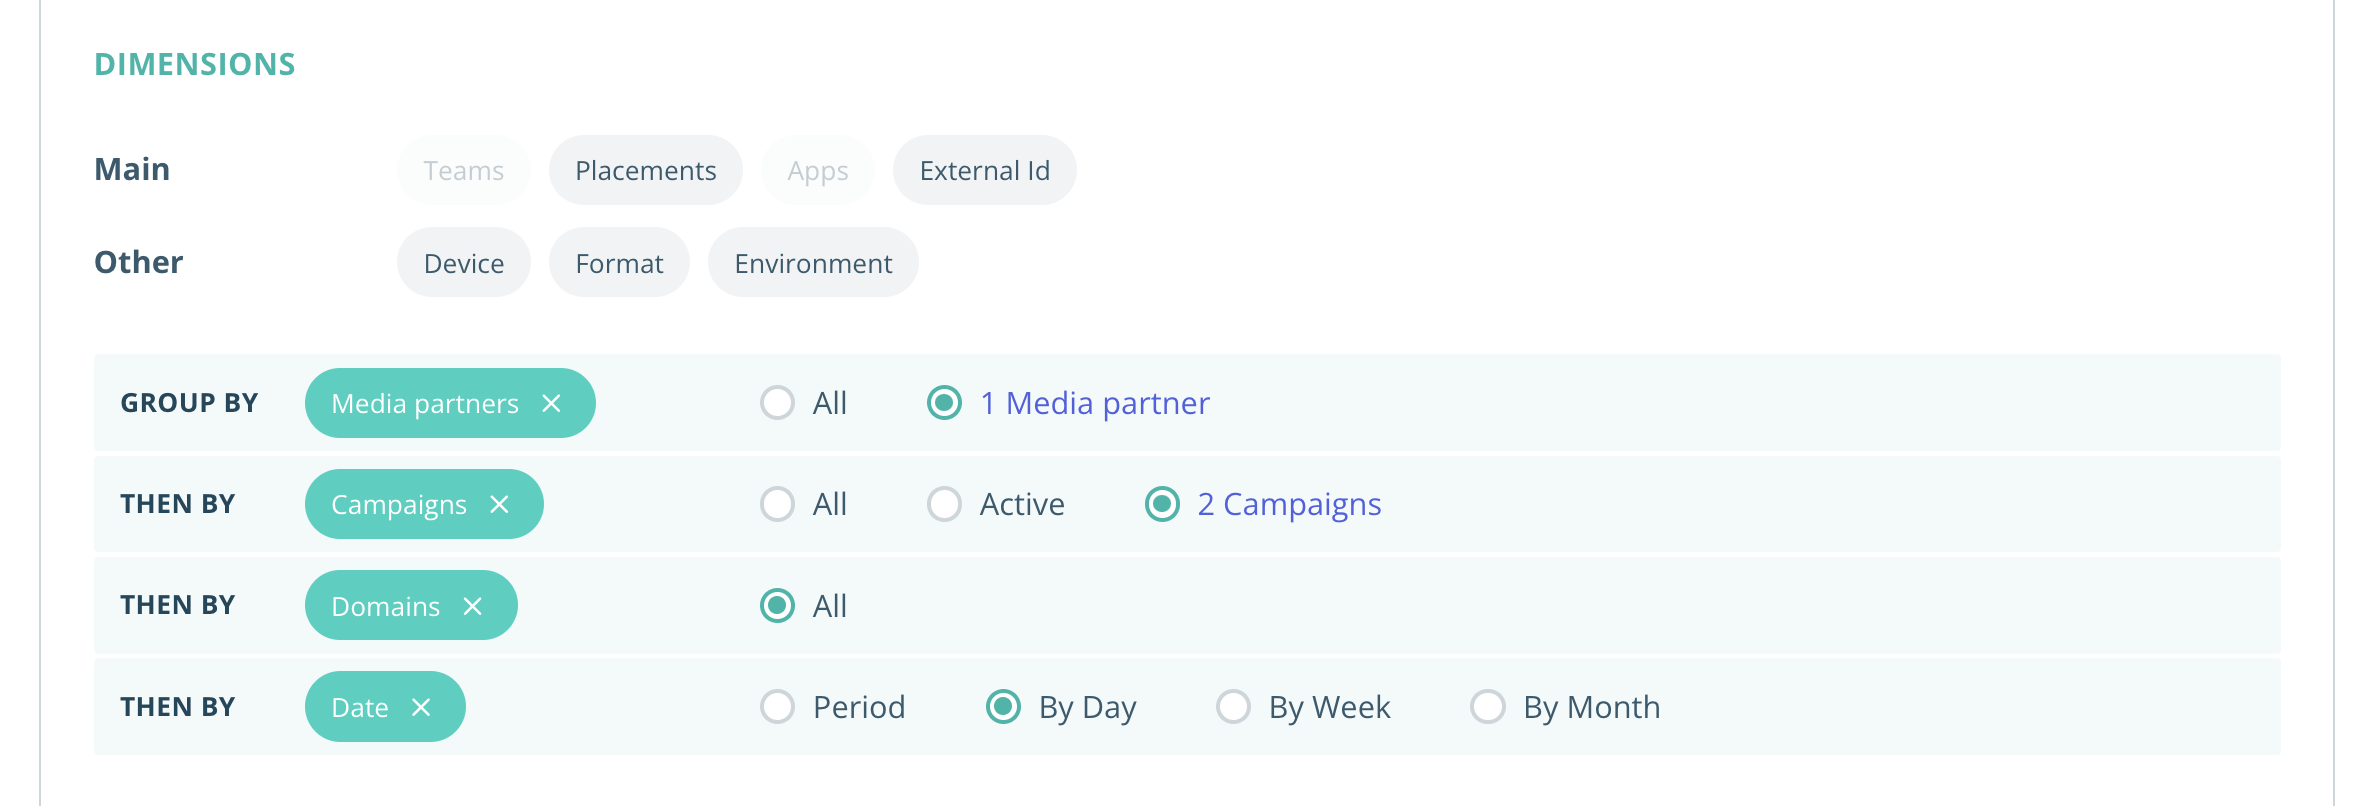
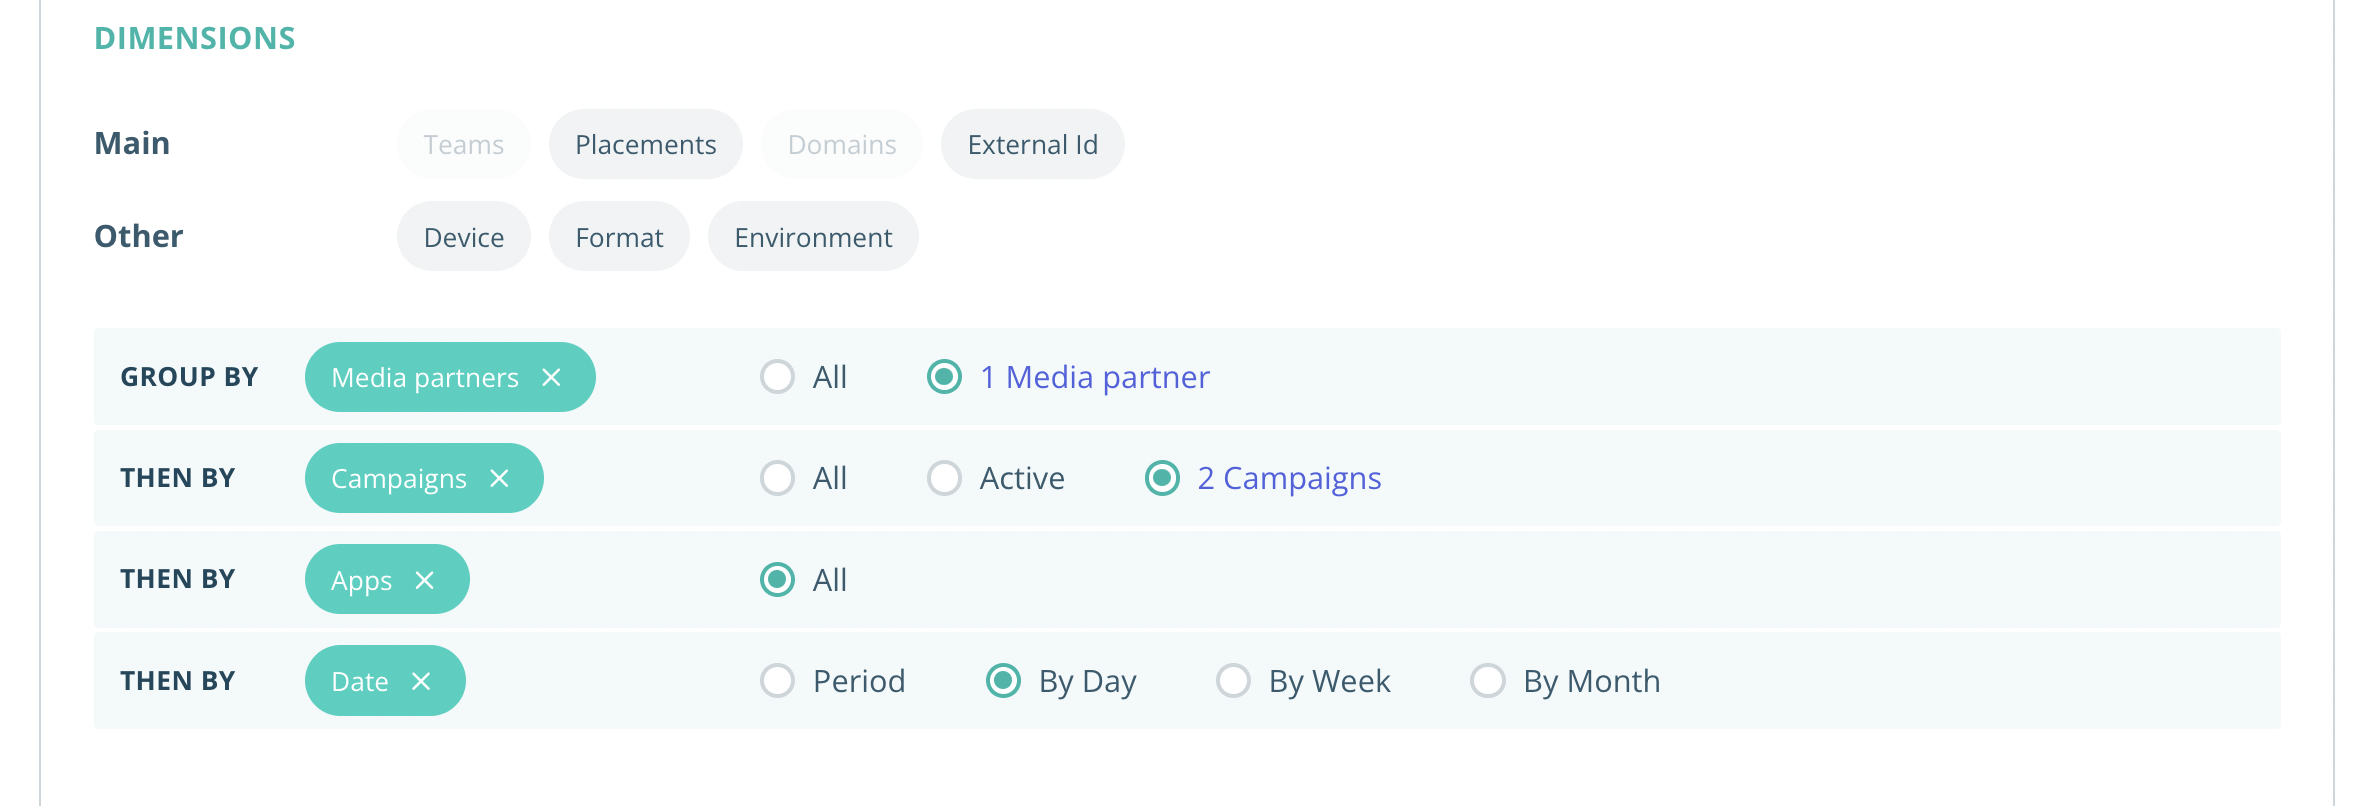
4. For the sheet "Daily Campaigns" for Dimensions section you need to select "Media Partners", "Campaigns", "Dates". Select dimensions in same order.
Also once dimensions are selected specify media partners (it should be Eskimi), also specify campaigns (you need to select campaigns that you want to include for reporting", and as last step select "by day" for Date dimension.
In this case IAS will generate report per selected campaign with daily split. Once this done scroll down till the section "Minimum Total Tracked Ads Filter".
5. In the "minimum total tracked ads filter" section you need to select "all tracked ads". In this case all measured impressions for dimensions you selected above will be presented in the report. Once selected you need scroll down till "Metric" section

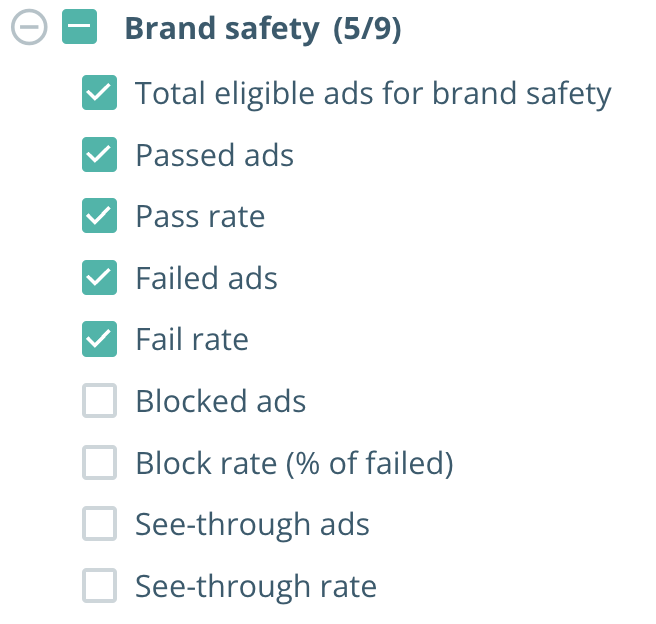
6. In "Metrics" section you need to enable metrics which are important to for campaign analysis. Below you can see our suggestions regarding metrics that should be selected. Please include them to any report you are creating for Eskimi team.
In case you would like to know definition of the metrics, please refer to article prepared by IAS: "Advertise Metrics Clossary"
 |
 |
 |
 |
 |
|
 |
7. At this step you can move back to the 3rd point and duplicate the sheet, in this case all settings will be already preselected and will not require additional selection from scratch. Once new sheets are duplicated, you need to rename them accordingly.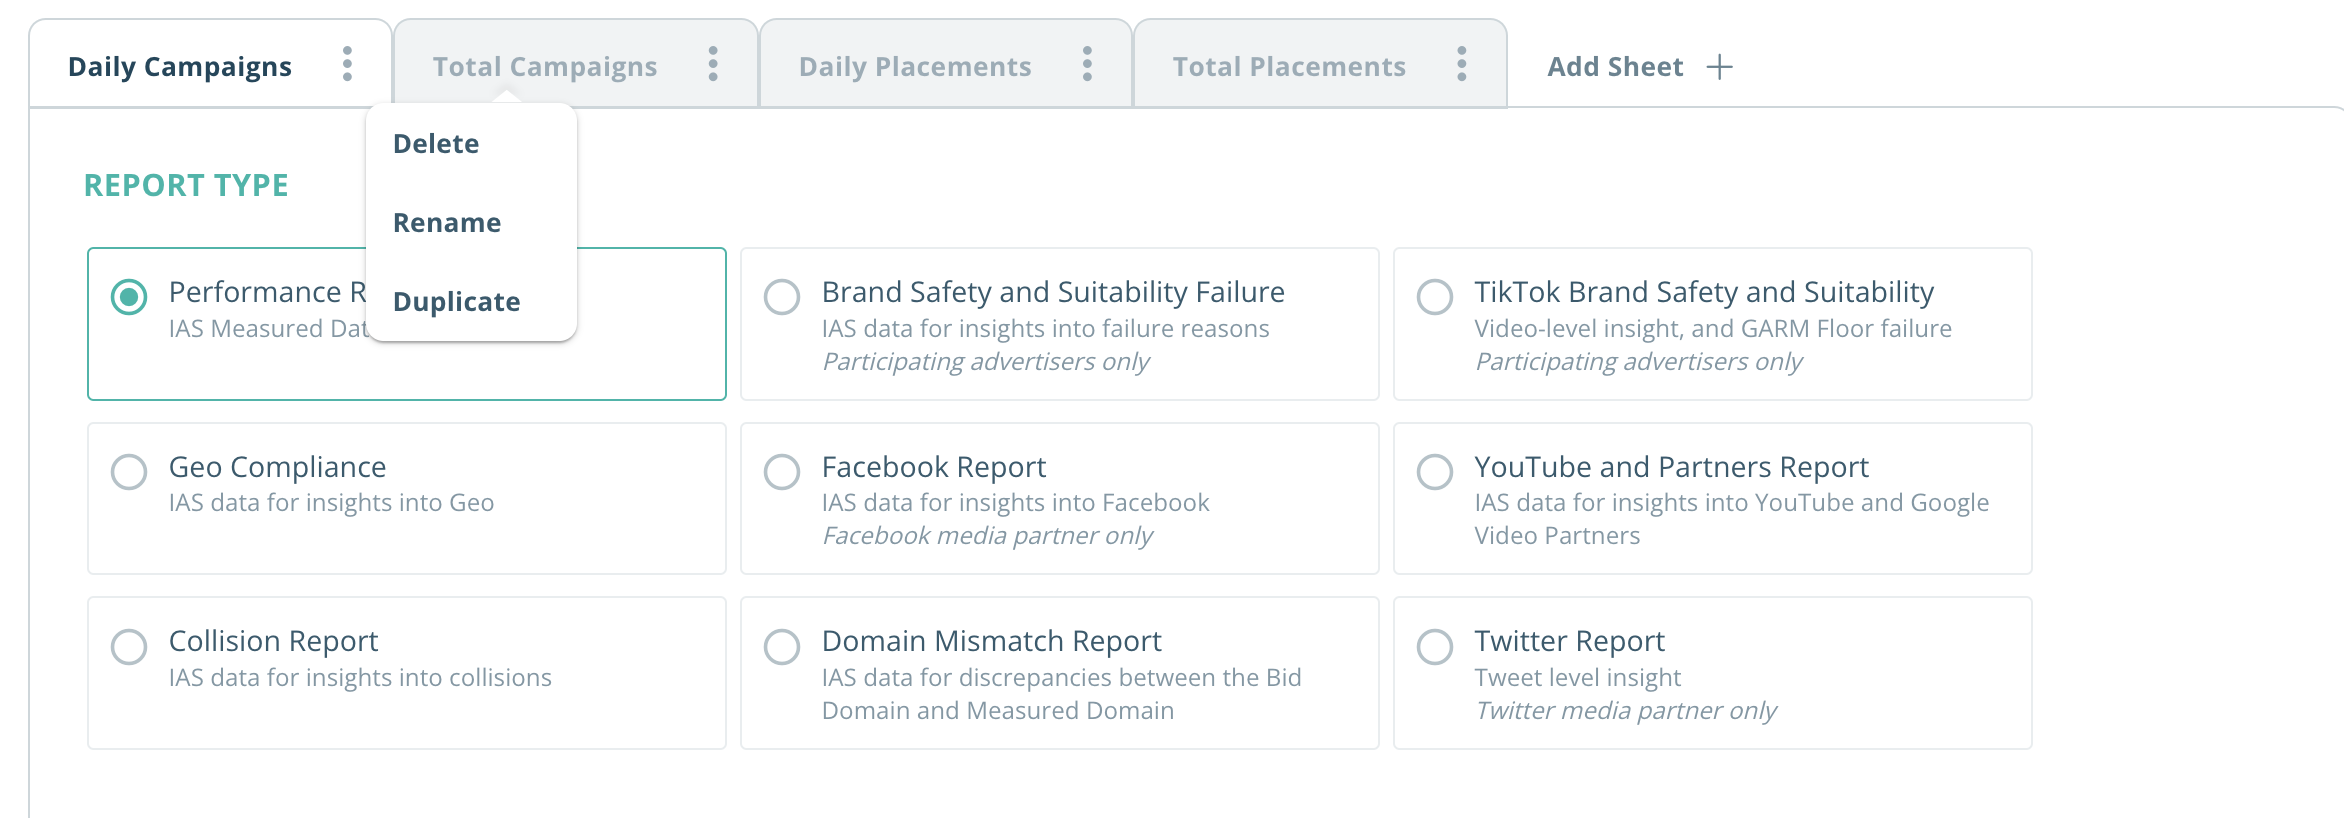
8. After duplicating sheets open the one you want to adjust 1 by 1. At this step you need to change dimensions per each sheet.
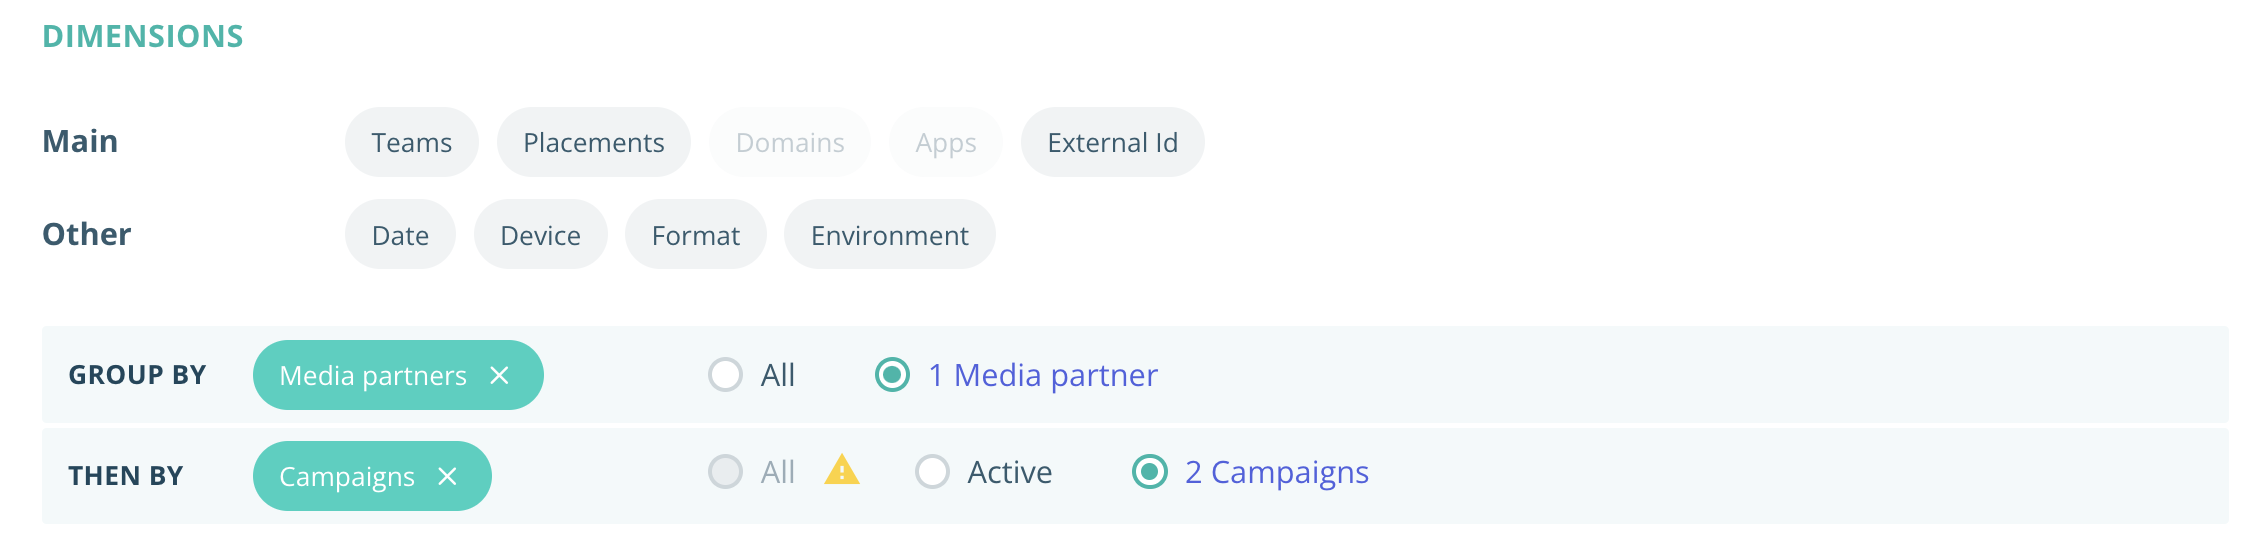
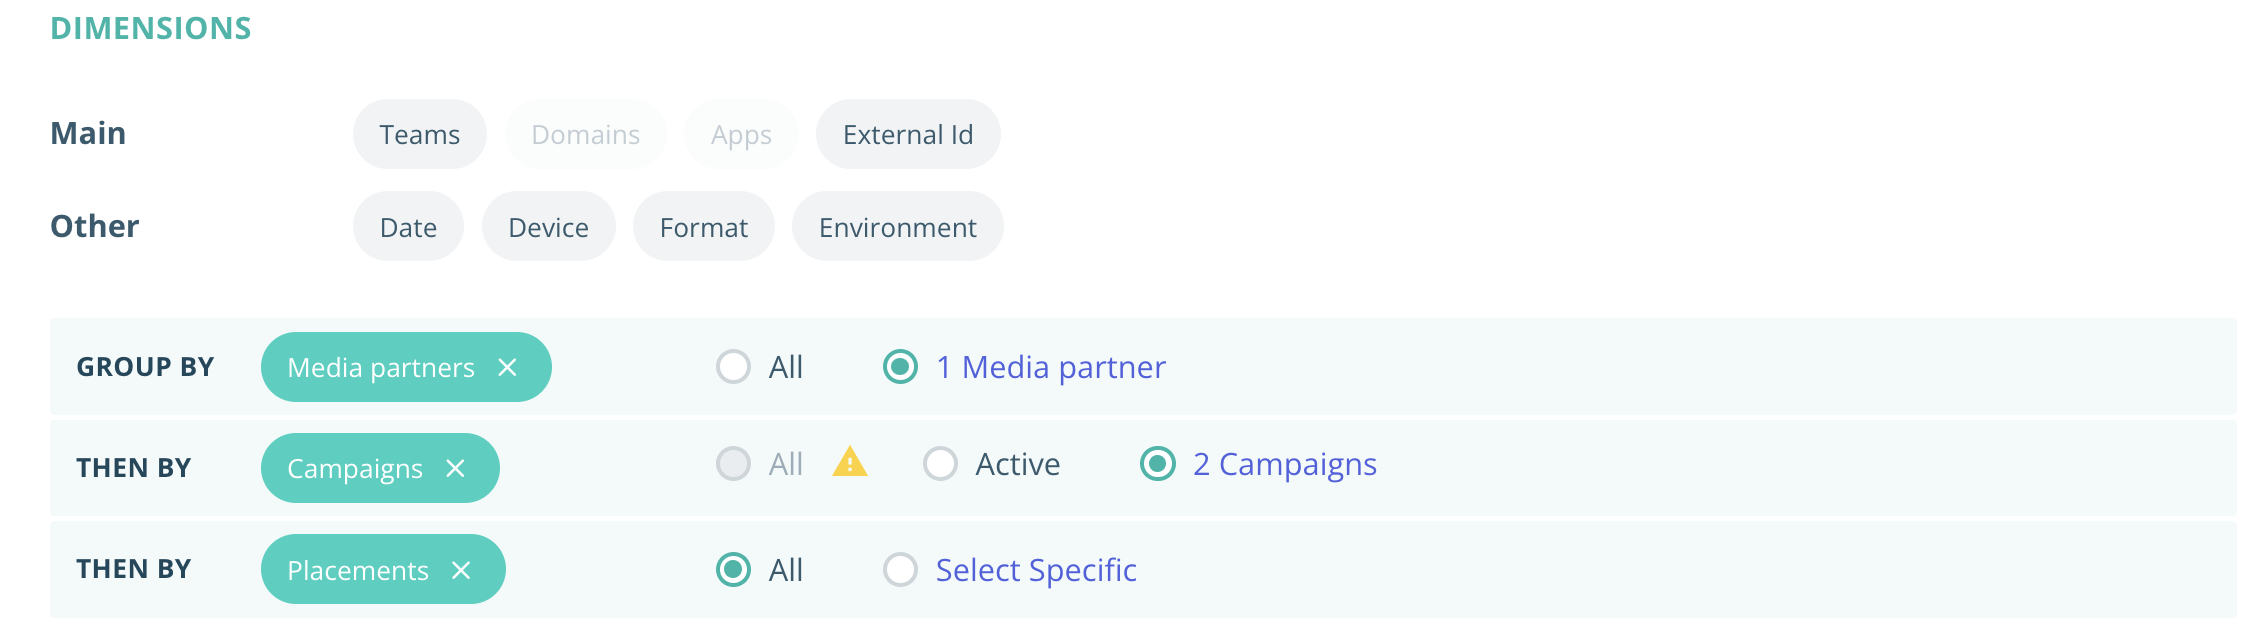
The sheet called "Total Camapaigns" should have selected dimensions as on screen below. Once dimension selected move to another sheet. Keep in mind that you also need to select media partner, and campaigns that you want to include in the report.
9. In case you set up pixel per each creative (a.k. placement) you can add additional report per placement segment. In this case the sheet called "Daily Placements" should consist dimensions as on screen below. Keep in mind that you also need to select media partner, and campaigns that you want to include in the report.
10. Open sheet "Total placements" and select following dimensions. Keep in mind that you also need to select media partner, and campaigns that you want to include in the report.
11. Once all set up is done scroll the page till the end and enter email details and frequency for the auto reporting. It is also possible to enter multiple emails who need to get the settled up report.
Email Details - enter "adops@eskmi.com"
Frequency - select "daily" and establish a period from the campaign first day till the end of last campaign.
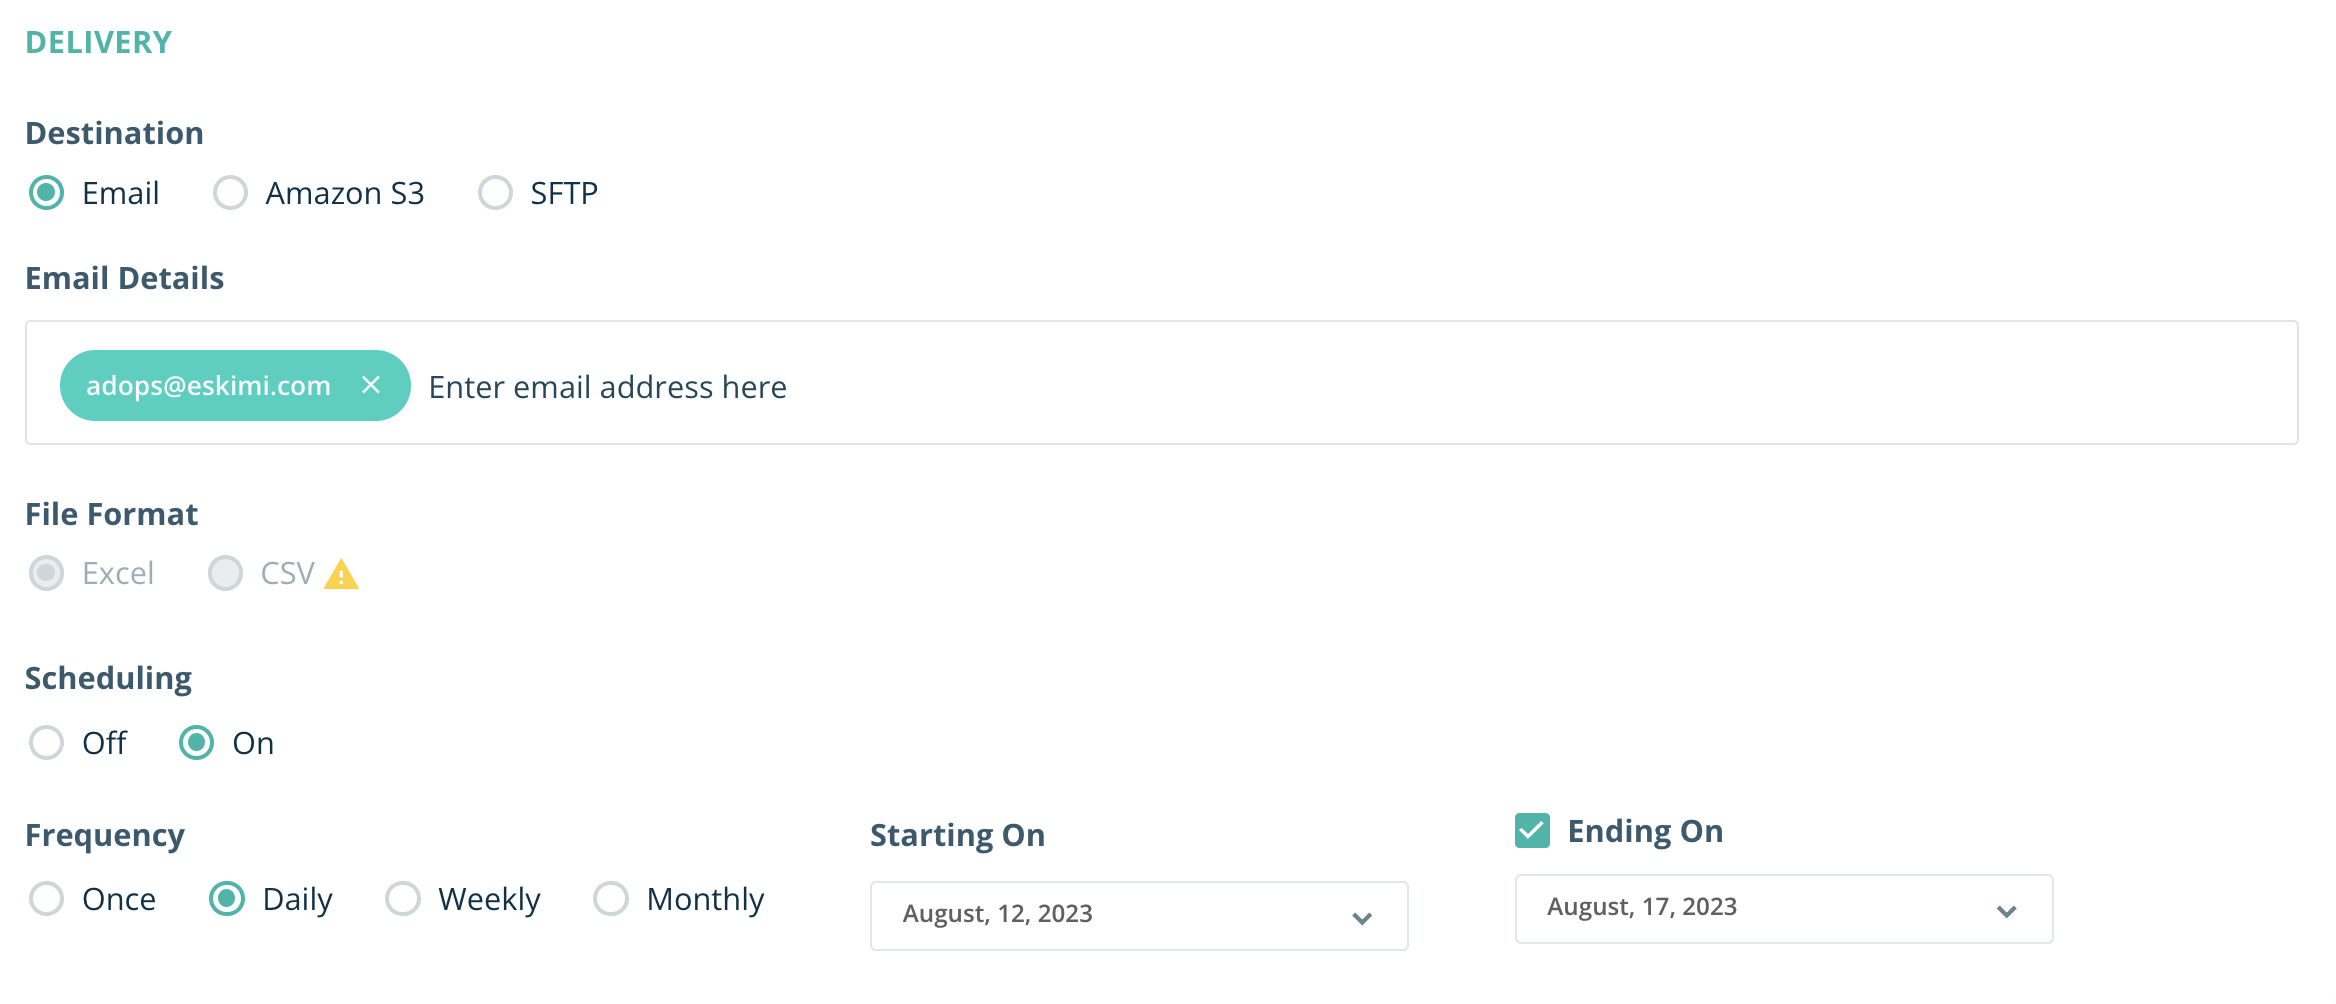
12. Once everything is done the button "save and run" will be active, so you need to press on it to activate the report.

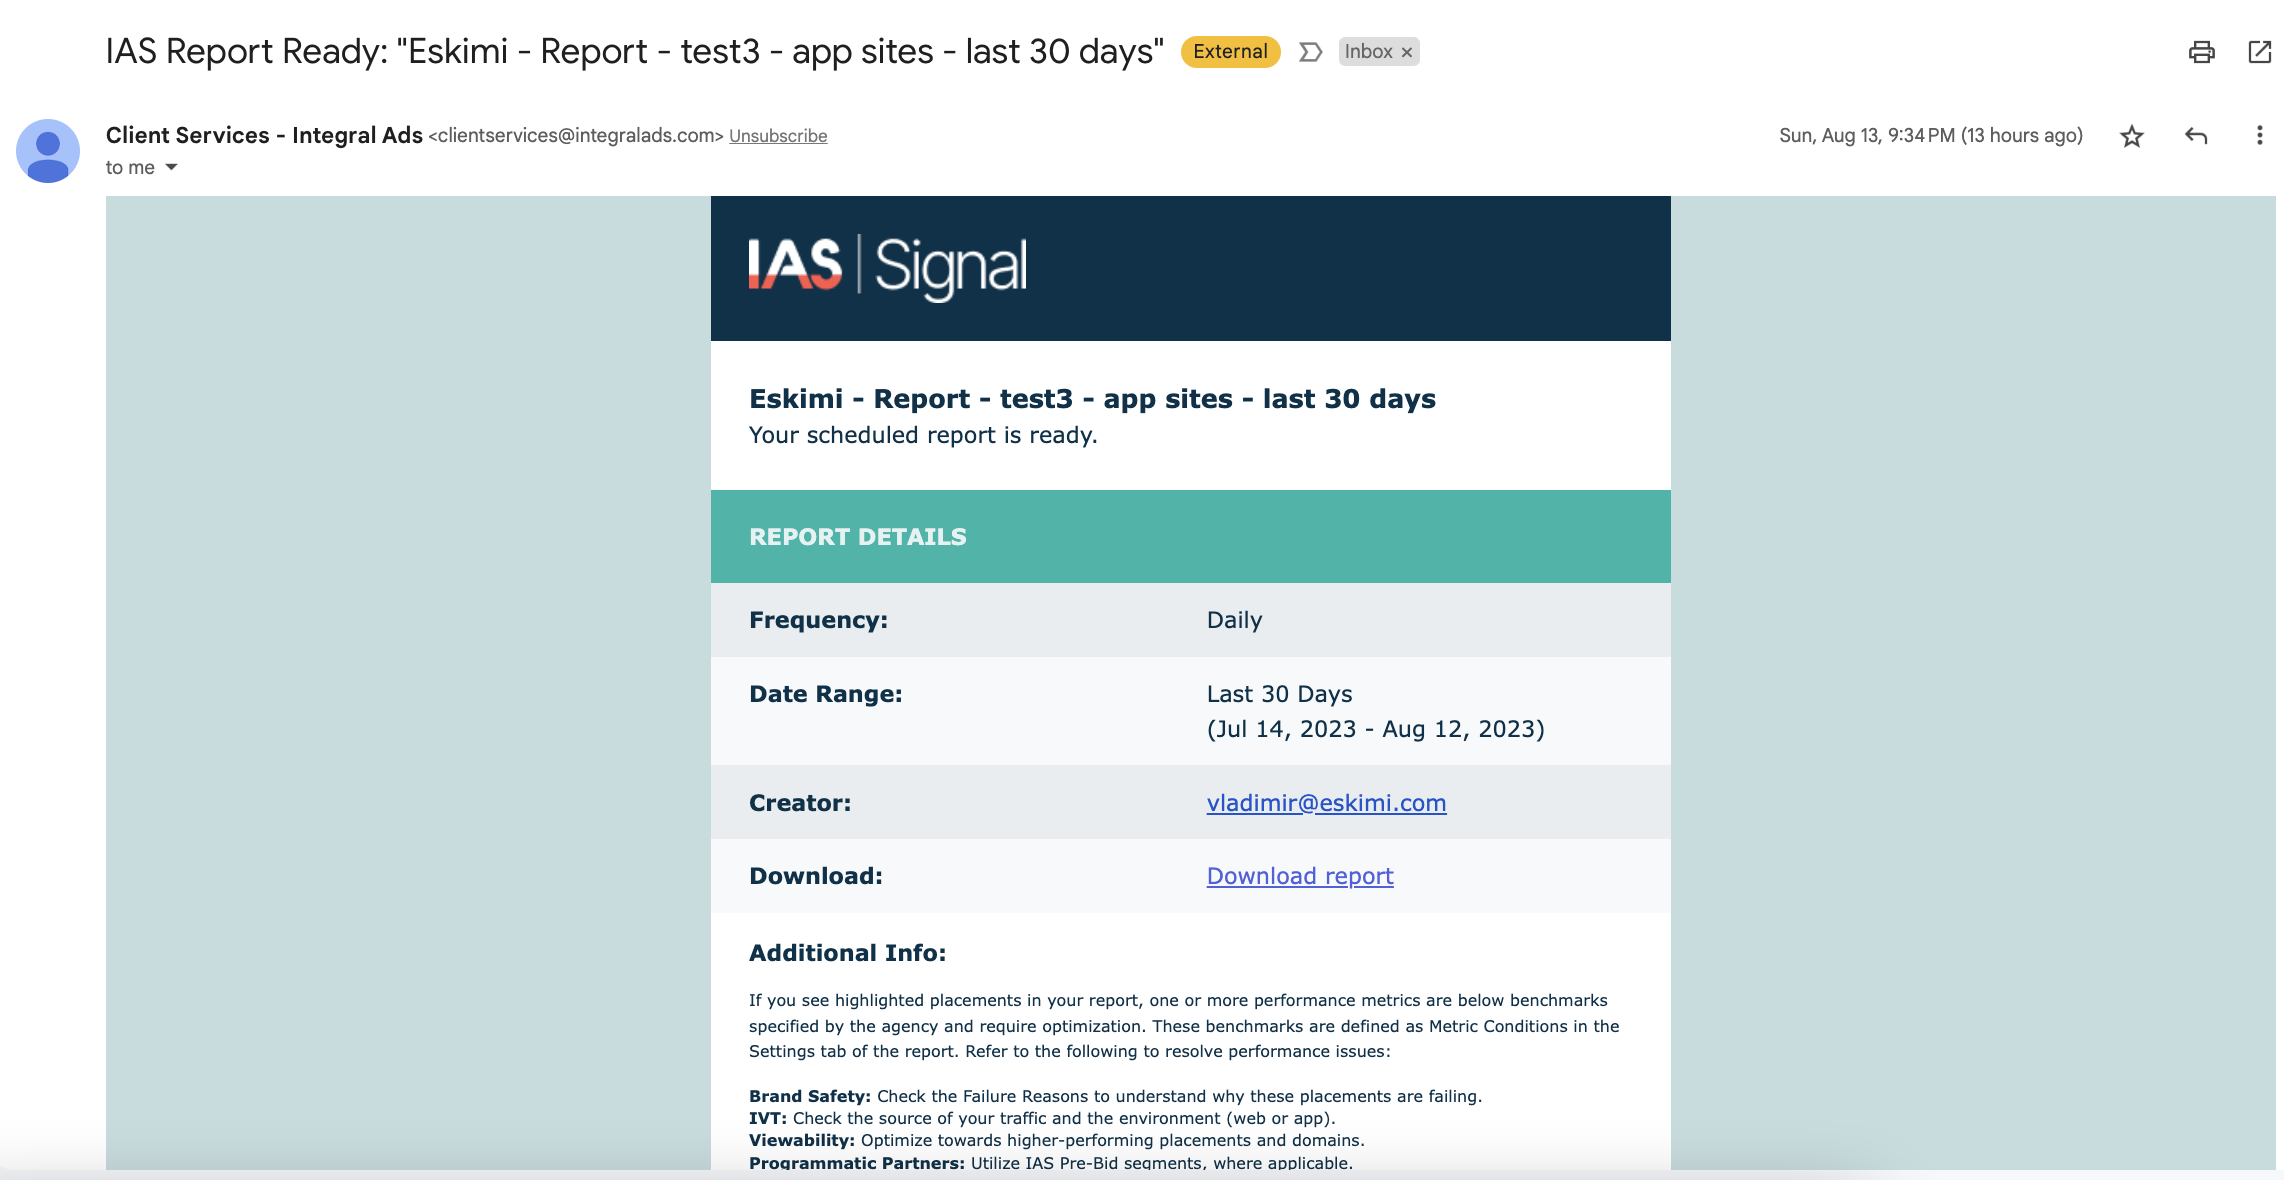
13. If everything set up correctly, the receiver(s) will start getting daily report from IAS. The example of IAS email presented below.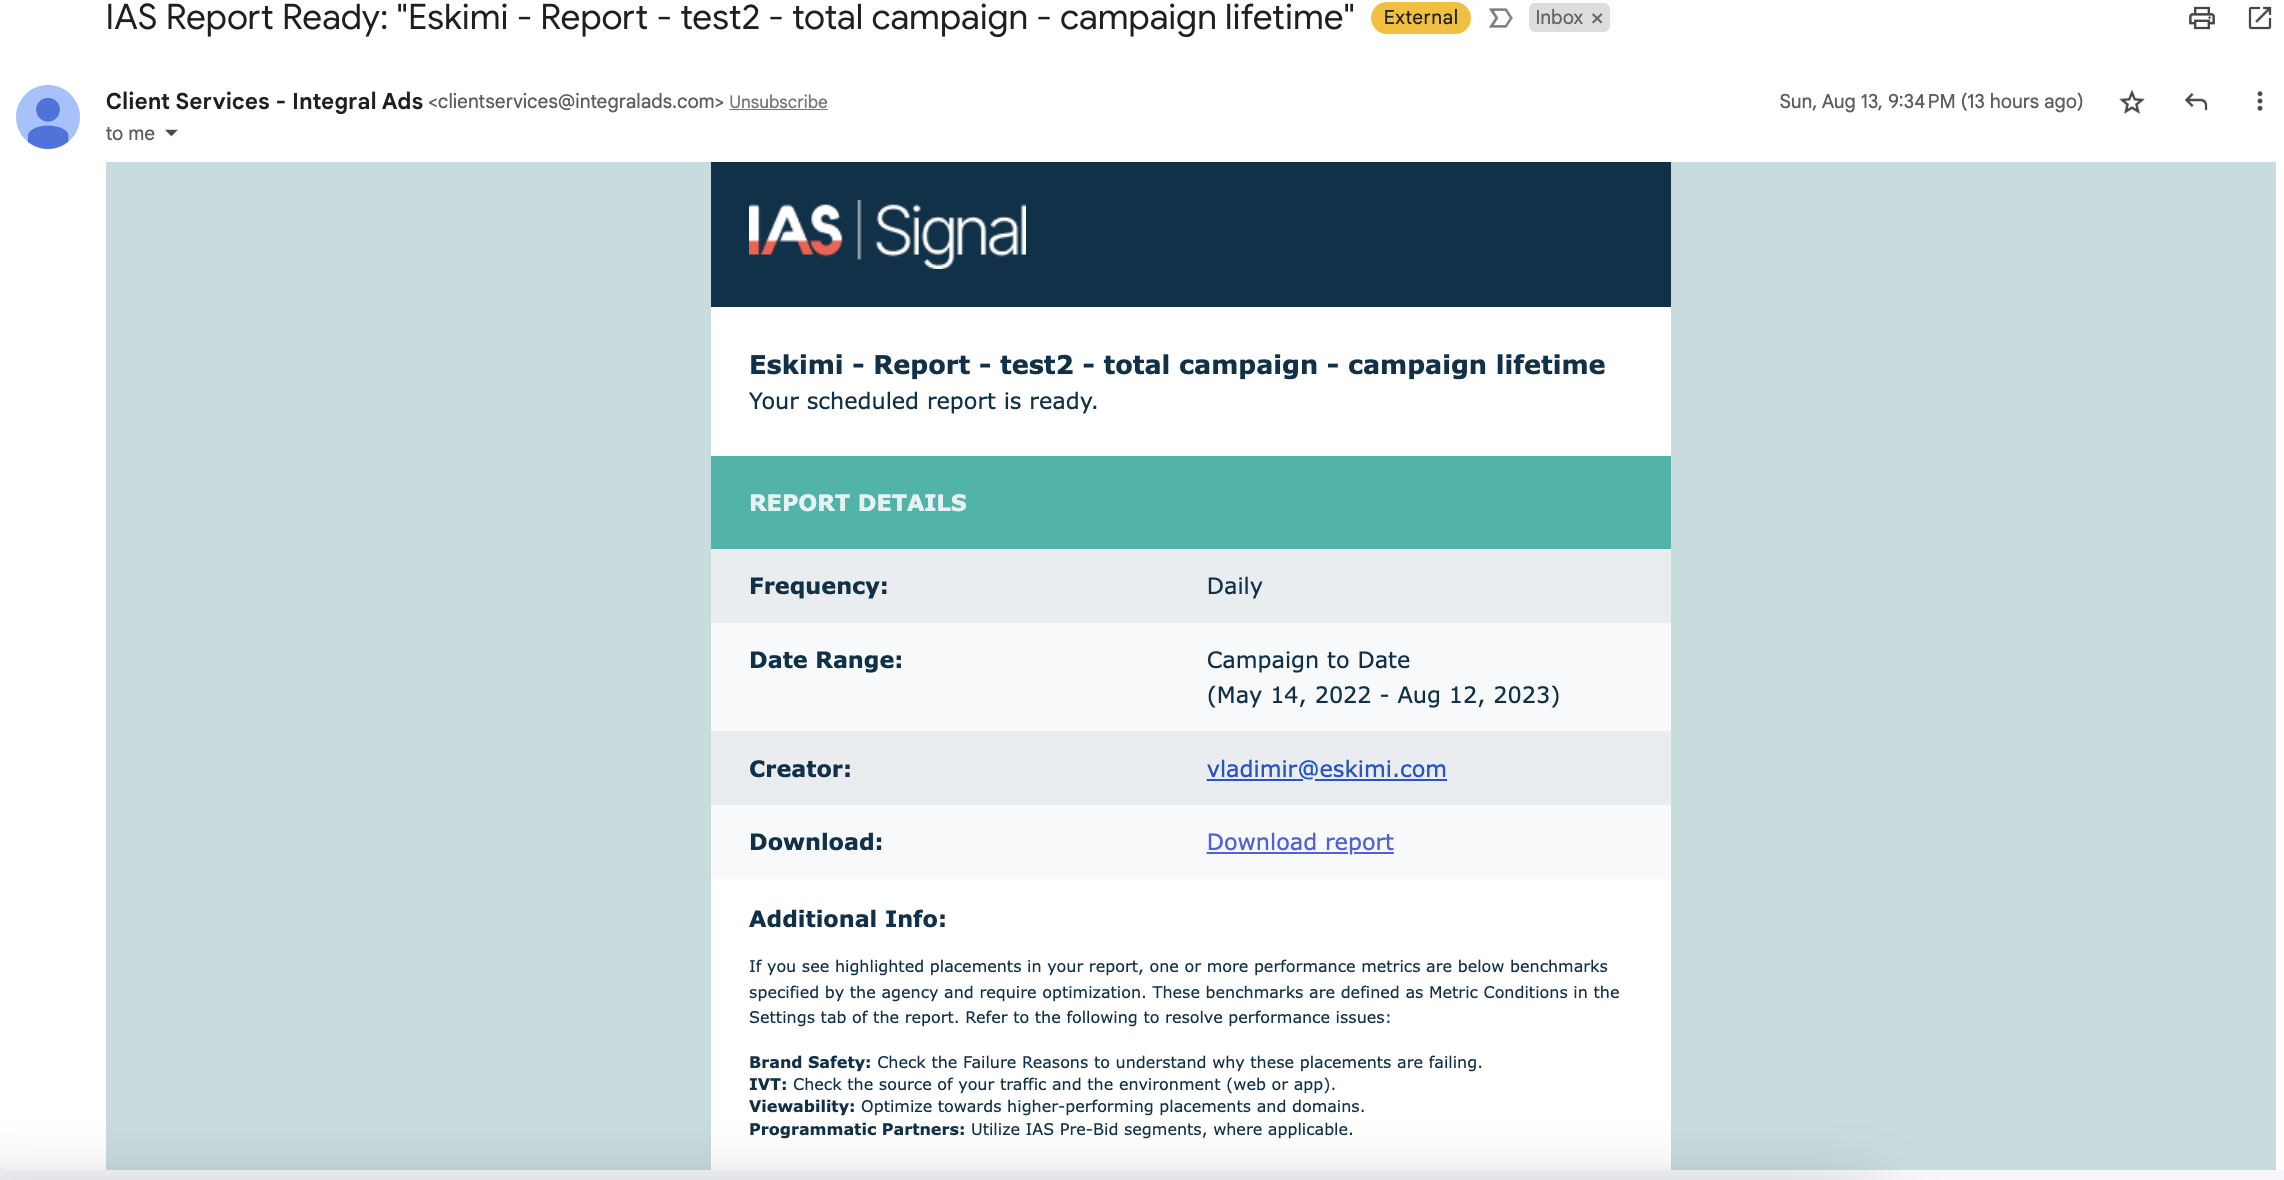
Site/Apps report step-by-step set up guide
0. If you already set up Total campaign report, you can go to Custom Report menu and duplicate the settings from previously created report. In this case most of the settings will be pre-selected and will require slight adjustments (you can follow this guide further to see the adjustment that need to be done). Otherwise you will need to create the report from scratch, where you can follow step-by-step process described below.
1. First of all open your IAS account and go to "Build New Report" menu

3. In Report Type section you will need to create 2 different sheets as it is shown on the screen below. You can name sheets accordingly "Domains" and "Apps". Each sheet will be presented in same xls file which will be generated automatically. Start with one sheet creation, select "Performance Report" and scroll down till "Dimensions" section.
Tip 1: Create 1 sheet at first, for example "Domains". And move to next steps. Later on the sheet might be copied so it will simplify process of creation as you will not need go from the scratch on all next steps for each separate sheet.
4. For the sheet "Domains" for Dimensions section you need to select "Media Partners", "Campaigns", "Domains" and "Dates". Select dimensions in same order.
Also once dimensions are selected specify media partners (it should be Eskimi), also specify campaigns (you need to select campaigns that you want to include for reporting", and as last step select "by day" for Date dimension.
In this case IAS will generate report per domains that appeared for selected campaigns with a daily split. Once this done scroll down till the section "Minimum Total Tracked Ads Filter".
5. In the "minimum total tracked ads filter" section you need to select "all tracked ads". In this case all measured impressions for dimensions you selected above will be presented in the report. Once selected you need scroll down till "Metric" section
6. In "Metrics" section you need to enable metrics which are important to for campaign analysis. Below you can see our suggestions regarding metrics that should be selected. Please include them to any report you are creating for Eskimi team.
In case you would like to know definition of the metrics, please refer to article prepared by IAS: "Advertise Metrics Clossary"
|
|
|
|
|
|
|
7. At this step you can move back to the 3rd point and duplicate the sheet, in this case all settings will be already preselected and will not require additional selection from scratch. Once new sheets are duplicated, you need to rename them accordingly.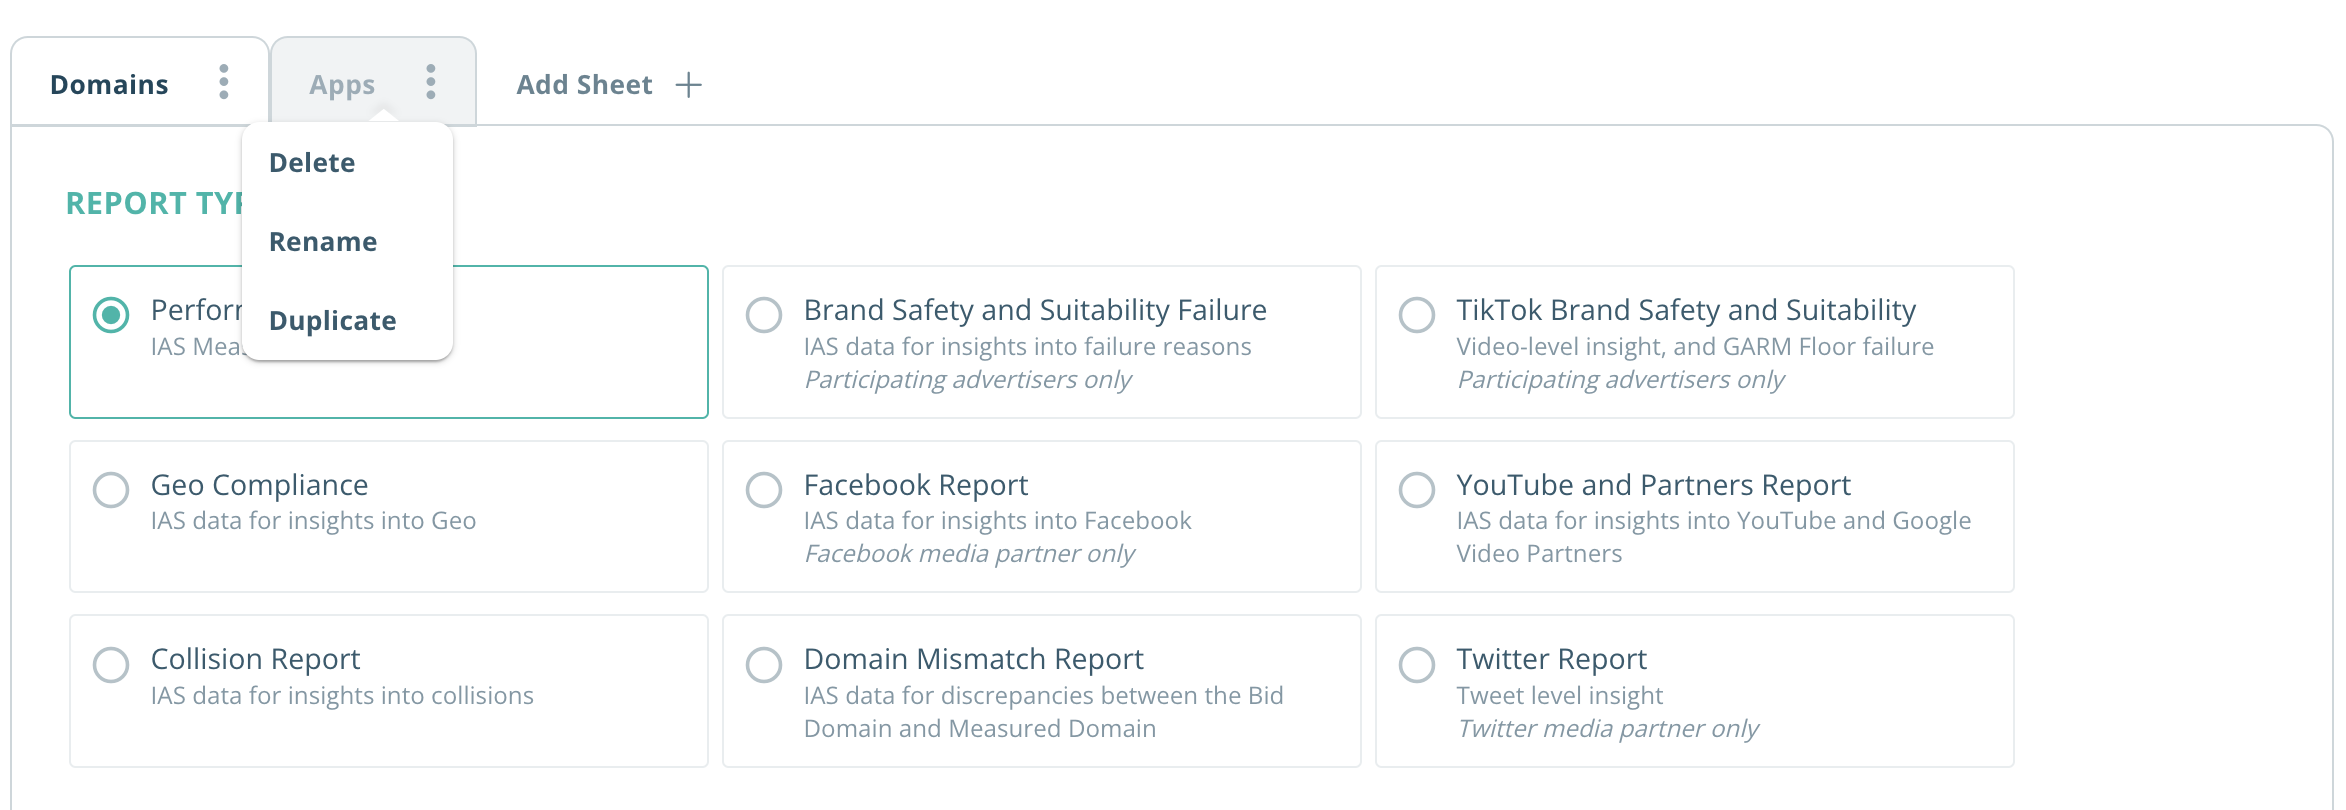
8. After duplicating sheets open the one you want to adjust 1 by 1. At this step you need to change dimensions per each sheet.
The sheet called "Apps" should have selected dimensions as on screen below. Basically you need to unselect "domains" and select "apps" here. Once dimension selected scroll the page down till "Dilivery" section.
11. Once all set up is done scroll the page till the end and enter email details and frequency for the auto reporting. It is also possible to enter multiple emails who need to get the settled up report.
Email Details - enter "adops@eskmi.com"
Frequency - select "daily" and establish a period from the campaign first day till the end of last campaign.
12. Once everything is done the button "save and run" will be active, so you need to press on it to activate the report.
13. If everything set up correctly, the receiver(s) will start getting daily report from IAS. The example of IAS email presented below.
Future campaigns
If you reached to this stage it means that your both reports are set up. The only question might remains is how to be with future campaigns. In this case there are several options:
Option One
If you are planning future campaigns to be tracked in IAS as well, you can simple edit previously created report by selecting new campaigns in the "Dimension" section and adjusting the Delivery period accordingly. Keep in mind that this should be done for both reports and for each sheet separately.
Option Two
You can also create new report by simple coping from previously created. For new report you need to select new campaigns that will be tracked with IAS as well. In this case, report setting require only several adjustments in "Dimension" and "Delivery" sections. Keep in mind that this should be done for both reports and for each sheep accordingly.
MOAT
Rich Media & MOAT measurement (external)
Maximizing media spends and ensuring ads are displayed in a fraud-free, brand-safe environment is a priority for many advertisers. To achieve this, brands globally are turning to third-party measurement solutions like MOAT. In this article, we will explore how MOAT measurement works with an innovative ad solution called Rich Media.
Defining Rich Media
Rich Media refers to HTML ads created by Eskimi's in-house creative team. These ads are developed using proprietary tools and are not reliant on third-party software.
Understanding MOAT Measurement
MOAT measurement is a third-party tool that utilizes JavaScript tags to enable brands to measure ad impressions based on various parameters such as invalid traffic (IVT), brand safety, viewability, and more. It serves the purpose of verifying supply quality and making necessary adjustments based on the gathered data.
Integration of Rich Media Ads with MOAT Measurement
Rich Media ads created by Eskimi can be effectively utilized in conjunction with MOAT impression trackers, namely JavaScript and Pixel tags. These third-party trackers are implemented by Eskimi's ad operations team prior to the campaign launch, ensuring seamless functionality.
Enabling Custom Ad-Finding Logic in MOAT
For optimal performance of Rich Media ads, it is essential to have MOAT's custom ad-finding logic enabled for your specific MOAT account. This customized logic, implemented by MOAT, plays a vital role in accurately measuring various ad metrics such as impressions, viewability, invalid traffic (IVT), brand safety, and other relevant parameters. With the custom ad-finding logic in place, Rich Media ads can be located with the highest degree of accuracy.
Workflow for Implementation
If your brand intends to incorporate Rich Media ads into your media mix, it is advisable to contact our dedicated MOAT account manager and inform them of your plan to run Rich Media ads through Eskimi. The MOAT account management team will facilitate the enabling of the ad-finding logic for your MOAT account. These changes need to be implemented only once. While the implementation of an ad-finding logic for a specific account will take 2-4 working days.
The client should also inform MOAT of the following:
- Are they running display and/or video activity?
- Which environments/devices are they running activity in (Desktop, Mobile web, or mobile in-app)?
- What is their preferred reporting hierarchy and corresponding Eskimi macros?

Should you require further clarification on the workflows, please feel free to reach out to your dedicated account manager, sales representative, or ad operations (adops) team at Eskimi.
Banners/IBV/Rich Media & IAS measurement
General information about IAS Display
Integral Ad Science (IAS) is the global market leader in digital ad verification, offering technologies that drive high-quality advertising media. IAS helps digital advertisers make great impressions, ensuring ads are seen by real people in safe and suitable environments.
IAS measurement allows deeper analytics for the programmatic campaigns. With the reporting clients will know about: Brand safety, viewability, ad environment, invalid traffic performance. These insights give the opportunity to optimize buying and deliver better results.
| IAS Solution | Explanation |
| Blocking | Display tags with blocking. Reures JS |
| Monitoring | Display tags without blocking. Can be JS or image |
If the media partner does not accept Javascript or the Javascript tag is not implemented, viewability measurements cannot be collected.
** Please note that 1x1 trackers cannot collect viewability and cannot be wrapped for blocking.
IAS With Eskimi DSP
Eskimi DSP can offer their clients to opt in for IAS measurement solution. The client has to inform their Business Managers. While BMs should confirm IAS tracker implementation with the adops who will be responsible for campaign management and optimization.
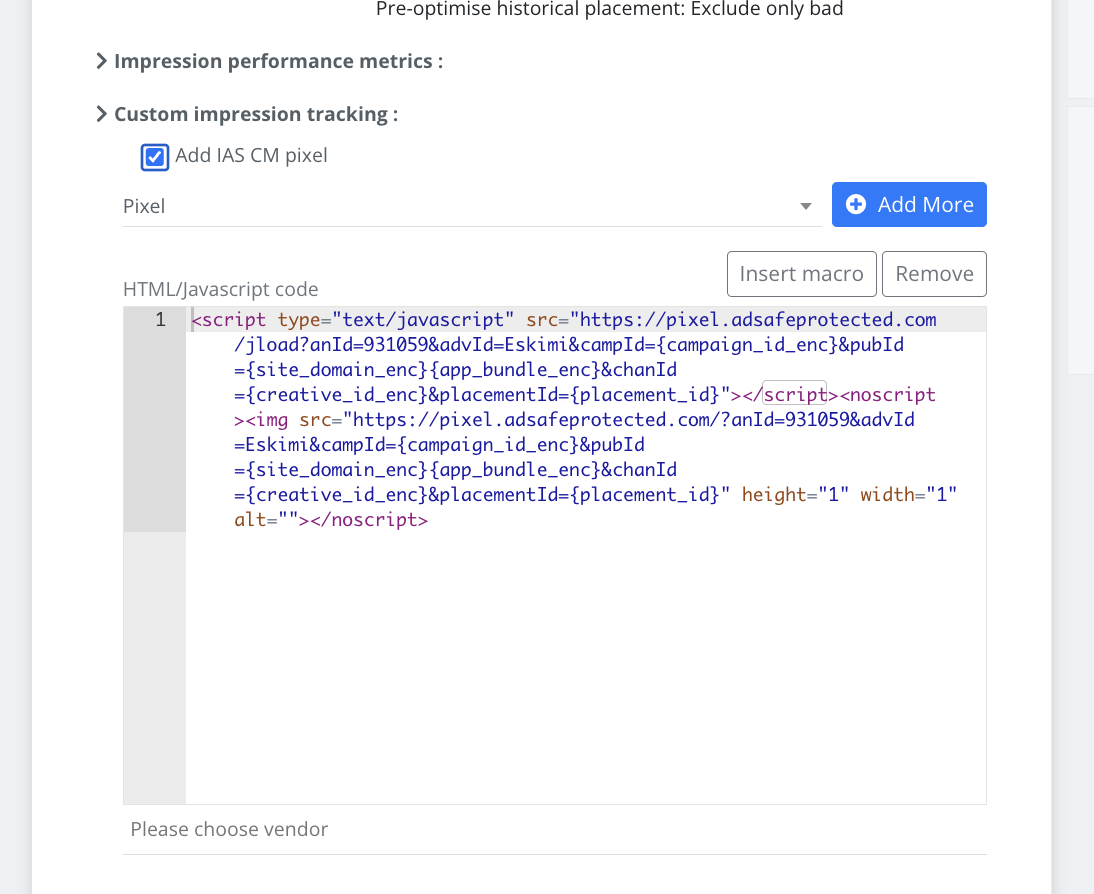
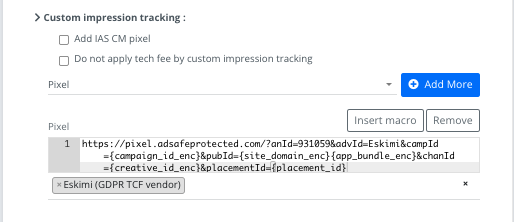
From the technical stand point adops need to implement CM pixel as a HTML/JS impression tracker. CM pixel is a small piece of code that measures performance and sends back the information to IAS dashboard. CM pixel works for Banners, IBV and Rich Media. Keep in mind that CM pixel is a universal code that doesn't require any changes.
CM Pixel
<script type="text/javascript" src="https://pixel.adsafeprotected.com/jload?anId=931059&advId=Eskimi&campId={campaign_id_enc}&pubId=
{site_domain_enc}{app_bundle_enc}&chanId={creative_id_enc}&placementId={placement_id}">
</script><noscript>
<img src="https://pixel.adsafeprotected.com/?anId=931059&advId=Eskimi&campId={campaign_id_enc}&pubId={site_domain_enc}
{app_bundle_enc}&chanId={creative_id_enc}&placementId={placement_id}" height="1" width="1" alt="">
</noscript>CM Pixel Implementation Example:
You need to mark check box from as it is shown on screen-below. You can see that check-box on campaign approval page for every campaign.
When the CM pixel is implemented to the campaign you should see the results accumulating on IAS within 1 working day.
Valuable Links
Dashboard link: https://reporting.integralplatform.com/uaa/login
Support link: https://support.integralads.com/s/contactsupport
Troubleshooting and Trackers Configuration Guides
Troubleshooting guide for 3rd party trackers
How to check if the tracker is a pixel:
Easiest way to check if the tracker you’re using is a 1x1 pixel or not is just to open it in a browser, for example:
https://pixel.adsafeprotected.com/jload?anId=931059&advId=Eskimi&campId={campaign_id_enc}&pubId=
{site_domain_enc}{app_bundle_enc}&chanId={creative_id_enc}&placementId={placement_id} not an impression pixel
https://pixel.adsafeprotected.com/?anId=931059&advId=Eskimi&campId={campaign_id_enc}&pubId=
{site_domain_enc}{app_bundle_enc}&chanId={creative_id_enc}&placementId={placement_id} correct impression pixel
If you implement the pixel incorrectly (for example if you use the first URL) there might be huge discrepancies between us and the 3rd party platform (they might even not track anything), so it’s very important before you launch a campaign that uses 3rd party trackers to double check if the trackers are correctly implemented.
https://ad.doubleclick.net/ddm/trackimp/N705418.1727343ESKIMI.COM/B28985587.353603375;dc_trk_aid=
545020201;dc_trk_cid=182974786;ord=[timestamp];dc_lat=;dc_rdid=;tag_for_child_directed_treatment=;tfua=;
gdpr=${GDPR};gdpr_consent=${GDPR_CONSENT_755};ltd=?https://track.adform.net/adfserve/?bn=60266225;1x1inv=1;srctype=3;ord={cachebuster}Some other ways to recognize if it’s a pixel:
<script type="text/javascript" src="https://pixel.adsafeprotected.com/jload?anId=931059&advId=Eskimi&campId={campaign_id_enc}&pubId={site_domain_enc}{app_bundle_enc}&chanId={creative_id_enc}&placementId={placement_id}">
</script>
<noscript>
<img src="https://pixel.adsafeprotected.com/?anId=931059&advId=Eskimi&campId={campaign_id_enc}&pubId={site_domain_enc}{app_bundle_enc}&chanId={creative_id_enc}&placementId={placement_id}" height="1" width="1" alt="">
</noscript>
This is a our internal IAS JS tracker, but you can extract a pixel from this tracker. Most of the tracking pixel will be placed inside the <img> element:
<img src="https://pixel.adsafeprotected.com/?anId=931059&advId=Eskimi&campId={campaign_id_enc}&pubId={site_domain_enc}{app_bundle_enc}&chanId={creative_id_enc}&placementId={placement_id}"
height="1" width="1" alt="">If you look closely you we will that the height and the width are set to 1x1 for this element (witch almost always indicates that it’s 1x1 pixel). So just extract the URL part from this element and use it as a tracking pixel (it’s not always possible to extract the pixel from JS trackers, keep that in mind).
How to validate that you have a 3rd party JavaScript tracker:
- The tag will be in a
<script><script> - It will be a code rather than a clickable pixel/image
- Allow various macros. Eskimi macros have to be implemented into the tag (ex.: {creative_id}, {site_id} etc.). Any 3rd party macros will not be supported and Eskimi system will not be able to fetch the data. (Eskimi macros can be found in campaign setup page, under click URL parameters).
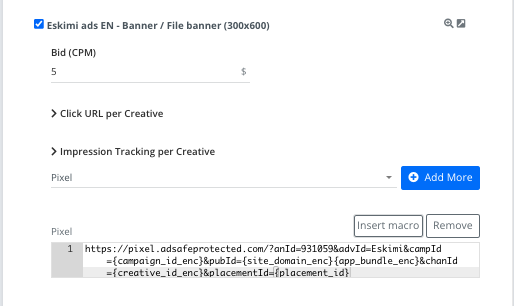
Third party trackers can be implemented two ways (both JS and Pixels):
1. Campaign level in the campaigns approval page:
2. Creative level in the campaigns edit page under each creative:
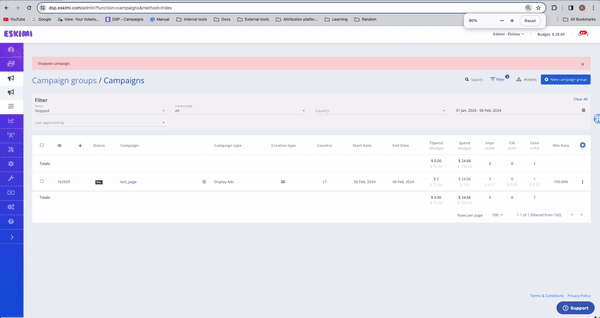
How to check if the trackers are firing:
1. Launch a campaign with trackers applied and leave it as pending.
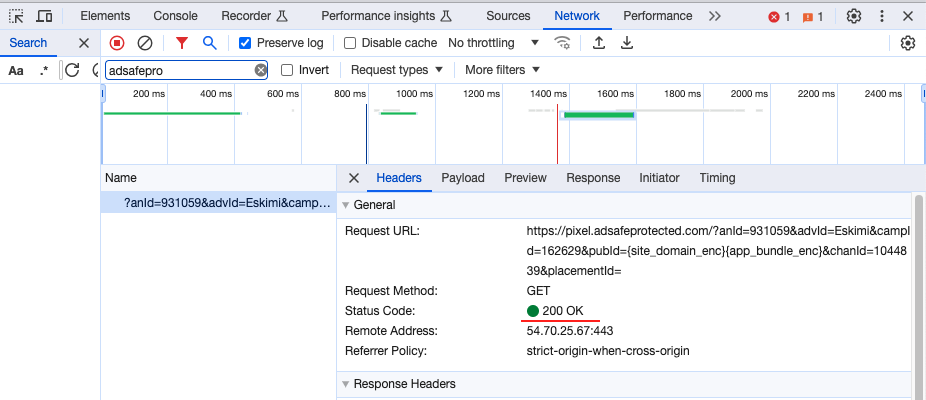
2. Copy part part of the trackers name/id, for example:
https://pixel.adsafeprotected.com/?anId=931059&advId=Eskimi&campId={campaign_id_enc}&pubId=
{site_domain_enc}{app_bundle_enc}&chanId={creative_id_enc}&placementId={placement_id}From this pixel you just can take adsafeprocted part or 931059 (this differs from tracker to tracker)
3. Open campaigns preview page.
4. In the preview page open developer tools by right clicking anywhere on the screen and click "Inspect", then navigate to the network tab and search for the trackers name (the part that was copied the step before), then refresh the page:
5. After you do the previous step, you we see a log pop up after the page refresh, click on that log, and if you see status 200 in the request header, it means that it's firing correctly:
Android WebView (Dalvik):
What to share to tech support:
1. Report - always include a report from 3rd party platform where we can clearly would see that there is discrepancy. Also in the report we only need to see impressions (or other metrics) by day and campaign. We do not require other splits in the clients report (for example we sometimes receive report by app/site, often those reports have over 100k rows in the sheets, witch makes the report almost unreadable for us). If tech support will require additional report with other splits, they will inform regarding it.
2. Trackers - Include original tracker csv/txt file. (Helps tech support understand if the trackers were implemented correctly).
3. Documentation - If you'll ever receive trackers from the client that you or your colleagues never seen before, then ask the client for the documentation for those trackers and share it in the ticket with tech support, as there is a high chance they tech support is not familiar with those trackers as well (test campaign would be recommended here as well, to be sure that the trackers will work).
Things to remember:
1. Discrepancies up to 15% are considered normal.
2. The tag should be implemented exactly as you got it from the 3rd party vendor.
3. There are supply limitations as there are publishers that will not support JS tags on their page.
4. Always change [timestamp] to {CACHEBUSTER} in the 3rd party tracker as it might impact numbers that the clients sees.
5. Majority of 1x1 pixels will track only impressions.
6. DC trackers need to be modified a bit for In-Game campaigns, more information in this manual
Adform creative tag implementation (updated)
The following article presents the approach how adform tags should be implemented in Eskimi DSP.
<script language="javascript" src="https://track.adform.net/adfscript/?bn=50747383"></script>
<noscript>
<a href="https://track.adform.net/C/?bn=50747383;C=0" target="_blank">
<img src="https://track.adform.net/adfserve/?bn=50747383;srctype=4;ord=[timestamp]" border="0" width="300" height="250" alt=""/>
</a>
</noscript>2. To continue tag implementation, you need to create banner type creative set, then add creative as JS/HTML banner and copy the tag from spreadsheet manually.
3. Once the code is copied, you need to adjust tag with click macro in order to track clicks in campaign.
3.1 add ;click={click_url} into the redirect string.
3.2 To ensure proper cache-busting, replace [timestamp] with {CACHEBUSTER}.
Once all 2 steps completed the tags should look like
<script language="javascript" src="https://track.adform.net/adfscript/?bn=50747383;click={click_url}"></script>
<noscript>
<a href="https://track.adform.net/C/?bn=50747383;C=0" target="_blank">
<img src="https://track.adform.net/adfserve/?bn=50747383;srctype=4;ord={CACHEBUSTER}" border="0" width="300" height="250" alt=""/>
</a>
</noscript>4. Press save and later you can link this creative to your campaign.
Notes:
The {CLICK_URL} Macro in Adform creative JS tags should be automatically added/updated after uploading saving, but it's good to always re-check and confirm.
Possible issues and troubleshooting:
According to our experience we noticed that the adform create tags might be created in multiply variations. Unfortunately, sometimes the creatives might be prepared incorrectly, not follow adform requirements. Therefore sometimes you might notice that after you followed the guide of tag adjustment the tag don't track clicks properly. In such cases suggest to client double check how the creatives were created, and if they follow all adform requirements. In that scenario client can refer to adform support team, or refer to official adform documentation:
The documentation of how the creative should be created below:
https://www.adformhelp.com/s/article/UUID-ba1da05a-285e-ade0-1165-a33481f90b35
Please also note that there are three important things to be taken into consideration when talking about Adform clicks to work correctly and tracker to fire well:
- Adform DHTML library;
- manifest.json file;
- Click function.
Adform Tag Creatives – Eskimi.com Domain Whitelisting
When working with client-supplied Adform tags, please be aware of a recurring issue: creatives may not render in our system due to domain whitelisting restrictions on the Adform side.
Root Cause:
Adform requires domains to be explicitly whitelisted to allow tag calls and asset serving. If eskimi.com is not whitelisted in the client’s Adform settings, the creative might not appear in our preview or live delivery environments.
What to Check / Do:
-
If a creative from Adform is not visible after tag upload, verify if eskimi.com is whitelisted in Adform.
-
Communicate this to the client and request their Adform team to add eskimi.com to the allowed domains list.
-
Once confirmed, recheck the creative visibility in the system.
Sizmek Tags
Sometimes it may happen that you will receive JS banner tags for Sizmek. But the tags may not be compatible with our DSP platform, without any additional changes.
Lets take an example of a bad tag:
<script src="https://bs.serving-sys.com/Serving/adServer.bs?c=28&cn=display&pli=107430544984&w=300&h=250&ord=[timestamp]&z=10000"></script>
<noscript>
<a href="https://bs.serving-sys.com/Serving/adServer.bs?cn=brd&pli=1074305984&Page=&Pos=-956631125" target="_blank">
<img src="https://bs.serving-sys.com/Serving/adServer.bs?c=8&cn=display&pli=107430445984&Page=&Pos=-9566431125" border=0 width=300 height=250></a>
</noscript>Upon looking at the tag there are a few things:
- First of all our {CLICK_URL} macro is missing.
- And no use of {CACHEBUSTER} macro.
- The URL in the <a> needs to be encoded.
In order to fix the tag, we need to make several changes.
To start let's look at the correct tag.
<script src="https://bs.serving-sys.com/BurstingPipe/adServer.bs?cn=rsb&c=28&pli=2601744794&PluID=0&w=300&h=250&ord={CACHEBUSTER}&ucm=true&ncu=$${CLICK_URL}$$"></script>
<noscript>
<a href="{CLICK_URL}https%3A%2F%2Fbs.serving-sys.com%2FBurstingPipe%2FadServer.bs%3Fcn%3Dbrd%26FlightID%3D2601447794%26Page%3D%26PluID%3D0%26Pos%3D57039442024" target="_blank"><img src="https://bs.serving-sys.com/BurstingPipe/adServer.bs?cn=bsr&FlightID=2644017794&Page=&PluID=0&Pos=574044392024" border=0 width=300 height=250></a>
</noscript>1. {CLICK_URL} macro is added in two places, the <script> part of the tag, and the <noscript> part of the tag.
<script> part of the tag: to insert the {CLICK_URL} macro you have to add the "&ncu=$${CLICK_URL}$$" of the first URL.
<noscript> part of the tag: insert {CLICK_URL} before the href="" url
2. Enable Cachebuster. Cachebuster in Sizmek is enabled, by using the [timestamp] property of the URL. To enable this from our DSP end, that has to be changed to {CACHEBUSTER}.
3. Encode the <noscript> URL: the after the {CLICK_URL} part has to be encoded. To encode the URL use this tool: https://meyerweb.com/eric/tools/dencoder/.
VAST video & IAS measurement
What is IAS pixel for VAST video?
Eskimi supports IAS third party pixels via the piggy back method, where the Eskimi append the IAS pixel tag directly on creatives prior to platform upload. To measure performance on IAS for video, VAST video creative must be wrapped into IAS wrapper. This is a small pixel code that can be implemented directly and automatically through Eskimi platform.
| IAS Solution | Explanation | Requirements |
| Multimedia Tag Monitoring | Video tracking tag that will work across desktop, CTV, mobile & in-app. Can measure viewability, set to not block | Requires a VPAID player/publisher support & 3rd party ad serving |
| Multimedia Tag Blocking | Video tracking tag that will work across desktop, CTV, mobile & in-app. Can measure viewability, set to block | Requires a VPAID player/publisher support & 3rd party ad serving |
| Unified Video Pixel | Video tracking tag that will work across desktop, CTV, mobile & in-app. Cannot measure viewability or block | Requires a VAST player & 3rd party ad serving |
Viewability measurements cannot be collected if it is not third party ad serving and the video inventories are not VPAID compatible. IAS alternative solution would be our Unified Video Pixel, which is essentially just the image pixel generated for various events (i.e. first quartile/ second quartile etc), you can implement the various event trackers to ensure you are able to collect valid quartile measurements since viewability would not be measured.
Why IAS tracker is relevant for VAST video?
IAS trackers allow advertisers to understand their VAST video performance in 3 main areas:
1. Brand safety
2. Viewability
3. Invalid traffic
When the a VAST video is wrapped into an IAS tag, the above mentioned mentrics will be tracked on IAS dashboard automatically.
How to wrap VAST video into IAS tracker?
Eskimi allows to wrap VAST video in highly automated manner.
1. Go to your account's Creatives section.
2. Select Add creative set.
3. Give your creative set a name & select creative format as Video.

4. From the format dropdown select VAST video or VAST XML. It will be possible to wrap VAST video even when VAST + IBV is selected.
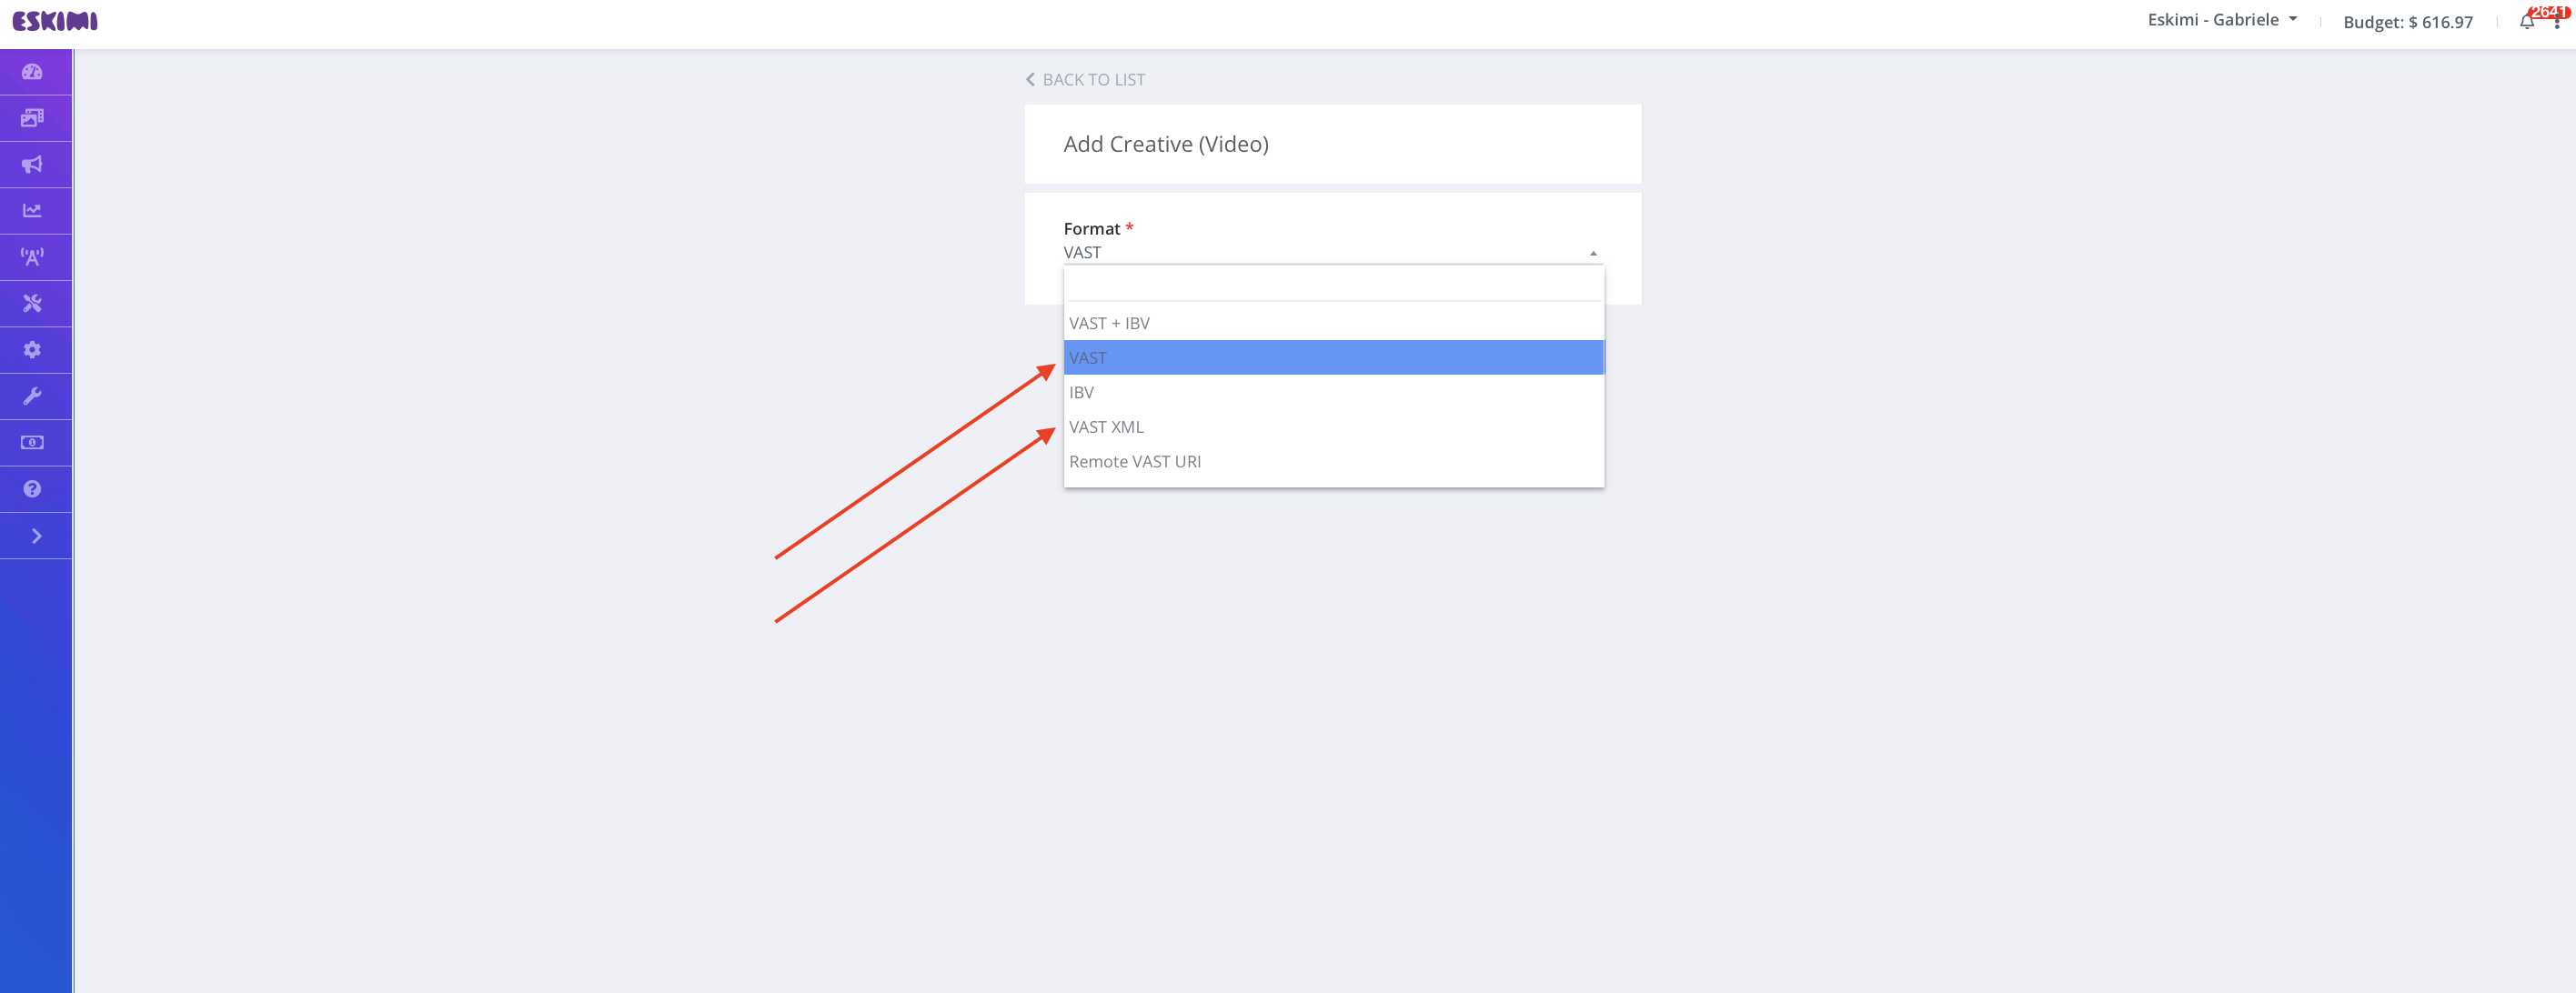
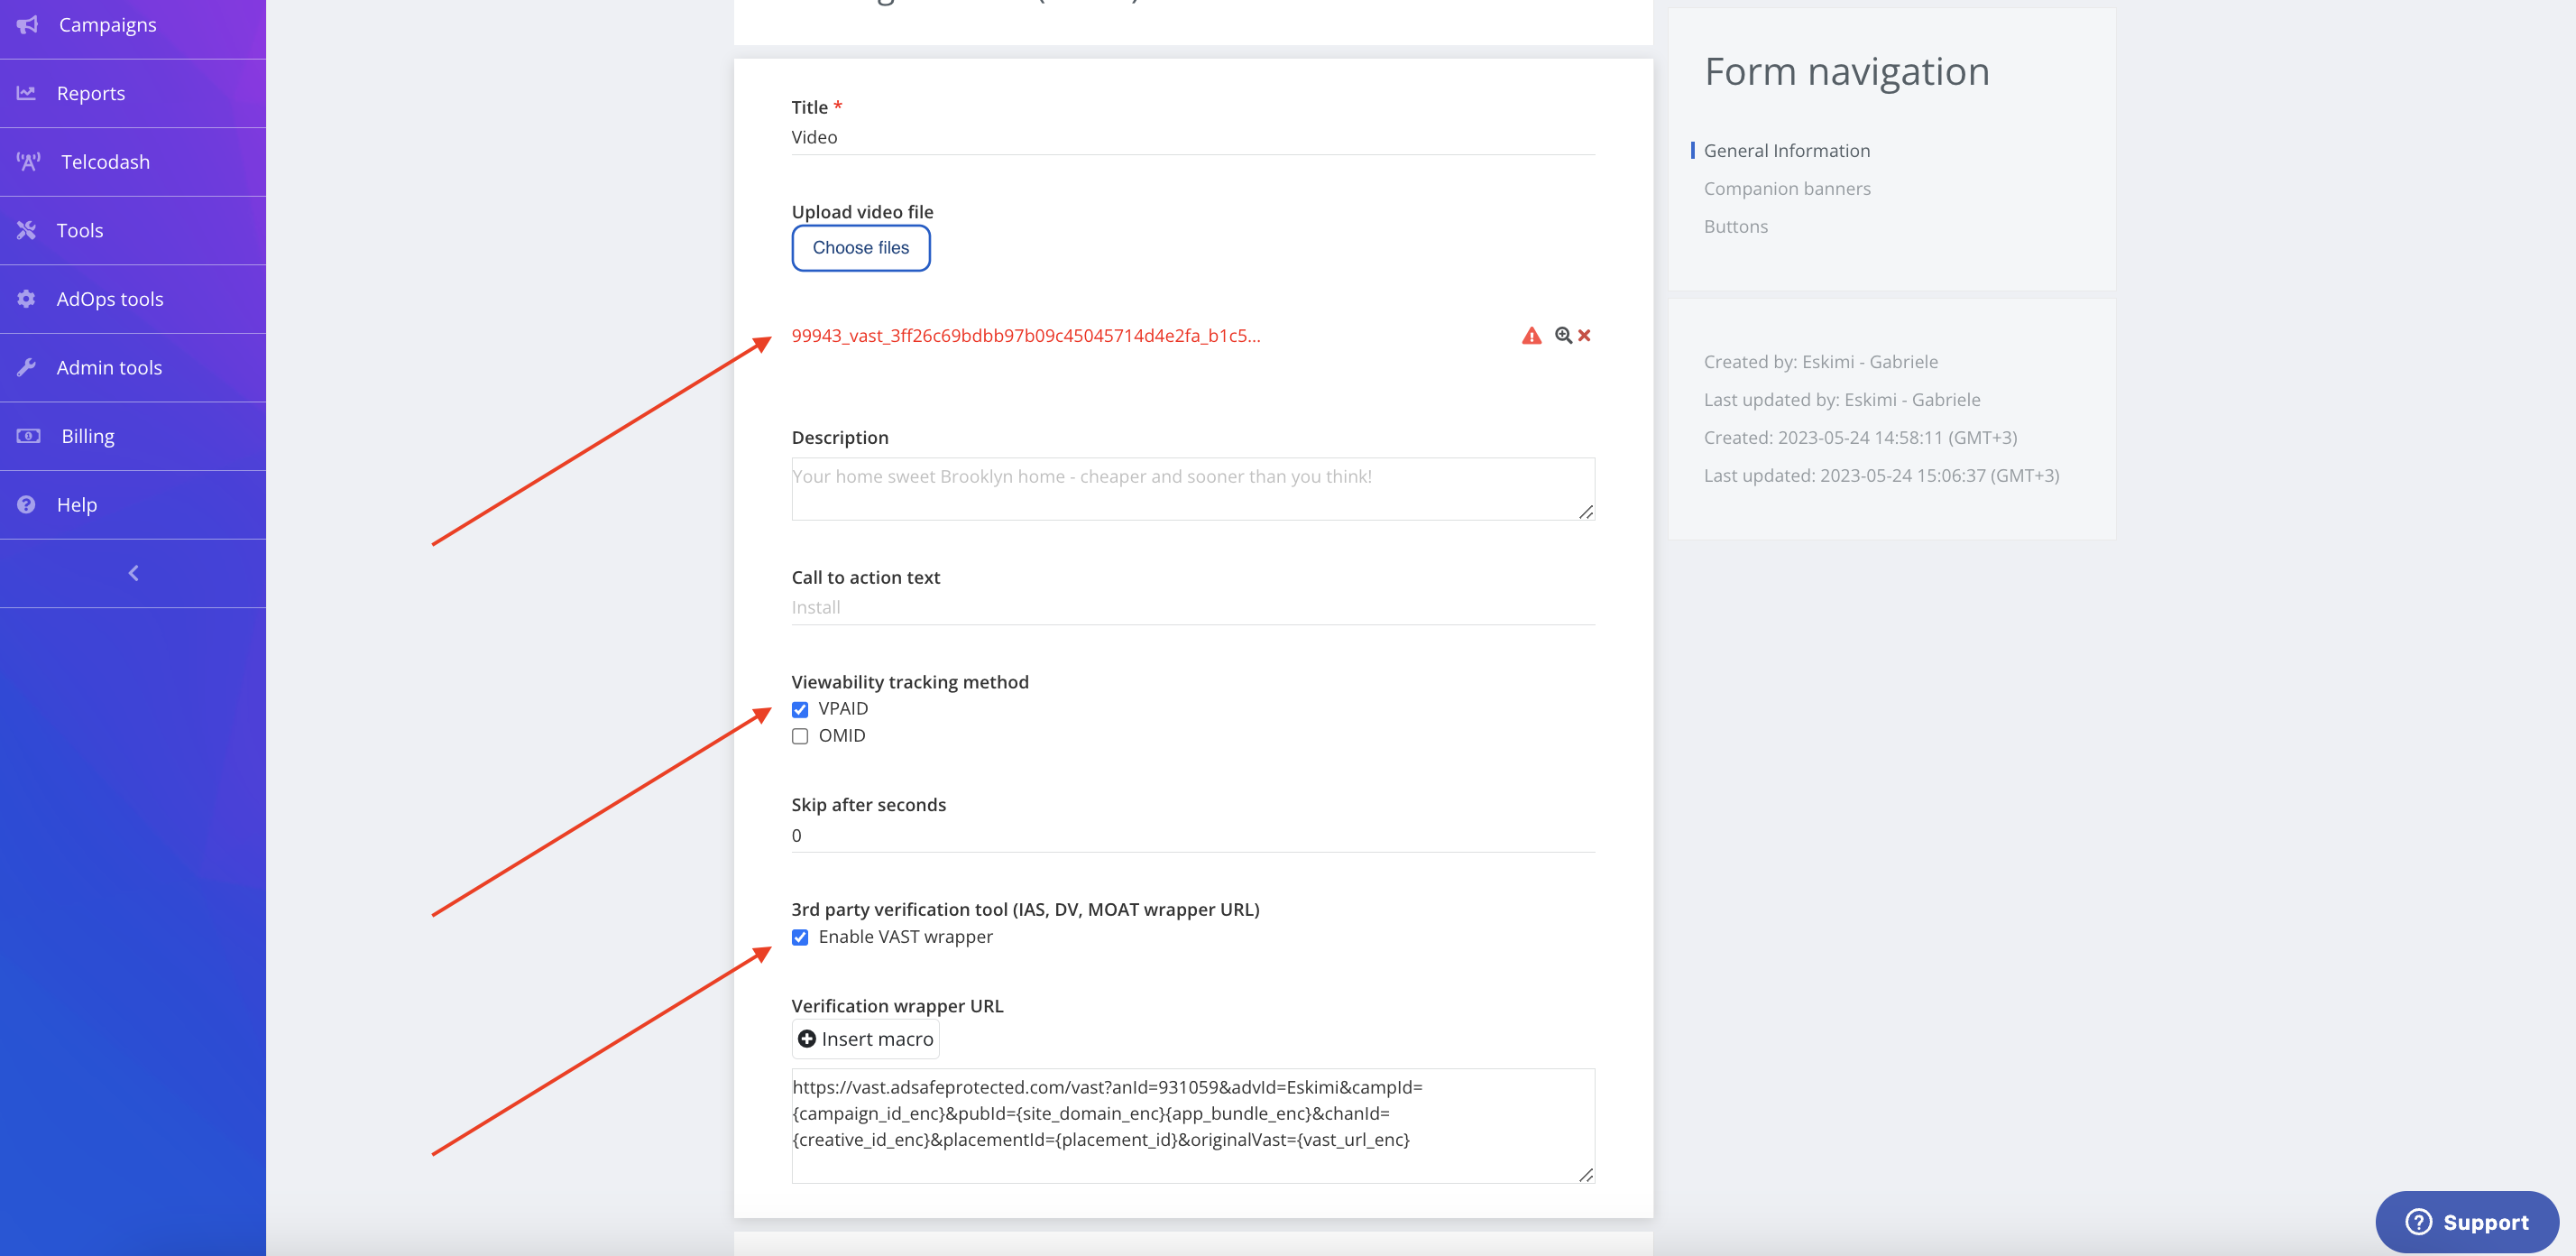
5. Upload your VAST video by selecting Choose file. You should see a successful video upload right below the button.
Select Enable VAST wrapper. The VAST video or tag will be automatically wrapped into the IAS tracker. It is not needed to take the VAST tag from the preview page anymore. VAST wrapper can be enabled at any point of the campaign execution.
The flow was tested and works as intended. However, any challenges can be directly discussed with the product team.
Limitations
1. Eskimi can wrap VAST videos only with Eskimi IAS tracker. If the client wants to wrap the video into their own IAS tracker it is necessary to follow the standard procedure where VAST video tag is taken from the preview page.
2. The wrapping is available for Eskimi IAS tracker. Any 3rd party trackers have to be used in the standard manner. For example, if the client wants to wrap the video into MOAT tracker it will be mandatory to setup the campaign and take the VAST tag from the preview page.
3. Any tracked video metrics will be reflected only on IAS dashboard. However, metrics can be exported manually or automated reports can be enabled to increase transparency with the clients.