Audience Creation Guides
- Behavior Targeting (User Interest Audience)
- Retargeting Geolocation Audience
- Retargeting Site First Party Audience
- Retargeting Apps/Sites Visitors Audience
Behavior Targeting (User Interest Audience)
What is Behavioral Targeting?
Behavioral Targeting (User Interest Audience) allows advertisers to reach users based on their interests and engagement with specific content categories such as sports, entertainment, finance, and more.
Eskimi DSP collects data from IAB-classified websites and apps, aggregating it daily through Data Management Platforms (DMPs). This ensures advertisers can target users actively engaging with selected verticals.
How to create a Geolocation Audience:
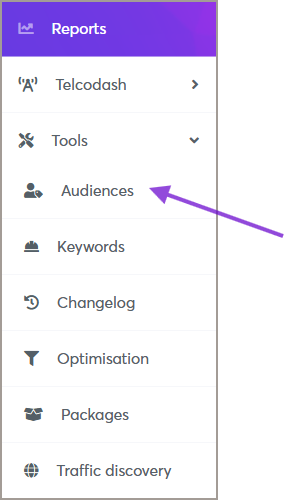
Step 1: Accessing the Audience Management Feature
-
Log in to your Eskimi DSP account.
-
Click on Audiences to access the audience management page.
Step 2: Creating a New Behavioral Audience
-
On the Audiences page, click the Add Audience button (top right corner).

-
A new window will appear—fill in the required information:
-
Audience Name: Enter a descriptive name for your audience.
-
Type: Select Behavioral (User Interests) as the audience type.
-
Country: Choose the country you want to target.
-
Verticals: Select the interest categories that match your campaign goals.

-

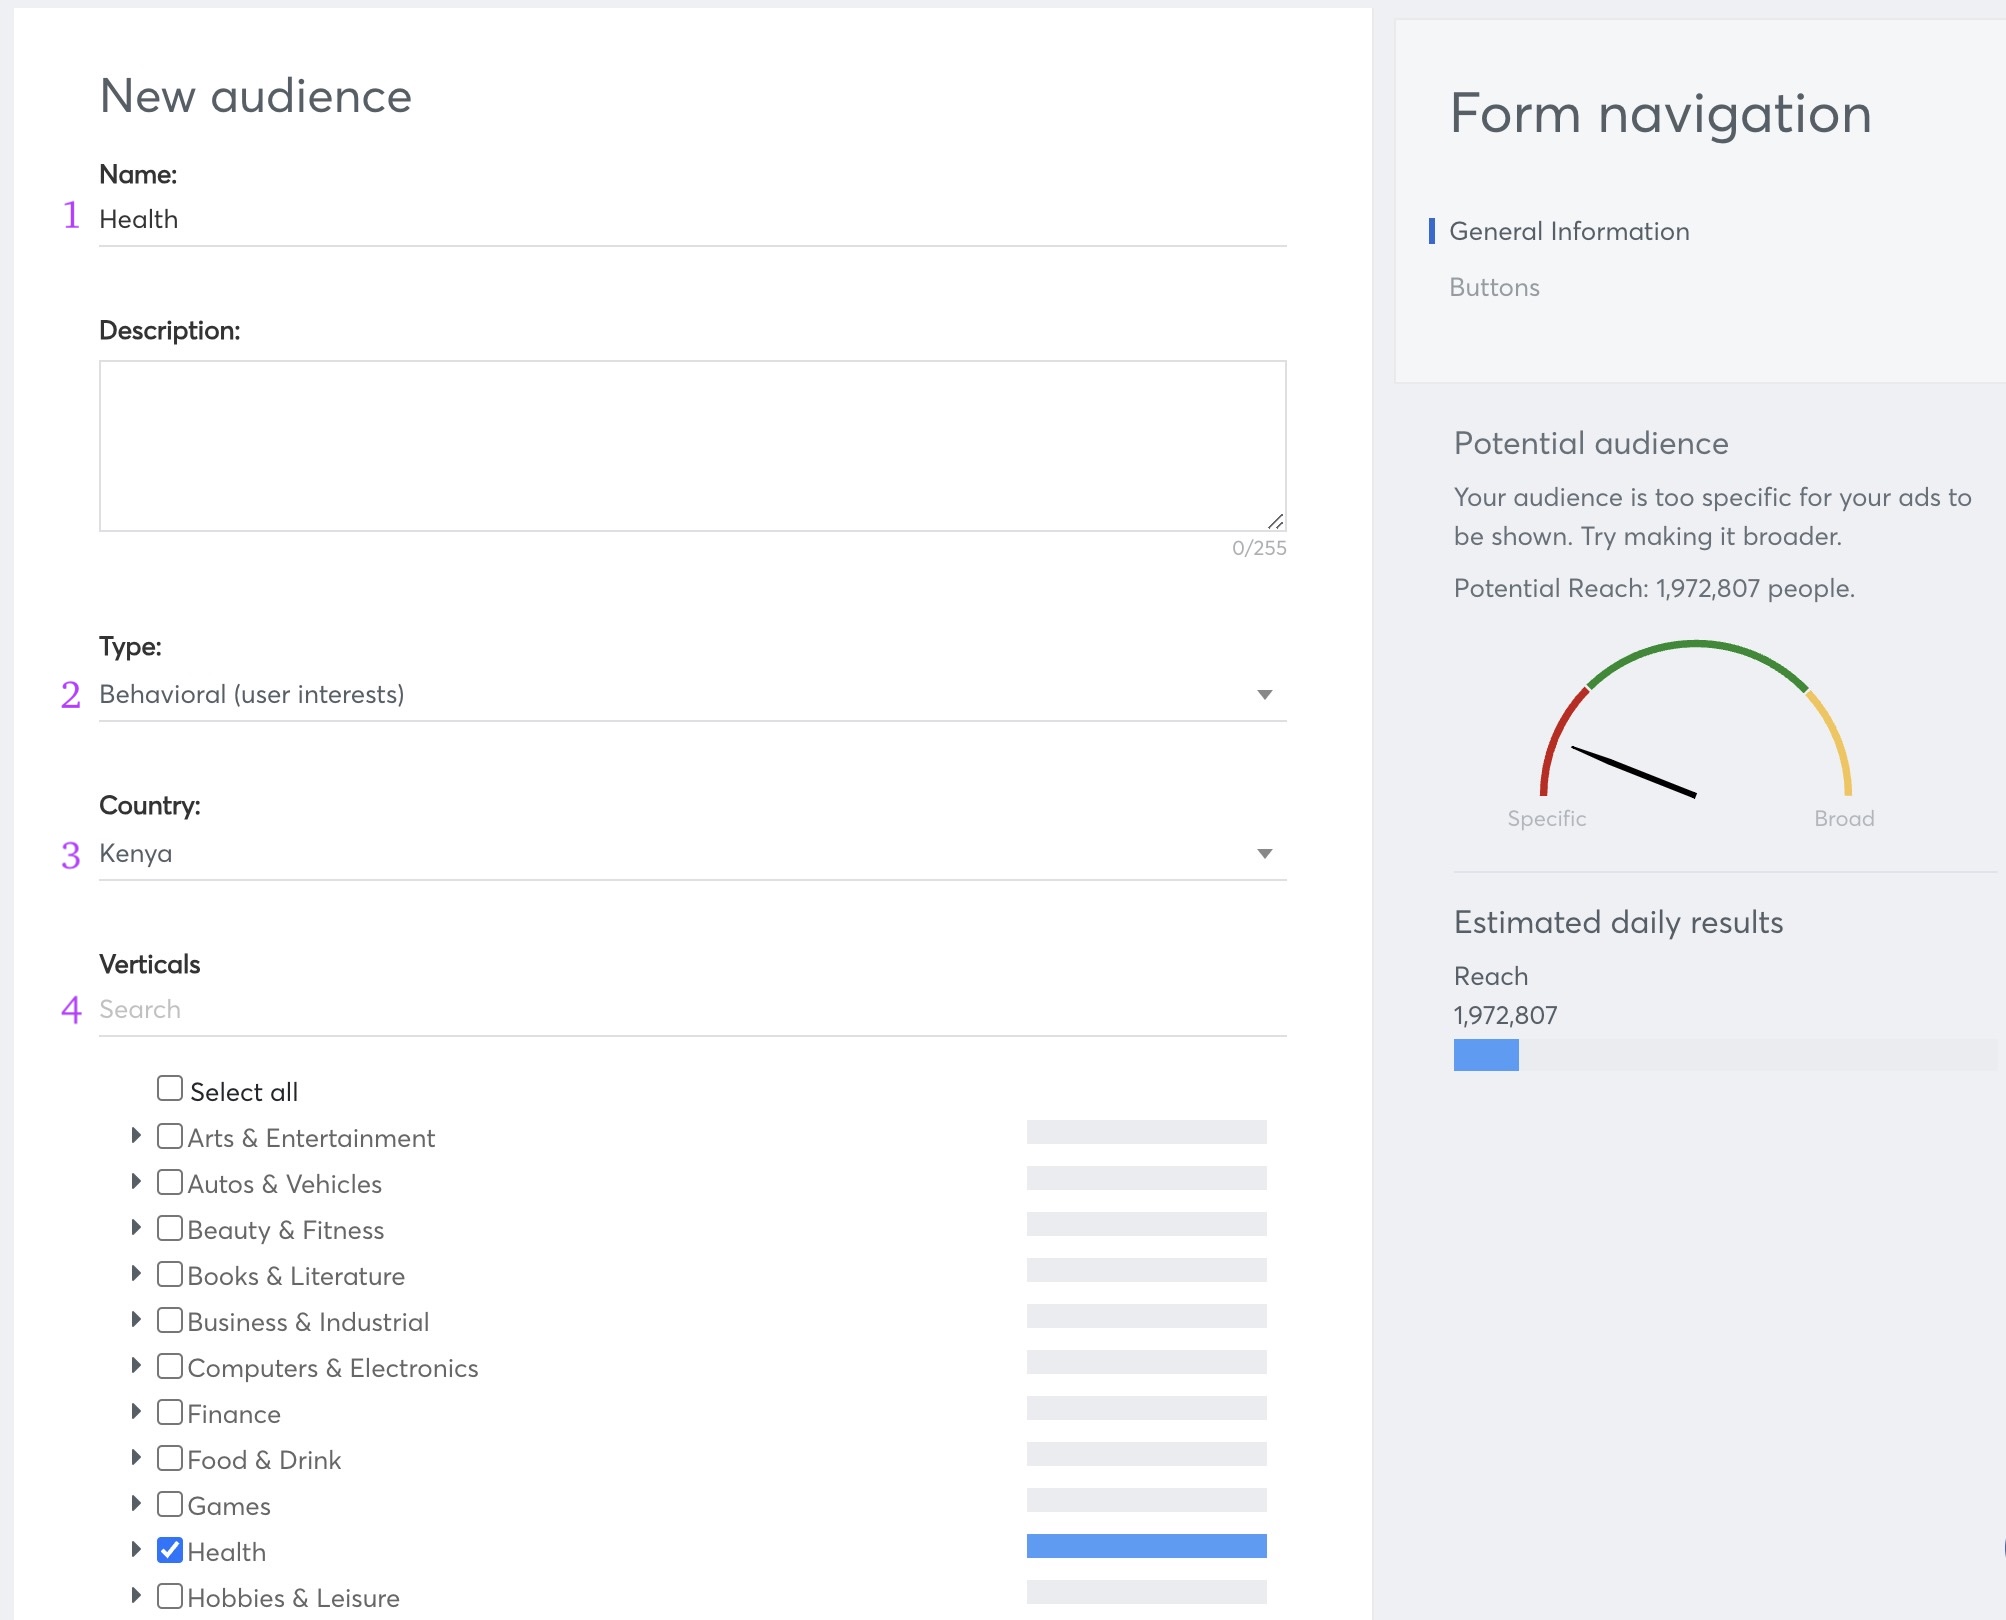
Note: While selecting verticals, you will see the Potential Audience Reach displayed in the right-side widget. This helps estimate the available audience size for your targeting.
-
Click Save to finalize your audience. The created audience will now appear under the DMP Audience Groups list.
Step 3: Applying Behavioral Audience to a Campaign
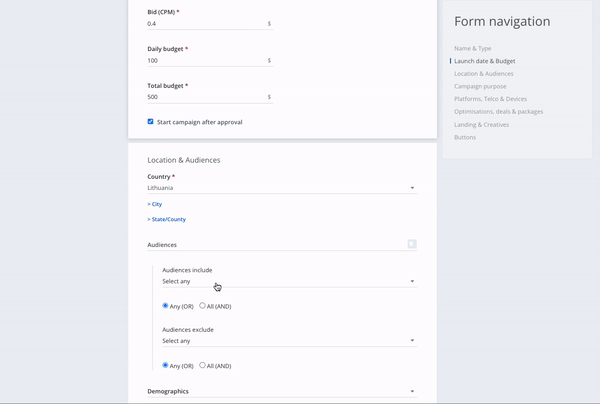
Once your Behavioral Audience is created, you can apply it to your campaign:
-
Open the campaign you want to edit.
-
Navigate to the Audience Targeting section.
-
Select the Behavioral Audience you created.
-
Save the campaign settings.
Retargeting Geolocation Audience
What is geolocation?
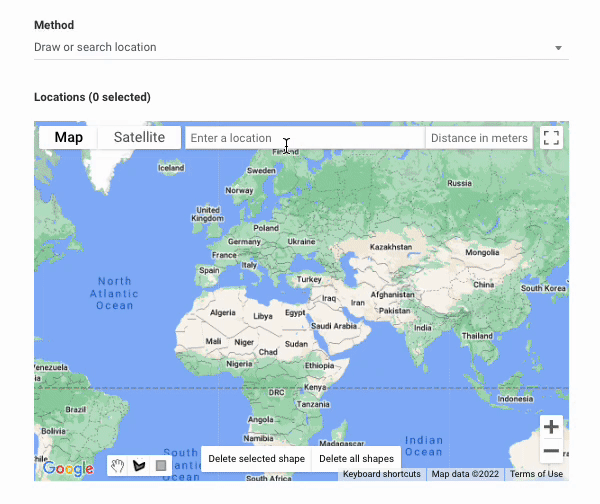
Geolocation is the process of determining a user's or computing device's geographic location using a number of data collection techniques. Eskimi determines the geographic location based on the GPS coordinates while supporting 3 geolocation audience creation methods: simply drawing or searching for the location, uploading GPS coordinates, or postal codes.
Why geolocation?
Retargeting geolocation audience targeting allows reaching highly targeted audiences within a specific location. The data is collected based on the location of devices (GPS) within a specific location and time. The creation of the location and time frame of which devices are being collected and aggregated into that actionable custom audience allows target users from specific locations, even after they have left that geolocation.
How to create a Geolocation Audience:
Step 1: Accessing the Audience Management Feature
-
Log in to your Eskimi DSP account.
-
Click on Audiences to access the audience management page.
Step 2: Creating a New Behavioral Audience
- On the Audiences page, click the Add Audience button (top right corner).
-
A new window will appear—fill in the required information:
-
Audience Name: Enter a descriptive name for your audience.
-
Type: Select Retargeting (geolocation) as the audience type.
-
Date: Choose date interval - here you indicate how long the audience will be collected
- Method: Choose the Method of data collection.
-
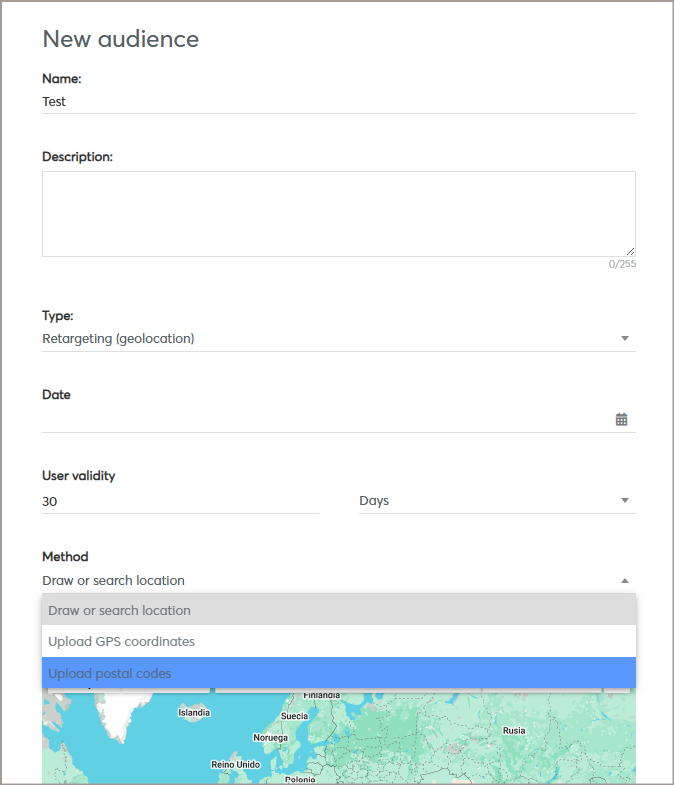
A geolocation audience can be created using 3 methods:
- Drawing or searching for the specific location - you can either type in the specific location and indicate the radius (in meters), or draw the shape covering the targeted location
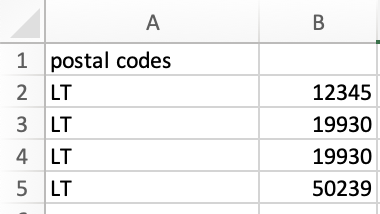
- Uploading GPS coordinates - this method requires uploading a CSV file with latitude in the first column and longitude in the second column

- Uploading postal codes - this method requires uploading CSV file with a 2-letter code in the first column and the postal code in the second column.
While creating a geolocation audience, it is required to indicate:
- name of the audience
- description (optional)
- type of the audience - Retargeting (geolocation)
- date (the period of time indicated for how long the audience will be collected)
- user validity (the period of time for how long the user is targeted. E.g., 30 minutes - meaning that after 30 minutes, the user that was seen in the specific location won't be retargeted anymore)
- method (draw or search location, upload GPS coordinates, upload postal codes)
- radius (the targeted location area in meters)
Step 3: Applying Behavioral Audience to a Campaign
Once your Geolocation Audience is created, you can apply it to your campaign:
-
Open the campaign you want to edit.
-
Navigate to the Audience Targeting section.
-
Select the Geolocation Audience you created.
-
Save the campaign settings.
Limitations
- Running specific types of creatives (e.g., VAST or Native) can limit the retargeting of possible users. It is recommended to use standard display banners in formats such as 300x250, 300x600, 320x480, 320x50, etc.
- The more narrow the location targeting is chosen, the fewer users retargeting the geolocation audience will collect. In some cases, 0 users may be collected due to very narrow location targeting or non-compliance with specific conditions (GPS must be enabled in the device, user must browse in the app or website which is reached by Eskimi via oRTB). Therefore, it is recommended to evaluate the location's popularity and size, and based on that, determine the radius.
- As the biggest part of GPS information for geolocation audience will come from users' apps, it might result in a higher reach of apps inventory during the campaign.
- Due to strict iOS privacy settings, most of geolocation audience users will be Android users.
- It is recommended to create the retargeting geolocation audience 2-5 days before the start of the campaign in order to evaluate the campaign's reach and overall potential.
The video below is a representation of retargeting a geolocation audience
Retargeting Site First Party Audience
First-party data is defined as data that was collected directly about your audience. In most cases, in Eskimi, we are collecting first-party data from your own website.
How is first-party data collected?
First-party data is collected by adding a pixel to a customer website that collects information about the behaviors and actions of the audience and records it. Whenever a visitor lands on or clicks on the website, looks at products, or fills out a survey, that data can be collected.
How to create a User First Party Audience:
Step 1: Accessing the Audience Management Feature
-
Log in to your Eskimi DSP account.
-
Click on Audiences to access the audience management page.
Step 2: Creating a New Behavioral Audience
- On the Audiences page, click the Add Audience button (top right corner).
-
A new window will appear—fill in the required information:
-
Audience Name: Enter a descriptive name for your audience.
-
Type: Select Retargeting (Site First Party) as the audience type.
-
Date: Choose date interval - here you indicate how long the audience will be collected
- Rule: Choose the rule - "Anyone visiting the website" OR "Users visiting specific web pages"
-
Step 3: Applying Retargeting Site First Party Audience to a Campaign
Once your Retargeting Site First Party Audience is created, you can apply it to your campaign:
-
Open the campaign you want to edit.
-
Navigate to the Audience Targeting section.
-
Select the Retargeting Site First Party Audience you created.
-
Save the campaign settings.
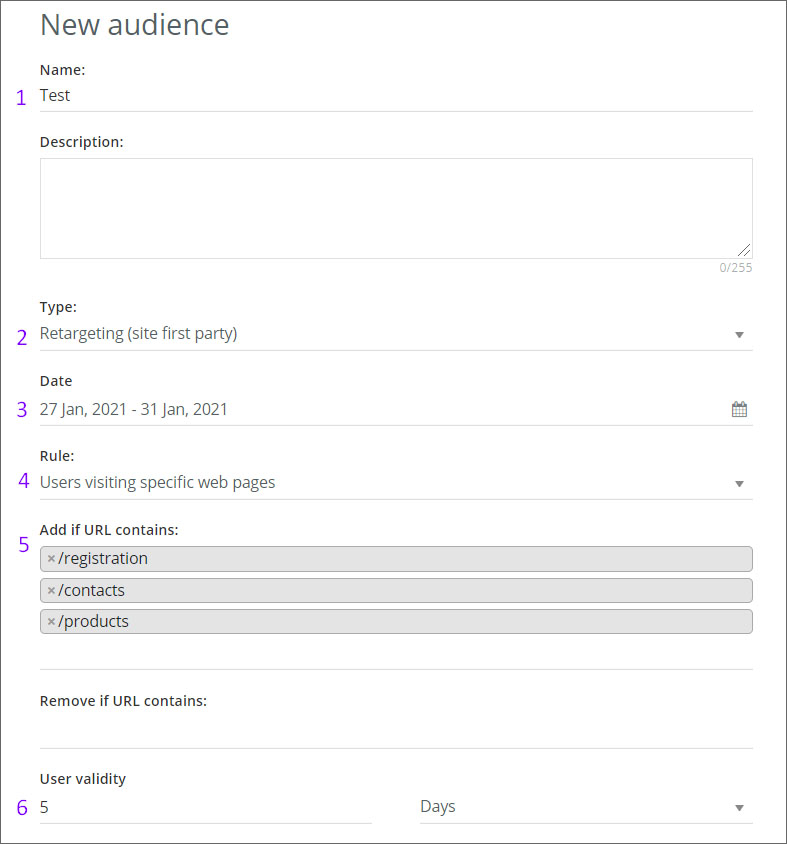
Let's now take a hypothetical situation: a customer wants to track audiences who enter the website's registration page, products page, and contact page.
Using the old tracking codes, we had to generate 3 separate codes which had to placed in these specific pages. But using the new tracking pixel, it is possible to use the same audience pixel on each website page, the rest is configured through the dashboard.
- To start the audience configuration, change the Rule from "Anyone visiting the website" to "Users visiting specific web pages"
- A new field named "Add if URL contains:" will appear
-
Since we have a hypothetical situation, add the URLs. For exampl,e registration URL will be "/registration", products page URL "/products", contacts page URL "/contacts"
- After adding the URL's set the "User validity" - here you indicate how long the collected audience will be stored.
When all variables are set, click "SAVE" and that's it, your Audience is configured and saved.
Note: if a customer wants to collect audience from 2 or more different websites, then only one tracking pixel is needed (but the same pixel must be installed on all websites).
But it's also important to keep in mind that the tracking pixel is linked only to one Eskimi DSP customer account. If a customer wants to collect an audience from 2 or more websites and campaigns will be launched from different accounts, then depending on the number of accounts, there will be a corresponding number of tracking pixels.
Retargeting Apps/Sites Visitors Audience
Creating an App & Site Audience allows to retarget users who have visited specific Apps&Sites and show them relevant ads when they visit other websites.
How to create an Apps/Sites Visitors Audience:
Step 1: Accessing the Audience Management Feature
-
Log in to your Eskimi DSP account.
-
Click on Audiences to access the audience management page.
Step 2: Creating a New Behavioral Audience
- On the Audiences page, click the Add Audience button (top right corner).
-
A new window will appear—fill in the required information:
-
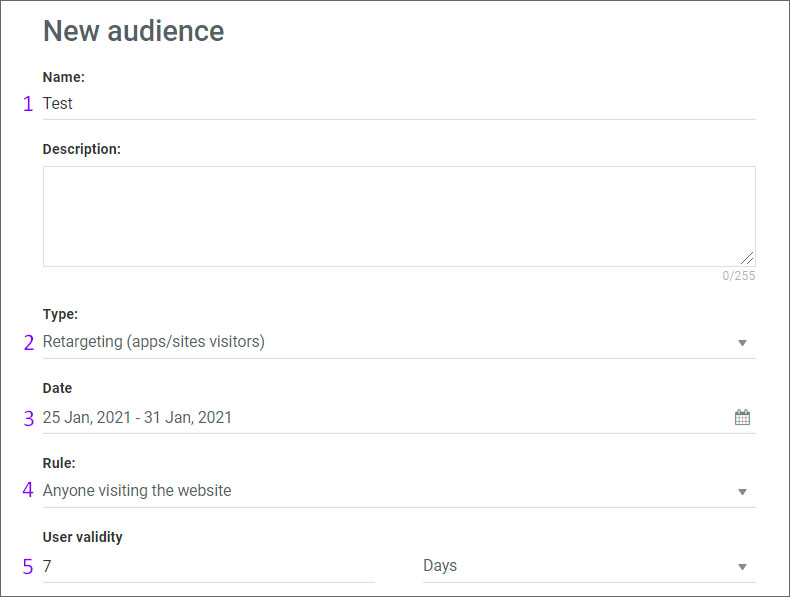
Audience Name: Enter a descriptive name for your audience.
-
Type: Select Retargeting (Apps/Sites Visitors) as the audience type.
-
Date: Choose date interval - here you indicate how long the audience will be collected
- Rule: Choose Rule - Anyone visiting the website (means that users will be collected from all sections of the site/app) OR Users visiting specific web pages (means that users will be collected from a specific section of the site/app (then you will need to indicate keyword for the specific section))
- User Validity: Indicate the user validity - here, you indicate how long the collected audience will be stored
-
- Country: Indicate the country from which you want the audience to be collected.
- Exchange: Also, you can choose from which exchange and what type of audience should be collected.
- Apps/Sites: Then you will need to choose Apps/Sites you wish to collect users from.
There are 2 methods to choose Apps/Sites.
1) The first method is to enter a site name in the search column and select the required one. Then the selected sites will appear in a separate list.
2) The second method is uploading apps/sites names from the CSV file. CSV file requirements - sites/apps must be entered in a column without additional characters (such as semicolons, spaces, etc.). So it is basically a domain name or app bundle if this is an app.
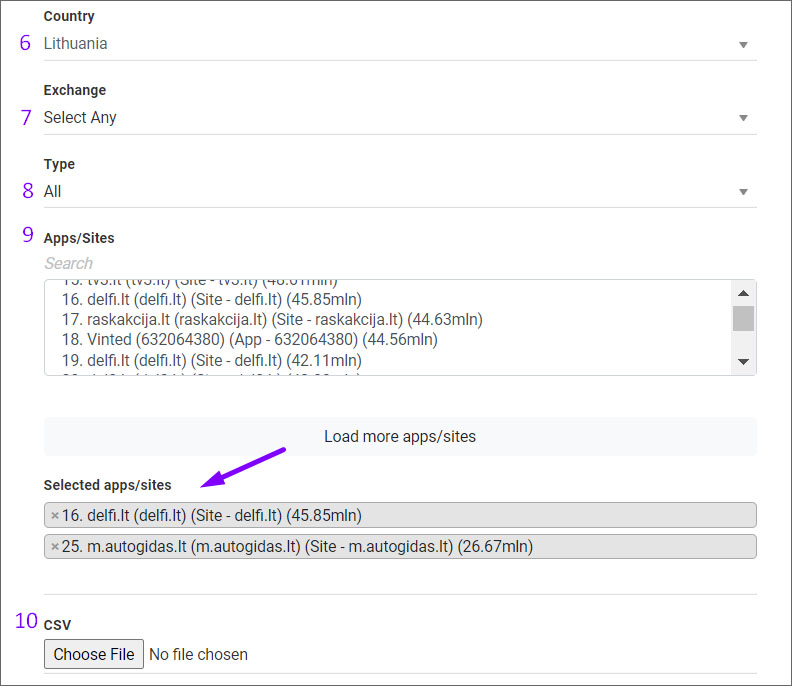
- Hit "Save" and your created audience will be saved in the list under First party. After the audience is updated by the system, you will see the audience pool gathered.
Step 3: Retargeting Apps/Sites Visitors Audience to a Campaign
Once your Geolocation Audience is created, you can apply it to your campaign:
-
Open the campaign you want to edit.
-
Navigate to the Audience Targeting section.
-
Select the Retargeting Apps/Sites Visitors Audience you created.
-
Save the campaign settings.
