New creative formats
Explore the latest formats available from Creative Studio and discover new ways to bring campaign ideas to life. This chapter introduces each format through clear explanations, visual examples and practical guidance on where it works best. You’ll also find the creative assets, specifications and briefing information required to get started. Use it when planning a campaign, preparing a client proposal or looking for a more engaging alternative to standard display advertising.
Breakout Ads
*Preview here.
BREAK THE FRAME: BANNERS THAT BLEND SEAMLESSLY INTO YOUR SITE
WHAT ARE BREAKOUT ADS?
This new format uses dynamic animations to pull attention out into the page and guide it back to the banner as you scroll down the page.
BENEFITS OF BREAK OUT ADS
👁️ Disrupts the Scroll
- Gets users to pause by breaking passive browsing
📐 Expands in Page
- 3D assets dynamically grow and change within a publishers website
⭐️ Heightened Immersion
- Attention verification paired with 3D assets pulls users deeper into the brand story
Add it to your presentation using our Pitch-ready slides here.
See Creative Requirements here.
*Preview here.
SET UP REQUIREMENTS
This table outlines the end-to-end SSP campaign workflow, the standard campaign setup process for AdOps, and the test campaign setup process for the Creative Studio team.
Requirement: SSP availability is strictly mandatory for this implementation. Creative planning and discussions will remain on hold until SSP is supported in the market.
SSP CAMPAIGN WORKFLOW
| STEPS | CLARIFICATION | OWNERSHIP |
|
1. Make a deal with the client |
- |
BDM
|
|
2. Receive a brief from the client |
- |
AM / BDM
(Depends on the market and client, based on the internal agreement between the AM and BDM teams)
|
|
3. Check the availability of placements in the Eskimi SSP inventory |
Scenario 1: If client wants
Scenario 2: If no specific sites mentioned or publishers are exist in our Eskimi SSP inventory:
|
AM / BDM
(Depends on the market and client, based on the internal agreement between the AM and BDM teams) |
|
4. Create the placement and send the tag to the publisher |
|
SSP team |
|
5. Prepare the campaign media plan |
|
AM |
|
6. Develop creatives |
The process depends on the creative type:
Scenario 1: static banners or templated Rich Media:
Scenario 2: Custom Rich Media or high-impact ads:
|
Scenario 1: AdOps Scenario 2: AM / Creative team
|
|
7. Confirm creatives with the publisher (optional; depends on the agreement with the publisher) |
For some high-impact campaigns:
When the creative is ready:
|
AdOps / SSP team / Creative team
(Responsibilities are described in the clarification column) |
|
8. Set up the campaign |
Once the media plan and creative preview have final approval, the campaign is ready for setup
|
AdOps |
|
9. AdOps informs the SSP Operations Specialist about the campaign |
Request traffic in the Slack channel #ssp_adops, or in the channel for the specific market, EG: #ssp_croatia or #ssp_greece - include:
Publisher availability must be checked and confirmed with the SSP team before this step (See Step 3) |
AdOps |
|
10. Check traffic and delivery |
|
AdOps / SSP team |
|
11. Request screenshots from all publishers |
|
AdOps / SSP team |
|
12. Campaign ends |
This follows the usual process for any other Eskimi DSP campaign
|
AdOps |
NOTE: Inform the SSP team about the traffic you will need as far in advance as possible. This allows time for traffic ordering, implementation and optimisation where required. Weekends and national holidays may delay traffic opening by SSP partners.
NOTE: Allow up to 24 hours for creative testing after the creative has been approved. This time is needed to confirm that the creative performs correctly and that all required metrics are measured accurately.
SSP CAMPAIGN SETUP FOR ADOPS
Eskimi SSP campaigns are set up differently from standard Eskimi DSP campaigns. Follow these steps:
- Start with the usual campaign setup and creative upload
- Check SSP publisher prices in the online document: https://bit.ly/384waVQ
- You must have access from the SSP team to open this file
- The campaign bid after margin must not be lower than the amount listed in the document
- Do not select targeting options for SSP campaigns unless the campaign is running too quickly or the client does not allow targeting to be removed; do not add impression capping or auto-optimisation
-
Create a package containing the required domains
-
If the site list is large, one common package may be used
-
If you need to control delivery separately for each publisher, create a separate package for each publisher
-
Find site IDs here: https://stats.eskimi.com/admin/adops/AppsSitesLookup/
-
Select IDs for the required exchange and add them to the package
-
In some cases, placement_id must be added instead of site_id
-
This is used when several campaigns run with one publisher at the same time, helping to keep trackers organised and control delivery by campaign or placement
-
The SSP team will confirm which ID is required
-
-
- If delivery is required on specific subdomains or site sections:
- Prepare a keyword list containing the section names used by the subdomain, such as lifestyle or sports
- In targeting settings, select Context options, then Find in URL
- Under Match options, choose Exact word type match
- Upload the keyword list in CSV format
- Set Default to No and Status to Enabled
- Assign the targeting to the relevant account user
- If the publisher provides traffic through a PMP Private Marketplace deal, AdOps must contact the publisher and request:
- Buyer ID
- Brand
- Country
- Creative type and sizes
- Campaign duration
- Position and targeting, if required
- After the publisher confirms the setup and provides the Deal ID, complete the deal setup in the DSP
- Select the exchange where the deal was created instead of the default Eskimi exchanges
- Use deal targeting in a separate campaign split where possible to improve performance control
- Select Allow multiple bids for all SSP campaigns, unless the client specifically requests that ads are not shown this way
- Select the correct exchange:
- Eskimi standard for standard banners
- Eskimi floating for floating banners
- Eskimi takeover for takeover banners
- GroupM or GroupM floating for campaigns running for WPP Kenya
- Check the CPM for every publisher added to the campaign
- Add and check the margin. The buying CPM must not be lower than the publisher CPM
- When setup is complete, use the following form to check whether anything has been missed
SSP TEST CAMPAIGN SETUP FOR CREATIVE TEAM
An Eskimi SSP test campaign is set up in a similar way to a standard SSP campaign:
- Upload the creatives
- Create the package for the site or placement where the creative will be tested
- Go to Tools > Packages > New package
- Enter the package name
- Select the package type and country
- Upload a CSV file containing comma-separated values
- Before uploading, confirm that you copied the correct publisher or placement ID for the creative type, such as takeover or floating
- EG: To test a floating ad in Lithuania, copy the floating-ad publisher or placement ID, place it in Excel, save it as a CSV file, and upload it
- Complete the campaign setup page as follows:
- Creative type: Banner
- Campaign type: Display Ads
- Name: Enter the name of the test
- Campaign goal: Awareness
- Primary campaign objective: CPM, then enter the bid value
- Pre-optimisation based on historical placement stats: Unselected
- Impression capping: Removed
- Date: Select the test date
- Total budget: Enter a small test budget, for example USD 10
- Daily Budget Pacing: Spread daily budget ASAP
- Bid (CPM): Enter the same value used for the primary campaign objective
- Country: Select the relevant country
- Deals and packages: Confirm that Eskimi floating or Eskimi takeover is selected, depending on the test
- Package: Select the test package (test sites and placements for Lithuania and Latvia may be found in the pinned messages in #ssp_lt and #ssp_lv)
- For a site package:
- Select Include Only
- Disable impression capping
- Disable auto optimisation
- Disable budget pacing for this package
- Disable App/site category exclusion
- For a placement ID package, select Include Only
- For a site package:
- Click URL: https://www.eskimi.com/campaigns
- Ad domain: eskimi.com
- Selected creative sets: Select the creatives
- Select Publish
The campaign will now have Pending status. The final step is to approve it:
- Go to Approve page → Ad Exchanges
- Scroll to the end and select E-SSP Partners
- Select the exchange that matches the banner type: Floating or Takeover
*Download Creative Requirements as a PDF here.
*Preview here.
Contextual Creative
⚡ QUICK ANSWER
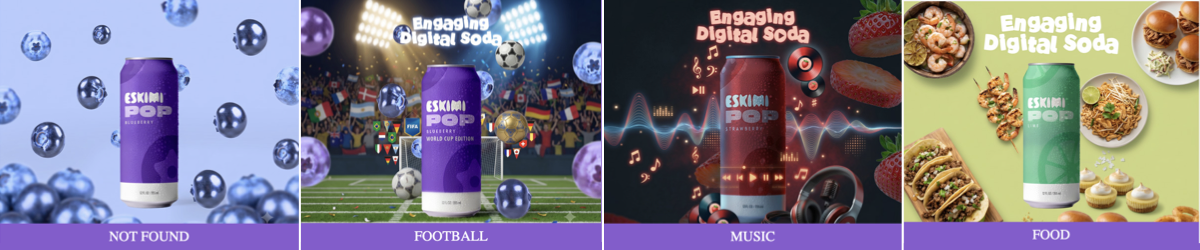
Dynamic Contextual Creative allows one banner to display different creative versions depending on the content of the page where the advert appears.
Instead of showing the same message everywhere, the banner can adapt to relevant topics such as food, football or music.
-
Several pre-built creative versions
-
A list of keywords linked to each version
-
One default version
When the advert is served, Eskimi receives contextual keywords describing the page. The banner compares these with the approved keyword lists and displays the most relevant creative version.
If there is no matching keyword, the default version is shown.
*View the interactive preview here.
💬 SIMPLE CLIENT EXPLANATION
Contextual Creative connects each impression with the most relevant pre-approved message available for that page. It allows one banner to adapt its visual or message according to the topic of the page. We create several approved versions in advance and connect each one to relevant keywords. When contextual keyword data is available, the banner automatically displays the best-matching version. If there is no match, it displays the approved default creative.
- One campaign idea, multiple relevant versions
- One creative package, multiple contexts
- Built for different content moments
- Make every placement more relevant with Contextual Creative
Add it to your presentation using our Pitch-ready slides here.
Need more detail? Read the explanations below👇
🧠 WHAT DOES “CONTEXTUAL” MEAN?
Contextual advertising uses the subject of the page to determine which advert or creative version to show. For example:
| PAGE CONTENT | CREATIVE SHOWN |
|---|---|
| Recipes, restaurants or food | Food creative |
| Football results or sports news | Football creative |
| Artists, concerts or playlists | Music creative |
| No matching topic | Default creative |
This helps the advert feel more relevant to what the person is currently reading.
CONTEXT-BASED RELEVANCE
The creative version is selected using the surrounding page content rather than the viewer’s personal profile. It does not use the person’s identity or require us to know who they are.
🔍 WHAT THIS PRODUCT IS - AND IS NOT
🔍 WHAT THIS PRODUCT IS - AND IS NOT
| IT IS | IT IS NOT |
|---|---|
| One master banner containing several approved creative versions | A new banner generated live for every page |
| Based on the topic of the page | Based on the identity of the user |
| Controlled by predefined keyword lists | AI making independent creative decisions |
| Designed to improve contextual relevance | A guarantee that keywords will be available on every impression |
| Supported by a default fallback creative | Dependent on a match for the advert to display |
🎯 WHAT IS IT GOOD FOR?
Dynamic Contextual Creative is useful when one campaign can connect naturally with several content categories.
It can help advertisers:
-
Make one campaign relevant across different page topics
-
Adapt the visual message without creating separate campaign setups
-
Match products or messages to suitable content environments
-
Reduce the repetition of showing one visual everywhere
-
Test different creative approaches within one campaign
-
Scale a central campaign idea across multiple interests
-
Maintain a relevant fallback when no context matches
CONTEXT-LED CREATIVE SELECTION
Unlike standard creative rotation, which usually selects ads according to delivery rules or performance, Contextual Creative selects an approved version based on the content of the page where the ad appears.
| STANDARD CREATIVE OPTIMISATION | CONTEXTUAL CREATIVE |
| Selects or prioritises creatives using rotation rules or performance data | Selects a creative using the content of the current page |
| May learn which version performs better overall | Checks whether available page keywords match a predefined creative version |
| Does not necessarily consider what the person is currently reading | Connects the message to the surrounding content |
| Usually requires separate uploaded creatives | Can hold the approved contextual versions inside one creative package |
SIMPLER SET UP REDUCES OPERATIONAL WORK
Multiple approved contextual versions can be included in one creative package, reducing the need to build a separate campaign setup for every topic.
💡 POSSIBLE USE CASES
- FMCG: Show different products or serving occasions alongside relevant recipes, food articles or lifestyle content
- SPORTS SPONSORSHIP: Display a sports-themed version on football or tournament content while using a broader brand version elsewhere
- MUSIC AND ENTERTAINMENT: Use different creative versions around artist news, streaming, festivals or entertainment content
- RETAIL: Match product categories with relevant page topics, such as fashion, electronics, homeware or beauty
- TRAVEL: Adapt the creative around destination, food, culture, adventure or family-travel content
- AUTOMOTIVE: Show different messages around performance, technology, family travel or sustainability
✅ WHEN TO RECOMMEND IT
This format works best when:
-
The campaign has one central brand idea
-
The idea can be adapted into at least two meaningful contexts
-
Each context has a clear visual or message
-
The client has enough assets to build the variations
-
Relevant page topics can be described using clear keywords
-
A suitable default creative can be created
-
The campaign will run across enough relevant content to make adaptation valuable
⚠️ WHEN IT MAY NOT BE THE RIGHT FORMAT
It may not add value when:
-
The campaign has only one message and one visual
-
The client cannot provide assets for multiple versions
-
The categories are too similar to create meaningful differences
-
The required context cannot be identified through clear keywords
-
The client expects unique content to be generated in real time
-
The campaign depends on every impression receiving a contextual match
-
The selected inventory does not consistently provide contextual keywords
Speak to Creative Studio before promising the format or the number of contextual versions.
⚙️ HOW IT WORKS
⚙️ HOW IT WORKS
1. WE CREATE THE CREATIVE VERSIONS
Creative Studio builds several approved visual versions inside one master banner. For example:
-
Food
-
Football
-
Music
-
Default
These versions must be created and approved before the campaign launches.
2. WE CREATE KEYWORD LISTS
Each creative version is connected to a list of relevant words and phrases - the delivery logic is built with hard coded keywords. For example:
| CATEGORY | EXAMPLE KEYWORDS |
|---|---|
| Food | Recipe, chicken, vegan, crispy, restaurant |
| Football | FIFA, match, striker, goalkeeper, Premier League |
| Music | Playlist, concert, festival, remix, Afrobeats |
The final keyword lists should reflect the campaign, market, language and content the client wants to target.
3. THE PLATFORM PASSES THE PAGE KEYWORDS
When available, the Eskimi platform passes contextual keywords into the banner using the {contextual_keywords} macro.
A macro is a placeholder that the platform automatically replaces with information when the advert is served.
4. THE BANNER SELECTS THE BEST MATCH
*Banner: in this setup, a banner = one package containing several pre-built and pre-approved versions of the campaign creative assets.
A suitable creative is always available, even when contextual keyword data is not.
📦 WHAT WE NEED FOR A CREATIVE BRIEF
📦 WHAT WE NEED FROM THE CLIENT
CAMPAIGN INFORMATION
-
Campaign objective
-
Target market
-
Campaign language or languages
-
Target audience
-
Planned media investment
-
Campaign dates
-
Required banner sizes
-
Final destination URL
CREATIVE DIRECTION
-
The central campaign idea
-
The required contextual categories
-
The message for each category
-
The default message
-
Final CTA
-
Visual references
-
Any mandatory legal copy
CREATIVE ASSETS
-
Editable, layered source files
-
Brand guidelines
-
Logos
-
Font files
-
Product images
-
Backgrounds or lifestyle imagery
-
Any category-specific assets
*See "What Are Open Files?" for accepted editable file types.
📝 HOW TO PLAN THE CREATIVE VERSIONS
Each contextual version should feel clearly relevant while still belonging to the same campaign. For example:
| ELEMENT | WHAT CAN CHANGE |
|---|---|
| Brand identity | NO |
| Main campaign idea | NO |
| Product | YES |
| Background | YES |
| Supporting images | YES |
| Headline | YES |
| Animation details | YES |
| CTA | YES |
| Legal copy | NO |
The differences should be meaningful. Changing only a small decorative element may not create enough value to justify a dynamic setup.
🛟 THE DEFAULT CREATIVE
The default creative is shown when:
-
Contextual keywords are unavailable
-
None of the keywords match
-
The page topic falls outside the planned categories
The default should therefore be a strong, complete advert that can work in any suitable environment. It must not look like an error message, placeholder or less important version.
🛠️ SETUP PROCESS
🛠️ SETUP PROCESS
STEP 1: CONFIRM THE OPPORTUNITY
STEP 2: AGREE ON THE CATEGORIES
Confirm the creative categories before production begins. For example:
-
Food
-
Football
-
Music
-
Default
Adding new categories later may affect the scope and delivery timeline.
STEP 3: PROVIDE THE ASSETS
Supply all editable files, copy, logos, fonts, product images, category-specific assets and legal requirements.
STEP 4: AGREE ON THE KEYWORDS
Create and review a keyword list for each category. Confirm languages, local terminology and any excluded topics.
STEP 5: BUILD THE CREATIVE
Creative Studio designs the versions and develops the matching logic inside one master banner.
STEP 6: REVIEW EVERY VERSION
The client must review and approve:
-
Each contextual creative
-
The default creative
-
The keyword categories
-
Copy and CTA
-
Legal requirements
-
The overall banner behaviour
STEP 7: LAUNCH
The campaign team confirms that the {contextual_keywords} macro is available and correctly passed into the banner.
Final availability may depend on the selected inventory and whether contextual keyword data is supplied for the impression.
🛠️ SETUP PROCESS
❓ FREQUENTLY ASKED QUESTIONS
❓ FREQUENTLY ASKED QUESTIONS
- IS THE CREATIVE GENERATED LIVE?
- No; all creative versions are designed, built and approved before launch
- DOES IT USE AI?
- Not to generate the advert at serve time; the banner follows predefined matching rules and approved keyword lists
- WHAT HAPPENS IF NO KEYWORDS ARE AVAILABLE?
- The default creative is displayed
- DO WE NEED A SEPARATE BANNER FOR EVERY CATEGORY?
- We need a separate visual version for each category, but the versions are contained inside one master creative set
- CAN THE COPY CHANGE?
- Yes; copy may change by category if this is agreed, supplied and approved before launch
- CAN WE ADD MORE CATEGORIES AFTER PRODUCTION STARTS?
- Possibly, but this changes the production scope and may affect the timeline
- Possibly, but this changes the production scope and may affect the timeline
- HOW MANY CATEGORIES SHOULD WE USE?
-
Use enough categories to make the campaign meaningfully relevant, but not so many that the assets, keywords and approval process become difficult to manage
-
Creative Studio will confirm a practical scope for each campaign
-
🔗 USEFUL LINKS
NEW TOOL: 🎸"Mock & Roll" AI Mockups

HOW TO USE THE AI MOCKUP TOOL
The AI Mockup Tool helps you quickly create working examples of Eskimi creative formats for pitches, proactive proposals and client conversations.
Unlike a previous AI-generated image or video mockups, this tool creates:
-
A working, interactive 300 x 600px banner
-
A .ZIP file prepared for upload to the Eskimi DSP
-
An editable, layered Figma file
-
Built-in Eskimi tracking codes
-
Files optimised for banner size limits
This means an approved mockup can be edited, resized, translated and prepared for a live campaign without rebuilding everything from the beginning.
The tool currently includes 25+ new and popular Eskimi rich media banner formats. Ask the tool to show you the available formats before you begin.
QUICK ANSWER
| IF YOU NEED TO… | THE TOOL CAN HELP YOU… |
|---|---|
| Show a client how a format could look | Create a visual, interactive example |
| Support a proactive pitch | Build a branded mockup quickly |
| Explain an idea that is difficult to describe | Show the proposed layout or interaction |
| Confirm that you understood a brief | Create an example for the client to review |
| Suggest a creative refresh | Show the client a possible new direction |
| Prepare an approved idea for production | Supply editable Figma files to Creative Studio |

TRAINING VIDEO
*Training was for AM's, but logic applies to everyone.
HOW TO INSTALL THE MOCKUP TOOL
HOW TO INSTALL THE MOCKUP TOOL
BEFORE YOU START: INSTALL THE TOOL
The AI Mockup Tool is added to your Claude account once. After that it stays available in every new chat.
You need to be logged into Claude with your Eskimi work account.
There are two ways to install it. Use Option A. Only use Option B if Option A does not work for you.
OPTION A: INSTALL FROM THE LINK (RECOMMENDED)
This is the standard route. The tool stays connected to the Creative Studio version, so improvements and new formats reach you automatically.
STEP 1: OPEN THE INSTALL LINK
- Open this link in a browser where you are already logged into Claude with your Eskimi account:
🔗 Mock & Roll Skill link share
STEP 2: INSTALL AND TURN IT ON
- Click Install
- Items shared with you may arrive switched off. If you see a toggle, switch it on
STEP 3: START A NEW CHAT AND OPEN THE TOOL
- Open a new Claude chat.
- Open a new Claude chat, type / and select eskimi-rm-mockup
- The tool will open with its first question and guide you from there
IF THE LINK DOESN'T WORK
| PROBLEM | WHAT TO DO |
|---|---|
| The link opens a login page | Log in with your Eskimi account, then open the link again |
| "This item isn't available" | You are logged into a personal Claude account rather than your Eskimi one. Switch accounts and try again |
| The page loads but shows nothing | Open Customise in the left sidebar, go to Plugins, and look under Shared with you |
| You find it but it looks greyed out | Shared items stay switched off until you enable them. Switch it on |
| It is installed but does not appear when you type "/" | Start a new chat. It will not appear in chats you opened before installing it |
| Still nothing | Use Option B below, or contact Creative Studio |
OPTION B: INSTALL THE SKILL FILE MANUALLY
Use this only if Option A does not work.
A manually installed version does not update. When Creative Studio adds formats or fixes problems, your copy stays as it is. You will need to download the new file and repeat these steps each time. Switch to Option A as soon as it works for you.
STEP 1: DOWNLOAD THE SKILL FILE
- Save it somewhere you can find it
- Do not unzip it
STEP 2: OPEN THE SKILLS PAGE
- In Claude, click Customize in the left sidebar, then open the Skills tab
STEP 3: UPLOAD THE FILE
- Click Add in the top right, then select Upload skill
- Choose the file you downloaded
STEP 4: CHECK IT IS ON
- The tool will appear in your Skills list
- If there is a toggle, make sure it is switched on
STEP 5: START A NEW CHAT AND OPEN THE TOOL
- Open a new Claude chat, type / and select eskimi-rm-mockup
KEEPING A MANUAL INSTALL UP TO DATE
If you installed using Option B, check this page occasionally for a newer file. To update, download the current file and repeat Steps 1 to 3. Remove the old version from your Skills list first so you do not end up with two copies.
WHAT DO I NEED TO GET STARTED?
WHAT DO I NEED TO GET STARTED?
You can create a mockup using only the client’s official website. However, the more useful information and assets you provide, the closer the result can be to your intended direction.
MINIMUM INFORMATION
Provide:
-
Client or brand name
-
Official website
-
Product or service
OPTIONAL ASSETS
You can also upload:
-
Logos
-
Product images
-
Campaign artwork
-
Brand guidelines
-
Copy or campaign messages
-
Fonts
-
Reference images
- A short explanation of the idea
-
Examples of the style you want
- Market or country
-
Campaign goal
You do not need to write a long prompt. A short, clear description and the correct website or assets are normally more useful than several pages of detailed instructions.
HOW TO CREATE A MOCKUP
HOW TO CREATE A MOCKUP
STEP 1: OPEN THE TOOL
Open the AI Mockup Tool in Claude.
If you do not know which format to use, ask:
“Show me the available creative formats.”
Review the list and choose the format that best supports your idea.
STEP 2: UPLOAD AVAILABLE ASSETS
Upload any suitable client assets you already have. If you do not have assets, provide the client’s official website. The tool can use it to identify possible:
-
Brand colours
-
Logos
-
Product imagery
-
Fonts
-
Visual style
You may be asked to accept website cookies or allow access to Figma while the tool is working.
STEP 3: DESCRIBE WHAT YOU NEED
Tell the tool what you want to create. For example:
“Create a Gallery 360 mockup for this beer brand. The campaign will run in Zambia and should focus on the new product packaging. Use the brand’s website for its colours and visual style.”
Or it can be as simple as:
"I want to create a banner for this brand, using their website as a reference: https://localbrewery.co/"
The tool may ask for additional information. Answer the questions as clearly as possible.
*See outcome of localbrewery.co mockups here.
STEP 4: LET THE TOOL BUILD THE MOCKUP
The tool will gather the relevant information and create the banner.
Generation time will depend on the selected format, supplied assets and complexity of the request. A mockup may take approximately 20 minutes, but this is not a guaranteed turnaround time. If you make multiple banners, the next banners generally don't take as long as the assets have already been set up from the first mockup.
The tool should explain what it is doing, such as which colours or visual references it identified from the website.
STEP 5: REVIEW THE RESULT CAREFULLY
Always check the complete mockup before showing it to a client. Review:
-
Logo quality
-
Product accuracy
-
Spelling and copy
-
Brand colours
-
Image quality
-
Shadows, gradients and backgrounds
-
Buttons and calls to action
-
Animation and interaction
-
Click-through behaviour.
-
Overall suitability for the client.
AI can produce damaged logos, unusual shadows, incorrect details or other visual mistakes. If something is wrong, ask the tool to correct it or request help from Creative Studio.
Never assume that an AI-generated result is correct simply because it looks finished.
WHAT FILES WILL I RECEIVE?
WHAT FILES WILL I RECEIVE?
1. WORKING BANNER .ZIP
The .ZIP contains the functional banner files, including the standard tags and tracking used by Creative Studio.
The banner can include working interactions such as:
-
Clickable buttons
-
Spinning or rotating elements
-
Gallery interactions
-
Other functionality included in the chosen format
The files are built with Eskimi DSP requirements and file-size optimisation in mind.
2. EDITABLE FIGMA FILE
Figma is a web-based design platform. The tool creates the design in separate, editable layers rather than combining everything into one flat image.
This allows Creative Studio to:
-
Update the copy
-
Replace products or images
-
Correct design details
-
Change languages
-
Create additional sizes
-
Prepare further campaign adaptations
The link to the Figma file should be included with the generated files or supporting README document.
If the client approves the mockup but requests changes, provide Creative Studio with the Figma link.
3. PREVIEW
The preview lets you test how the banner looks and behaves on the DSP before it's shared or uploaded. You can upload it to the DSP as usual.
Test every interaction. Do not rely only on a still screenshot.

COMMON QUESTIONS & LIMITATIONS
COMMON QUESTIONS & LIMITATIONS
The AI Mockup Tool:
-
Does not guarantee that every generated design will be visually correct
-
May produce low-quality or inaccurate brand elements
-
May need help when a website blocks access or contains limited assets
-
Does not replace Creative Studio for detailed design improvements
-
Does not replace a strategist when original campaign thinking is required
-
Does not replace client approval
-
Does not replace the normal quality-checking process
-
Works best with the supported formats already included in the tool
- DO I NEED CLIENT ASSETS?
- No; you can begin with the client’s official website only
- Supplying good-quality logos, product images and campaign assets will normally produce a more accurate result
- CAN I EDIT THE MOCKUP LATER?
- Yes; the tool creates a layered Figma file that Creative Studio can use for updates and adaptations
- CAN CREATIVE STUDIO CREATE OTHER SIZES?
- Yes; share the Figma link and approved design with Creative Studio when briefing the additional work
- CAN I CHANGE THE LANGUAGE?
- Yes; the editable Figma file allows the copy to be replaced for localisation
- CAN I UPLOAD THE .ZIP TO THE DSP?
- The .ZIP is built for the Eskimi DSP; however, it must still be reviewed, approved and checked through the normal campaign process before going live
- DO I HAVE TO COME UP WITH THE CREATIVE IDEA MYSELF?
- No; use the tool when you already have a direction you want to demonstrate or clarify
- If you need help developing the idea itself, speak to a Creative Project Manager or request the appropriate proactive or strategic support
- WHAT IF THE RESULT LOOKS WRONG?
- Ask the tool to correct the problem; if the issue needs design judgement or manual editing, share the Figma link with Creative Studio
REMEMBER
Use the tool to make ideas easier to see, understand and approve. It supports the creative process - it does not replace the people, judgement and approvals required to deliver a successful campaign.
The AI Mockup Tool is an optional resource. It does not mean that the sales team must become designers or develop creative ideas for every brief.
If the client needs original creative thinking, strategic campaign ideas or expert recommendations, use the appropriate Creative Studio support:
-
Speak to a Creative Project Manager for initial guidance
-
Use a Creative Token for proactive concepts or demos
-
Request Creative Strategy support for qualifying opportunities
-
Submit a full brief when Creative Studio production is required
*Read about how to get proactive creative support.
The tool helps you communicate or demonstrate an idea. It does not replace creative strategy or professional creative judgement.
NEW TOOL: Eskimi Event Checker

👉 Access the Event Checker 🔗HERE.
👯 WHO IT'S FOR
- Anyone who needs to confirm a rich media banner is reporting correctly:
- Creative Studio
- Ad Ops
- BDMs
🤔 WHAT IT'S FOR
- Every rich media banner fires small signals back to Eskimi when something happens: it loads, someone interacts with it, a video plays, someone clicks.
- These signals are called tracking pixels or events, and they become the numbers in campaign reports.
- If an event is missing or broken, the banner can look perfect and the report will still be wrong.
- Until now, checking this meant digging through the browser’s developer tools, which was slow and may have needed technical knowledge.
Now, the Event Checker shows every event the moment it fires, so anyone can check a banner in a couple of minutes 🙌
🛠️ HOW TO USE IT
- Open the tool link.
- Paste one or more Eskimi preview links into the box. To check several banners side by side, paste one link per line. Supported links:
- Each banner plays live on screen.
- Interact with the banner as a user would: hover, tap, swipe, play the video, click. On a laptop, use the Simulate buttons to mimic mobile actions.
- Every signal pops up as an alert the moment it fires.
- Watch the Required Events Checklist for each banner. The progress ring turns green once every required event has fired:
- tracker (`x-rm-alias`)
- Main
- Seen_All
- Mouse_Over
- Touch
- *The checklist can be edited if a specific format needs different events
- Every event is caught:
- Engagement events
- The tracker
- Video events (start → quartiles → complete)
- Click-throughs
✋ ALSO HANDY
- Error warnings: Flags problems reported by the banner itself (JS errors and "console.error") like a missing ticket ID or tracker ⚡️
- Live alerts: On-screen alerts, a sound, optional desktop notifications, and an unread count in the browser tab 🔔
- Live log: a running list of every event, filterable by Events, Video, Clicks or Errors, with the full pixel URL for each 📊
- CSV export: download the log as a spreadsheet 📄
- Simulate buttons: Hover, Touch, Swipe and Click, so you can test mobile behaviour without a phone 👆
- Mobile friendly: works on phones, and swipe banners also work in Chrome’s mobile preview mode 📱
- Dark mode 🌑
✅ GOOD TO KNOW
- Testing is safe: Pixels fire in test mode (`test=1`), the same as the official preview, so they won’t affect real campaign numbers
- Clicks don’t open the advertiser’s website: They’re logged, but no new tab opens unless you switch on “Open clicks”
- Shortcut link: add
?url=followed by a preview link to the end of the tool link, and it opens with that banner already loaded:- EG: ?url=<preview-link>
- Useful for sending a ready-to-check link to someone else