| Where the conversion happens | Method | How it works |
|---|---|---|
| Website | Eskimi conversion pixel | A small piece of code placed on the page or action you want to count, e.g. the purchase confirmation page or a sign-up button. When a user who clicked your ad completes the action, the pixel fires and the conversion is recorded. |
| Your own server, CRM or app backend | S2S (server-to-server) postback | Eskimi adds a unique click ID to the landing page URL. Your system stores it and sends it back to Eskimi when the conversion happens. |
| Mobile app (installs and in-app events) | Mobile measurement partner (e.g. AppsFlyer, Adjust) | The partner attributes installs and in-app events to Eskimi clicks and sends them to Eskimi DSP. |
CPA auto-optimisation needs the Eskimi conversion pixel (or an S2S postback) to be in place before the campaign starts, so the system has conversion data to learn from.
### Where to Find the Setup Guides - [Eskimi Tracking Pixel - Introduction & Implementation](https://manual.eskimi.com/books/eskimi-pixels/page/eskimi-tracking-pixel-introduction-implementation) - [s2s (Server to Server) Tracking](https://manual.eskimi.com/books/eskimi-pixels/page/s2s-server-to-server-tracking) - [Mobile measurement partners & Eskimi](https://manual.eskimi.com/books/mobile-measurement-platforms/page/mobile-measurement-partners-eskimi) - [Troubleshooting Eskimi Tracking & Conversion Pixels](https://manual.eskimi.com/books/eskimi-pixels/page/troubleshooting-eskimi-tracking-conversion-pixels) ### Summary Track website conversions with the Eskimi conversion pixel, conversions in your own systems with an S2S postback, and app installs and in-app events through a mobile measurement partner. Conversions then show in Eskimi DSP reports by campaign, creative, site and app. Set up tracking before launch, and choose the main conversion carefully: it is the one CPA auto-optimisation works on. # Simplified Conversion Pixel Implementation *This article is dedicated to users and developers who have to implement the tracking pixel to the website.* *Disclaimer: all example codes are used from a testing account.* 1. Firstly obtain the base pixel code. Login to your account, and access the " Tracking Pixels " section. [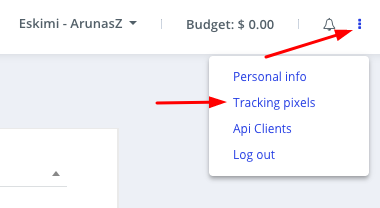](https://manual.eskimi.com/uploads/images/gallery/2022-08/HbOVxakDdnRdVZ6r-image-1661858823751.png) 2. Customize your tracking code. For this example, we want to track conversions of a specific campaign. - Tick the "Campaign" checkbox, and select the appropriate campaign. - Tick the "Conversion" checkbox. Now your base pixel code should look like this (see image below): [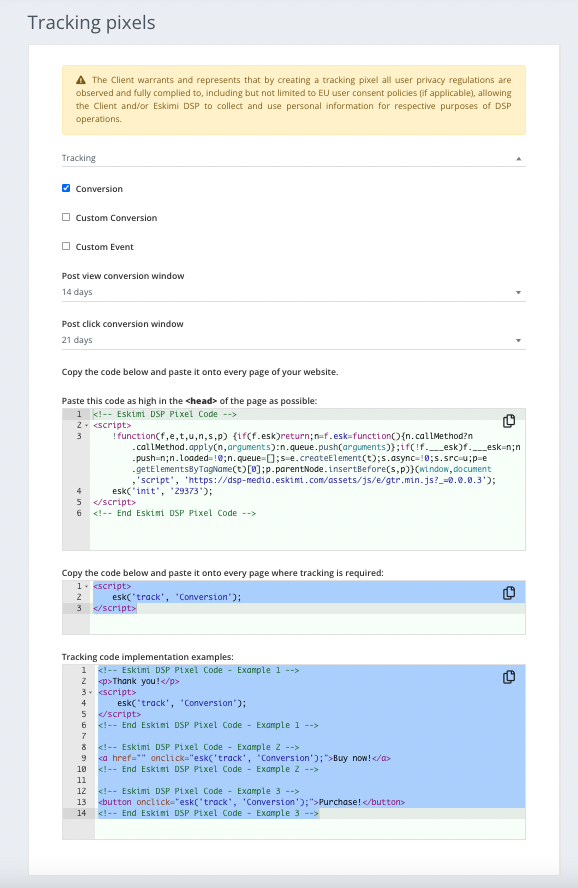](https://manual.eskimi.com/uploads/images/gallery/2023-01/a7UqUfmUaND3Nn0X-screen-shot-2023-01-04-at-17-21-47.png) 3. When you have generated the code, forward this to the website developers. In this situation, since we are tracking conversions, the code has to be implemented between the **<body> </body>** tags of the success page, like in the example below. [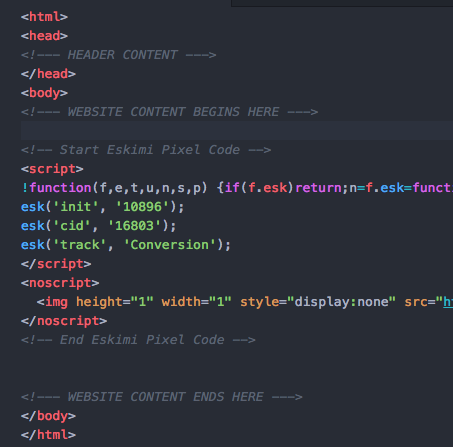](https://manual.eskimi.com/uploads/images/gallery/2023-01/Lx0AiGHb4Q80IeRh-screen-shot-2018-08-09-at-13-01-13.png) 4. Test your code and see if everything works and if the pixel code is being called. To test the code, open up the Developer Tools of your browser and using the "Network Traffic" tools check if the pixel code is being launched. # Eskimi Conversion Pixel Implementation on Action Button On some occasions, you will need to implement a conversion registration when the user clicks a button. This can be done in a few easy steps. **Step 1** Initialize the base pixel. Paste your base pixel code between your websites success page <body> </body> tags. And if the code is initialised in the <head> </head> tags then everything is set up. This how it should look when it is initialized between the <body> tags. [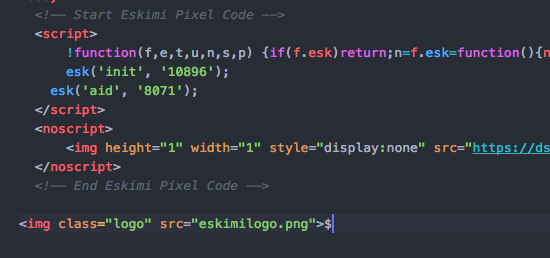](https://manual.eskimi.com/uploads/images/gallery/2021-01/image-1610545159229.png) **Step 2** On the "Submit" button, add an ***onclick*** property to the button, with the attribute **"esk ('track', 'Conversion');"** The button code should look like this [](https://manual.eskimi.com/uploads/images/gallery/2021-01/image-1610545174560.png) Now every time the button is clicked a successful conversion is registered. Don't forget to view the source code of the page.