# Eskimi pixels
# Eskimi Audience / Tracking Pixel
# Eskimi Tracking Pixel - Introduction & Implementation
Integrating tracking pixels into your digital marketing campaigns is crucial for effective measurement and [optimization](https://manual.eskimi.com/books/reporting/page/eskimi-optimisation-possibilities) of your campaigns. If you're using Eskimi DSP for your advertising needs, this manual article will guide you through the introduction and implementation process of Eskimi DSP tracking pixels.
Eskimi is a separate platform, and we have our own user base and tracking system. Eskimi combines a larger reach of customers and needs to track them separately. The audience code allows you to create audiences from your current site users, analyze the browsing pages of your current users, and then retarget them. Also, when you put audience code in your site, our programmatic platform learns more about your users, conversions, and can direct better quality users from the programmatic campaigns that you run. Also, the code does not impact the load times or performance of the page; it is quite light.
If you prefer to implement Eskimi DSP Pixels through Google Tag Manager (GTM), you can follow the instructions outlined in the provided [article for a step-by-step guide](https://manual.eskimi.com/books/tracking/page/eskimi-pixel-implementation-via-gtm).
It is important to note that when implementing pixels, testing should be conducted in collaboration with the Eskimi support team. This will ensure accurate data collection and validate whether the pixel is properly integrated with your website.
Eskimi DSP provides the following tracking pixels for:
- **Audience**
- Campaign
- **Conversion**
- Custom Conversion
- Custom Event
---
#### **Audience and Conversion pixels**
The most commonly used tracking pixels are audience and conversion pixels, as they allow implementing new advertising strategies and [optimization possibilities](https://manual.eskimi.com/books/reporting/page/eskimi-optimisation-possibilities).
In order to track retargeting (site first party) audience, engaged sessions, and conversions, it is necessary to implement Eskimi tracking pixels on the landing page.
Implemented pixels allow you not only to see the metrics but also to optimize them, which is significantly important. With implemented pixels, you can see (just a few examples):
- From which websites or apps the conversions were made, and based on that, optimize the inventory
- What is the conversion rate of a particular creative that allows for optimization on creatives
- Which browsers generate the most sessions, which gives an opportunity to optimize for browsers.
Audience and conversion pixels give you multiple opportunities to optimize for better performance therefore, it is strongly recommended to implement them for multiple campaigns' objectives.
---
#### **Eskimi DSP Tracking Pixels Implementation**
Each account on the Eskimi DSP platform is equipped with a unique and highly customizable tracking pixel codes.
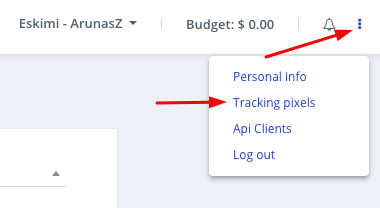
To access the pixel code, go to your account and locate the three-dot icon in the top right corner of the page. Click on it and select the "Tracking Pixels" option from the drop-down menu. In the "Tracking Pixels" section, the first code you see corresponds to the audience code, which is utilized for Site First Party audience collection.
For a visual reference, please consult the accompanying image below.
**[](https://manual.eskimi.com/uploads/images/gallery/2023-06/Xj2S2P1iRJU8aMKK-ezgif-com-video-to-gif-9.gif)**
To properly implement this Audience pixel, it must be initialized on every page of your website. You can either place it between the <body> </body> tags or inside the <head> </head> tags, depending on the consistent structure of your site.
As previously mentioned, implementing the Audience pixel will enable you to:
- Collect Site First Party Audience data from your webpage
- Track and report Sessions and Session Rate metrics
---
#### **Conversion Pixel**
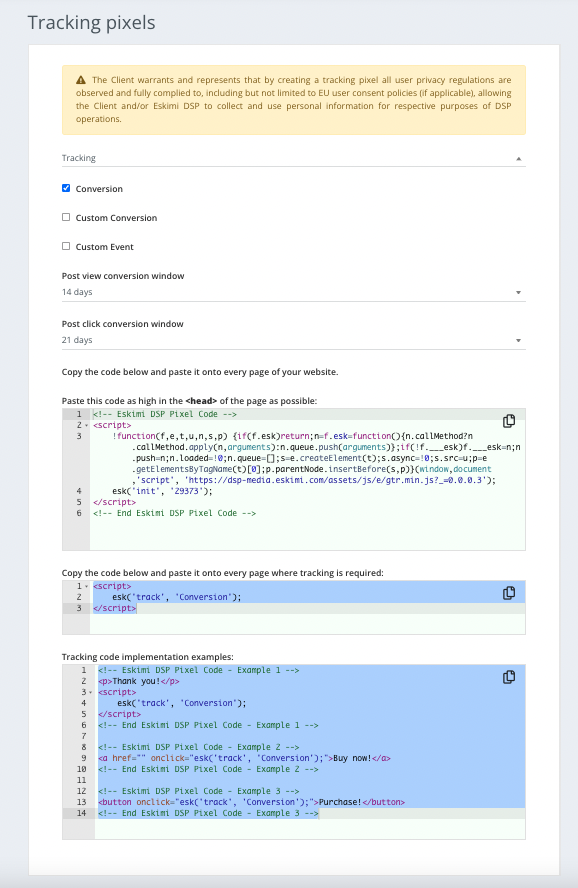
To access the Conversion pixel code, select the Conversion option, and the code for conversion tracking will be displayed below.
The copied Conversion pixel code should be placed on the specific page where tracking is required. This can be the Success Page, Thank You page, or any other page as per your requirement.
For a visual reference, please consult the accompanying image below.
[](https://manual.eskimi.com/uploads/images/gallery/2023-06/KSfnhzlsBpD1GDS1-ezgif-com-video-to-gif-10.gif)
The Conversion pixel can be customized by applying specific campaign IDs or utilizing custom conversions.
Including a campaign ID in the code allows you to track conversions that are initiated through a particular campaign. On the other hand, custom conversions enable tracking of preferred actions such as registrations, adding items to a shopping cart, purchases, and more. While custom conversions provide reporting and analysis capabilities for tracking the number of custom conversions, it is important to note that campaign performance optimization based on custom conversions is not possible.
Important note - please avoid initializing conversion code on every page, as doing so will lead to every page visit being counted as a successful conversion.
---
#### **Post View and Post Click Conversion Window Customisability**
Conversion tracking can be customised to align with preferred conversion windows for both post-view and post-click conversions. This allows you to set specific time frames within which conversions are attributed to interactions, whether they are viewed or clicked. By customising the conversion window, you can fine-tune your tracking to best suit your desired attribution model and accurately measure the impact of your campaigns.
# Eskimi Conversion Pixel
# Conversion tracking
Conversion tracking is a tool that shows you what happens after a customer clicks on your advertisement - whether they purchased your product, signed up for your newsletter, or filled out a form to receive more information. By tracking conversions, you will be able to know which campaigns, sites, or apps bring you business. This helps you invest more wisely in the best ones and boost your return on investment (ROI).
Eskimi DSP can provide these enhanced metrics by implementing a conversion tracking pixel on your side. The conversion pixel is a tiny (1x1 pixel) transparent image.
A variety of things can be tracked:
##### **Websites**
What it means: track when a customer completes an action on your website. This could be, for example, making a purchase, signing up for a newsletter, clicking a button, or any other valuable action a customer can take on your website.
##### **Apps**
What it means: track when a customer installs your app or completes an in-app action, such as a purchase.
##### **Phones**
What it means: track when a customer calls you from a phone number in your ads or from a phone number on your website, or when they click your phone number on your mobile website.
##### **Imports**
What it means: track when an ad click leads to a conversion in the offline world, such as a sale in your office or over the phone. To do this, you’ll import your conversions into Eskimi DSP by uploading a file or transmitting data through our API.
The conversion tracking process works a little differently for each conversion source, but for each type besides offline conversions, it tends to fall into one of these categories:
- You add a conversion tracking tag, or code snippet, to your website or mobile app code. When a customer clicks on your ad from selected Eskimi DSP sites, or when they view your video ad, a temporary cookie is placed on their computer or mobile device. When they complete the action you defined, our system recognises the cookie (through the code snippet you added), and we record a conversion.
- Some kinds of conversion tracking don’t require a tag. For example, to track phone calls from call extensions or call-only ads, you use a Google forwarding number to track when the call came from one of your ads, and to track details like call duration, call start and end time, and the caller's area code.
Once you’ve set up conversion tracking, you can see data on conversions for your campaigns, ad groups, ads, and keywords. Viewing this data in your reports can help you understand how your advertising helps you achieve important goals for your business.
# Simplified Conversion Pixel Implementation
*This article is dedicated to users and developers who have to implement the tracking pixel to the website.*
*Disclaimer: all example codes are used from a testing account.*
**Step 1:**
Firstly obtain the base pixel code.
Login to your account, and access the " Tracking Pixels " section.
[](https://manual.eskimi.com/uploads/images/gallery/2022-08/HbOVxakDdnRdVZ6r-image-1661858823751.png)
**Step 2:**
Customize your tracking code. For this example, we want to track conversions of a specific campaign.
- Tick the "Campaign" checkbox, and select the appropriate campaign.
- Tick the "Conversion" checkbox.
Now your base pixel code should look like this (see image below):
[](https://manual.eskimi.com/uploads/images/gallery/2023-01/a7UqUfmUaND3Nn0X-screen-shot-2023-01-04-at-17-21-47.png)
**Step 3:**
When you have generated the code, forward this to the website developers.
In this situation, since we are tracking conversions, the code has to be implemented between the **<body> </body>** tags of the success page, like in the example below.
[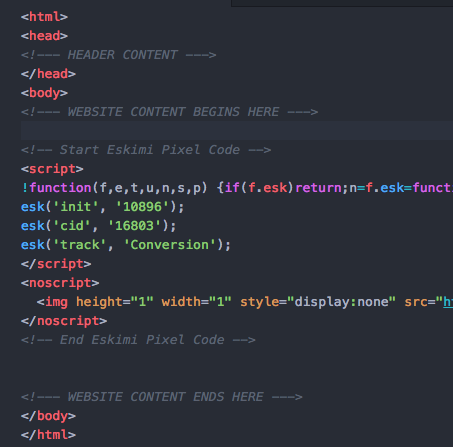](https://manual.eskimi.com/uploads/images/gallery/2023-01/Lx0AiGHb4Q80IeRh-screen-shot-2018-08-09-at-13-01-13.png)
**Step 4:**
Test your code and see if everything works and if the pixel code is being called.
To test the code, open up the Developer Tools of your browser and using the "Network Traffic" tools check if the pixel code is being launched.
# Eskimi Conversion Pixel Implementation on Action Button
On some occasions, you will need to implement a conversion registration when the user clicks a button. This can be done in a few easy steps.
**Step 1**
Initialize the base pixel.
Paste your base pixel code between your websites success page <body> </body> tags. And if the code is initialised in the <head> </head> tags then everything is set up.
This how it should look when it is initialized between the <body> tags.
[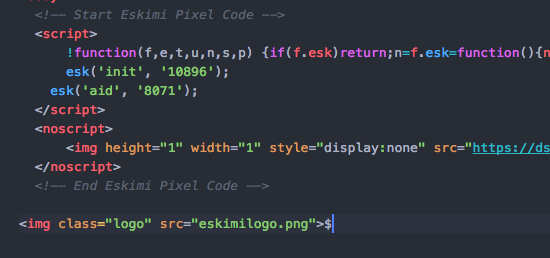](https://manual.eskimi.com/uploads/images/gallery/2021-01/image-1610545159229.png)
**Step 2**
On the "Submit" button, add an ***onclick*** property to the button, with the attribute **"esk ('track', 'Conversion');"**
The button code should look like this
[](https://manual.eskimi.com/uploads/images/gallery/2021-01/image-1610545174560.png)
Now every time the button is clicked a successful conversion is registered.
Don't forget to view the source code of the page.
# Eskimi Pixel implementation via Google Tag Manager (GTM)
# Eskimi Pixel Implementation via GTM
Integrating tracking pixels into your digital marketing campaigns is crucial for effective measurement and [optimization](https://manual.eskimi.com/books/reporting/page/eskimi-optimisation-possibilities#bkmrk-audience-and-convers). If you're using Eskimi DSP for your advertising needs, this manual article will guide you through the process of implementing the Eskimi DSP tracking pixels seamlessly using Google Tag Manager (GTM).
Follow the step-by-step instructions below to efficiently set up the Eskimi DSP tracking pixels through GTM and ensure accurate tracking and measurement of your advertising efforts.
It is important to note that when implementing pixels, testing should be conducted in collaboration with the Eskimi support team. This will ensure accurate data collection, and validate whether the pixel is properly integrated with your website.
---
**Audience pixel implementation**
- Access your GTM account, and on the top left side of the page select **New Tag**
- Name the Tag according to the tag configuration and triggering
- Under Tag Configuration choose tag type - **Custom HTML** and paste the Eskimi DSP base (audience) tracking code
- Under Advanced Settings select Tag firing option - **Once per page**
[](https://manual.eskimi.com/uploads/images/gallery/2023-06/lL0P5MUPgT7x9A1A-ezgif-com-video-to-gif-5.gif)
- Under the Triggering section choose a default trigger - All Pages (Page View)
- Once the Tag Configuration and Triggering is added, press Save
[](https://manual.eskimi.com/uploads/images/gallery/2023-06/QOImqTZSV8yt87o2-ezgif-com-video-to-gif-1.gif)
---
#### **Conversion pixel implementation**
- In order to implement Eskimi conversion tracking pixel, press **New Tag**
- Name the tag according to the tag configuration and triggering
- Under Tag Configuration choose tag type - **Custom HTML** and paste conversion tracking code.
- Under Advanced Settings select Tag firing option - **Once per page**
[](https://manual.eskimi.com/uploads/images/gallery/2023-06/43fEVF9Ow5wE1s6N-ezgif-com-video-to-gif-6.gif)
- To finalise Eskimi conversion pixel implementation, under the Triggering section choose an existing trigger for conversion or create a new one. In the example below you can see the most common trigger for tracking conversions with success/thank you page url.
[](https://manual.eskimi.com/uploads/images/gallery/2023-06/1pAbRT6iXjOGnXzE-ezgif-com-video-to-gif-8.gif)
---
#### **Submit the changes**
Once you have set up the necessary pixels and triggers, the last and most important step is to submit the changes. Without submitting them, the changes will not be applied to the actual environment of the site. To do this, go to the overview page and look for the "submit" button in the top right corner. Click on the "submit" button and follow the process until all the recent changes are published on your website. This submission ensures that the modifications you have made will take effect and be visible in the live environment of your site.
[](https://manual.eskimi.com/uploads/images/gallery/2023-06/2LiORY3JvRyba8VH-ezgif-com-video-to-gif.gif)
---
**Tag Sequencing / Prioritisation**
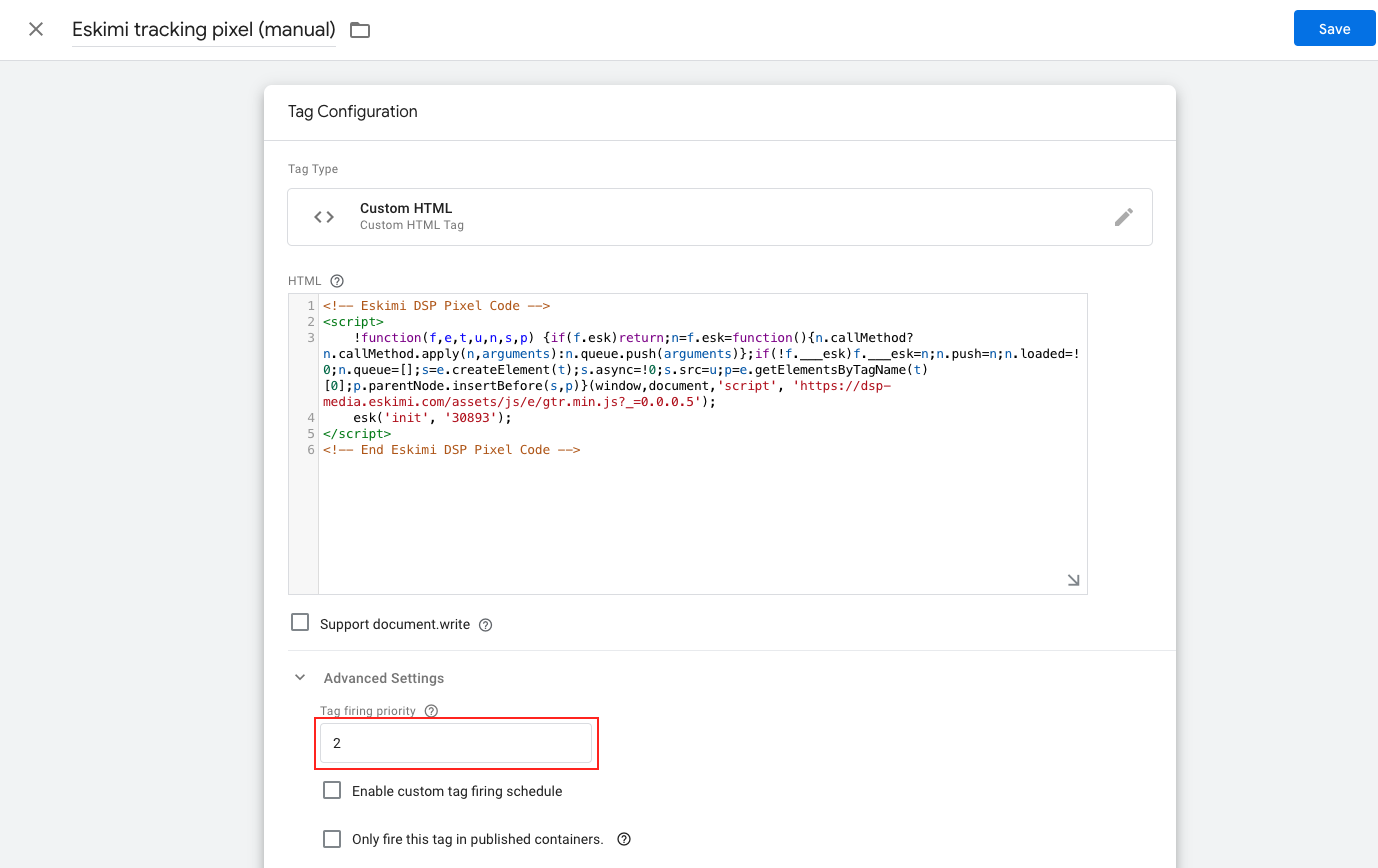
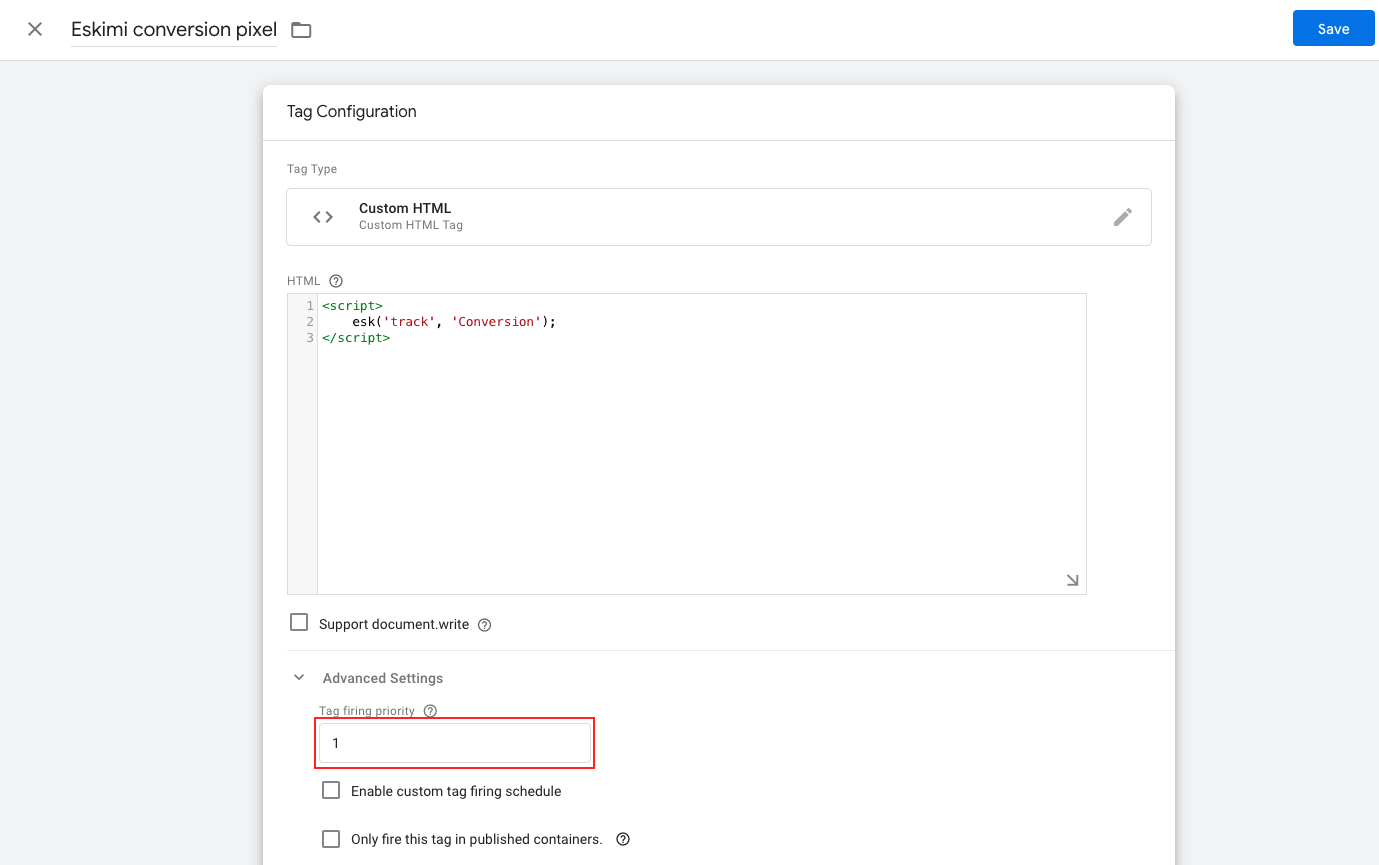
You can control tag firing prioritisation in the **Advanced Settings** of a tag. \*This configuration is implemented on the page where the conversion pixel is deployed, ensuring that the "Tracking pixel" fires first before the "Conversion pixel" because the conversion pixel relies on the "esk" function described in the tracking pixel.\*
- **Tag Firing Priority:** Determines the order in which tags will be fired. The value can be a positive or negative integer, and tags with higher values will fire before those with lower values. (For example, a priority 3 tag will fire *before* a priority 1 or 2 tag.) Priority defaults to 0 if no value is specified. Tags will still fire asynchronously.
In our case, we need to set the **Eskimi tracking pixel** priority to **2** and the conversion pixel priority to **1**.
[](https://manual.eskimi.com/uploads/images/gallery/2024-03/LvAYHWtOl1Bf4xqE-image-1710321576322-16-53.png)
[](https://manual.eskimi.com/uploads/images/gallery/2024-03/CN7clWRj6hCDmFLi-image-1710321925709-23-47.png)
**Another option** if firing priority is used by other tags
If other tags, such as analytics tags, are also used in the webpage setup, or if tag priority is utilised in other scenarios, **"Tag sequencing"** can be an alternative to "Tag firing prioritisation." This approach ensures that tags fire in a specific sequence, which can prevent conflicts when numerous tags are present on the same page or "Tag firing prioritisation" is used with other tags.
In our scenario, we can specify which tag should fire before or after a particular trigger. It's crucial to ensure that the "Tracking pixel" fires **before** the "Conversion pixel" or in other words - "Conversion pixel" fires **after** the "Tracking pixel".
[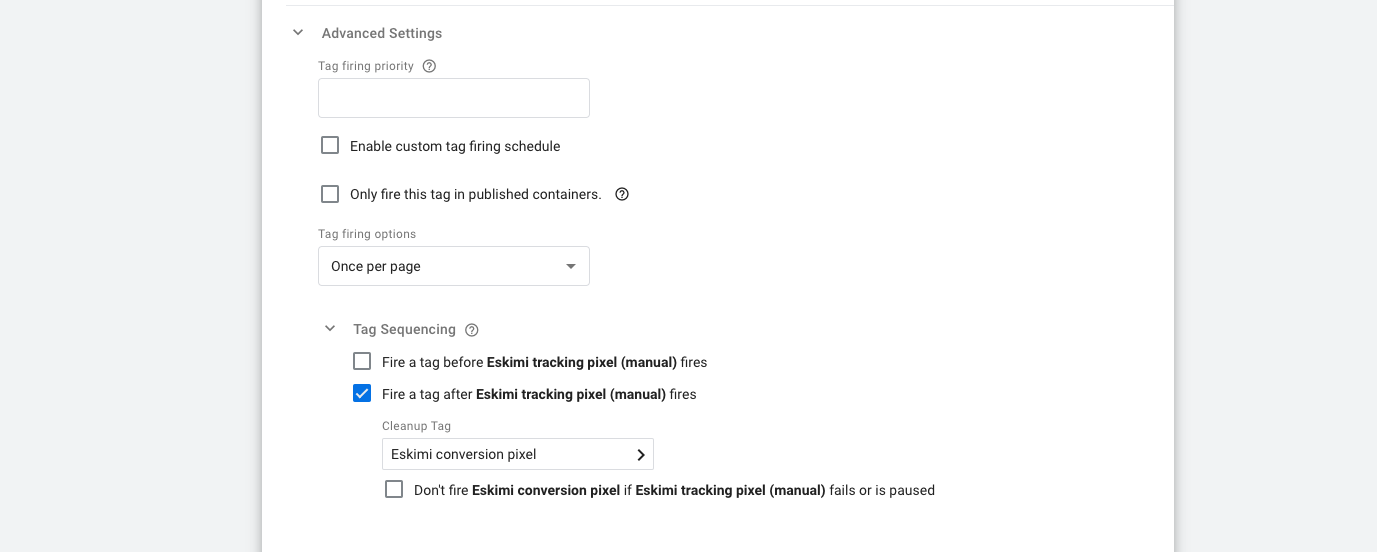](https://manual.eskimi.com/uploads/images/gallery/2024-03/ritErLJG5KkTelOr-image-1710323705812-54-46.png)
**OR**
[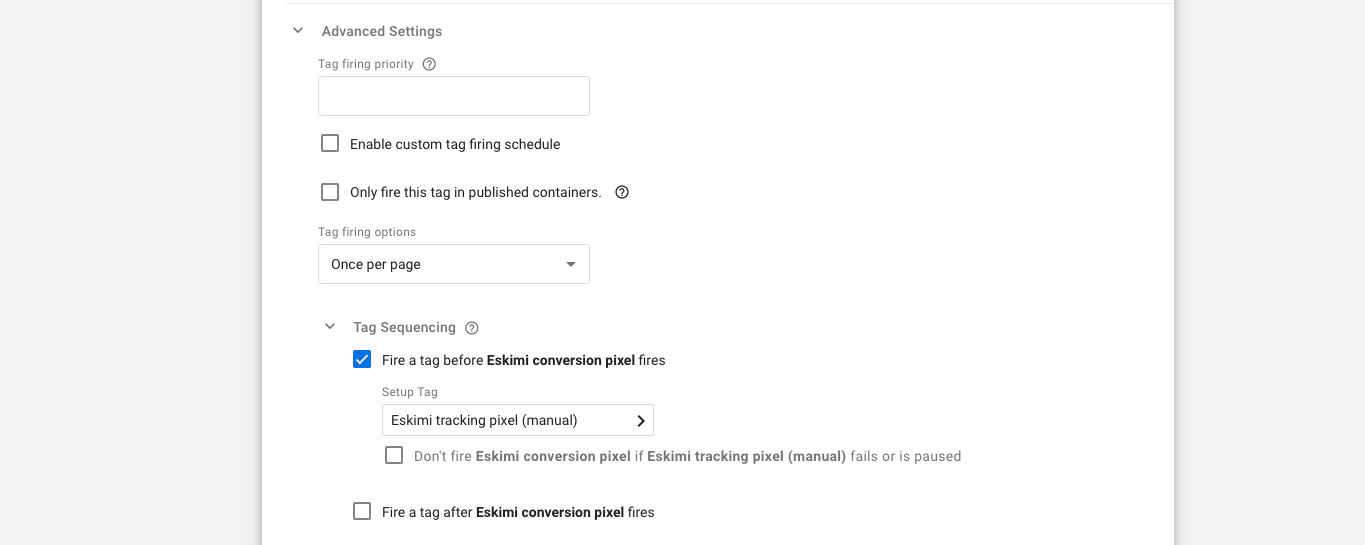](https://manual.eskimi.com/uploads/images/gallery/2024-03/3Zbxkxo9VaRlAQhi-image-1710323736650-52-47.png)
---
# S2S Tracking (Server to Server)
# s2s (Server to Server) Tracking
### **Click code is an advanced tracking method.**
This is a server-side tracking method that does not require any client cookie information.
It works by passing back a **eucid** (encrypted user cookie id) value which is added to your landing page URL whenever the user clicks on any of your ads served through Eskimi DSP.
When the user completes a successful conversion event, the advertiser needs to transmit **eucid** value back to the Eskimi DSP server by calling back the DSP server's conversion tracking pixel.
Once the **eucid** is validated on a server, a successful conversion event will be recorded and will appear on the campaign performance optimisation tool.
**Eucid pass to the advertiser**
When the user clicks on one of your ads, Eskimi DSP adds a **eucid** (click code) parameter to the landing page URL and redirects the user to your landing page.
---
### **Examples**
The example below shows how the landing page URL looks before and after user is redirected with added **custom\_name** parameter:
**before**: [http://advertisersite.com/campaign.php?custom\_name={eucid}](http://advertisersite.com/campaign.php?custom_name=%7Beucid%7D)
**after**: [http://advertisersite.com/campaign.php?custom\_name=MTAwMjZfNjU4NTg4NDFfbmdf](http://advertisersite.com/campaign.php?custom_name=MTAwMjZfNjU4NTg4NDFfbmdf)
The advertiser is allowed to use a custom parameter name instead of *eucid* by adding {eucid} macro to the landing page URL while setting up the new campaign. This will be replaced with a unique **eucid** value automatically.
**Importance of eucid transportation**
The advertiser is required to store the passed **eucid** until a successful conversion or end of the session occurs.
To perform a one-time conversion notification, the advertiser needs to issue the **eucid** by HTTP request from the server-side (s2s).
From the examples above, we already know that **eucid** value is MTAwMjZfNjU4NTg4NDFfbmdf. The advertiser is required to keep this value until a successful conversion occurs.
**Conversion tracking**
After a successful conversion event, the advertiser will need to pass the **eucid** value by making a server-side HTTP request (s2s) to the URL [https://dsp.eskimi.com/pixel?eucid=MTAwMjZfNjU4NTg4NDFfbmdf](https://dsp.eskimi.com/pixel?eucid=MTAwMjZfNjU4NTg4NDFfbmdf)
---
### **Implementation**
To enable click code based conversion tracking, the advertiser needs to pass back the **eucid** parameter value to Eskimi DSP conversion pixel by requesting it by **s2s** (server to server) method.
- **Eskimi Postback URL for s2s tracking with redirect:**
Our Postback URL for s2s tracking: *[https://dsp.eskimi.com/pixel?eucid={random\_click\_id}](https://dsp.eskimi.com/pixel?eucid=random_click_id)*
This Postback URL has to be implemented on your server side.
*The random\_click\_id* needs to be replaced with your click\_id macro, so when conversion happens it should send the value for click id which delivered conversion.
- **Eskimi Postback URL for s2s tracking without redirect:**
This tracker can be used by advertisers which do not support redirect in postback request. This is unusual case because most of systems support redirect.
Our Postback URL for s2s tracking: [https://dsp-ap.eskimi.com/campaign/pixel?eucid={random\_click\_id} ](https://dsp-ap.eskimi.com/campaign/pixel?eucid=%7Brandom_click_id%7D)
*The random\_click\_id* needs to be replaced with your click\_id macro, so when conversion happens it should send the value for click id which delivered conversion.
**Available Eskimi parameters/macros for Postback URL(Which we can show to the customer if asked):**
[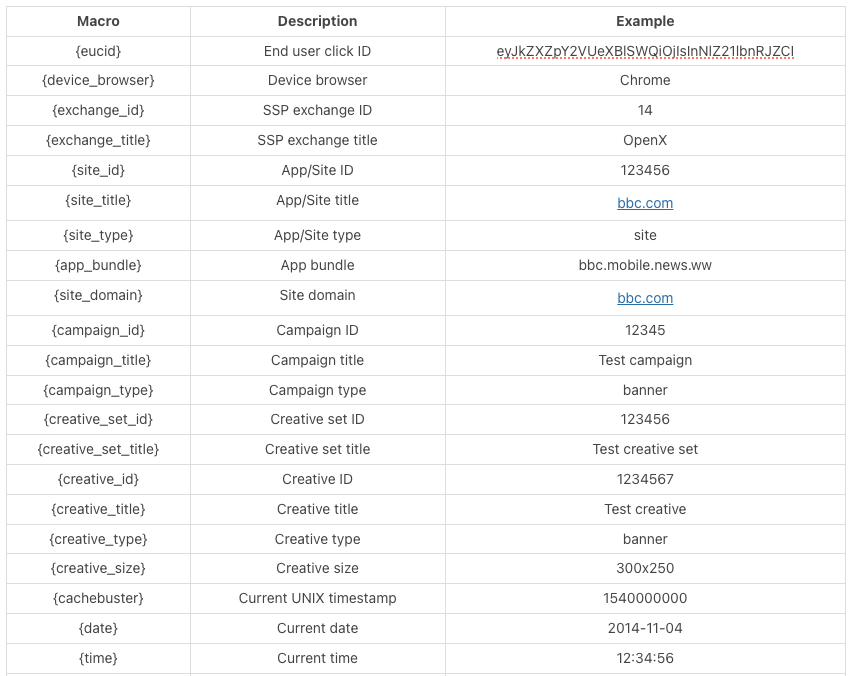](https://manual.eskimi.com/uploads/images/gallery/2025-02/YGde14QIIz60ha6R-image-2.png)
# Troubleshooting
# Troubleshooting guide for Eskimi Tracking / Conversion pixels
#### **How to check for Audience Tracking and/or Conversion pixels on the page**
Before proceeding, it's crucial to understand the client's setup regarding Eskimi pixel implementation:
- **Location of Main Audience Tracking Pixel:** Determine whether the main Audience Tracking pixel is implemented on a single page or across multiple pages.
- **Location and Trigger for Conversion Pixel:** Determine the placement of the Conversion pixel, identify the event that triggers its firing, and ascertain whether the main Audience Tracking pixel is also present on the same page which is mandatory for conversion pixel to work.
---
Knowing these details, we can begin checking whether Eskimi pixels are firing on specific pages:
- To observe the triggered events, we can utilise the **Eskimi Chrome extension**. Click [**here**](https://manual.eskimi.com/books/tracking/page/how-to-check-that-eskimi-pixel-is-implemented-monitoring-extension-for-google-chrome) for the guide on how to install and use it.
**OR**
- Open Developer Tools in any common browser by right-clicking and selecting *"Inspect"* on the landing page or any other page where pixels are potentially implemented.
- Navigate to the "*Network"* tab and type "gtr" in the search bar. This should display only Eskimi pixels. If nothing appears, try refreshing the page.
---
If the **Audience Tracking pixel** is present, we should observe two events in the "Network" tab both having Status Code: 200:
- A JavaScript file.
[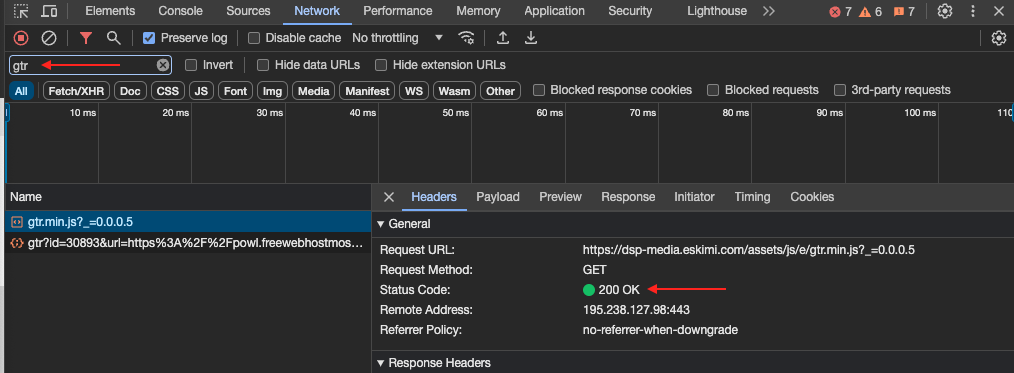](https://manual.eskimi.com/uploads/images/gallery/2024-03/daSGHpBkk4oDzxlH-image-1710341322260-06-30.png)
- A GET request containing the unique DSP account tracking pixel ID, page URL, and other metrics.
[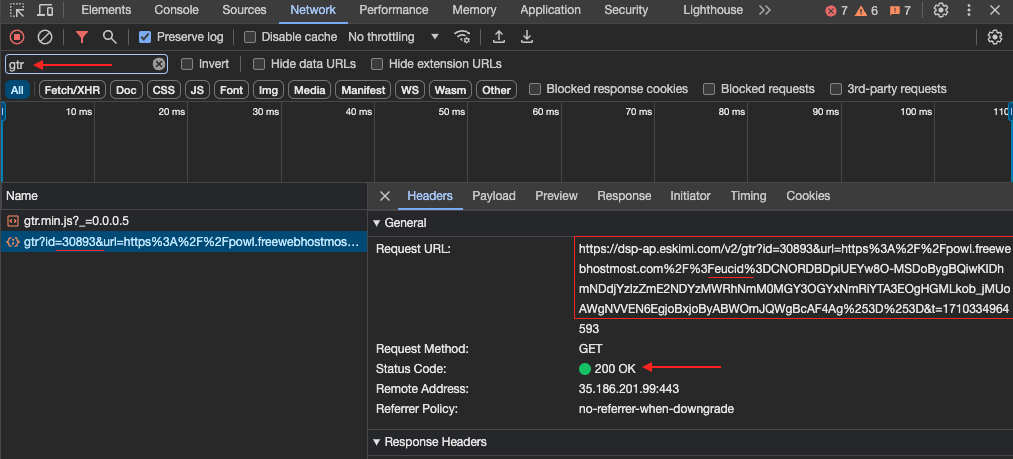](https://manual.eskimi.com/uploads/images/gallery/2024-03/psVFrXvKh78UUiX5-image-1710341424609-05-54.png)
- You should also observe the Audience Tracking pixel in the Elements tab.
[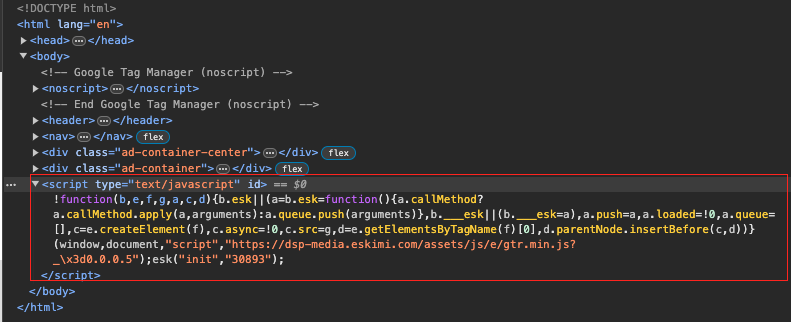](https://manual.eskimi.com/uploads/images/gallery/2024-03/2IAbcqxXBNXELC3A-image-1710342210153-18-17.png)
---
If the **Conversion pixel** along with the **Audience Tracking pixel** are present, we should also observe two events in the "Network" tab, both having Status Code: 200:
- The same JavaScript file.
- A GET request containing the unique DSP account tracking pixel ID with **conv=1**.
[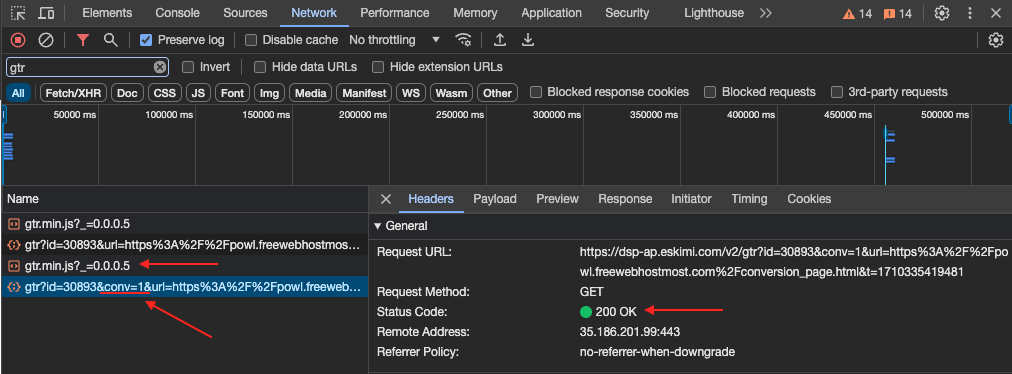](https://manual.eskimi.com/uploads/images/gallery/2024-03/ed8ZaLmJp1msU7Pb-image-1710342599822-10-52.png)
- You should also observe both pixels in the Elements tab.
[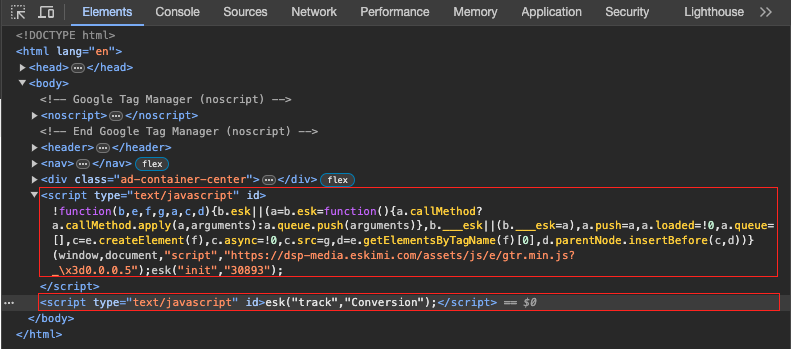](https://manual.eskimi.com/uploads/images/gallery/2024-03/iFkPOV7sJlzG5CP6-image-1710342650698-16-42.png)
If both pixels are present in the Network and Elements tabs, then it should work as intended. If they are present and events are not counted on the DSP side, you can check a few technical aspects:
1. **Unique Tracking Pixel ID:** Clients often have multiple accounts in Eskimi DSP, which may result in the incorrect ID being utilised.
2. **Status Codes:** If the status code is not 200, it indicates potential blocking of these pixels due to the webpage configuration.
- - There is a possibility that the client's webpage setup is blocking third-party cookies, which can affect the functionality of our tracking and attribution systems. In this case clients may need to adjust their website configurations to allow Eskimi third-party cookies if they are being blocked intentionally.
---
##### **Test campaign**
To verify whether Eskimi DSP is accurately counting engaged sessions and conversion events, we can execute a technical test campaign within the same Eskimi client's account where a unique tracking ID is utilised on the webpage.
**Approval of the campaign is unnecessary**; it can remain pending while utilising a click test URL. For this test to be effective, we must utilise the client's webpage as the landing page.
**Test URL:** Copy and paste it into your browser, then simply modify the campaign IDs in both instances - after "dspclick/..." and "?test=?..." to simulate an actual click.
[https://ads.eskimi.com/dspclick/198867/0/?test=198867](https://ads.eskimi.com/dspclick/198867/0/?test=198867)
**\*\*\*Important\*\*\***
When verifying pixel implementation or conducting a test campaign, please ensure that third-party cookies are enabled on your browser. Our targeting and attribution rely on the functionality of third-party cookies, so it's essential to have them enabled.
---
#### **Addressing Pixel Setup Issues: Steps and Recommendations**
Upon discovering that either the audience or conversion pixel is missing, through either the Eskimi Chrome extension or manual verification, consider the following steps before escalating the matter to technical support:
1. **Inquire about Pixel implementation details with the Client on more time**: Clarify how the Eskimi pixel is integrated across their web properties. Questions should cover:
- The scope of Audience Tracking Pixel implementation (single page or across multiple pages).
- The intended behaviour and trigger mechanisms for the Conversion Pixel.
- - Is the Conversion Pixel implemented on the landing page, registration form, thank you page, or elsewhere? If the client is using Google Tag Manager (GTM), please check with the client that the triggers for the Conversion Pixel have been correctly implemented.
- The presence of the Audience Tracking Pixel on pages designated for conversion events.
2. **For Clients utilising Google Tag Manager (GTM)**:
- **Verify Pixel Type**: Confirm whether the client has opted for the Custom HTML version of the Audience Pixel or the Template version. We currently recommend the Custom HTML version for its flexibility and compatibility. For guidance, refer to the Eskimi Pixel Implementation Manual [**here**](https://manual.eskimi.com/books/tracking/page/eskimi-pixel-implementation-via-gtm#bkmrk-step-1%C2%A0).
- **Check Tag Configuration**: If the pixels are correctly added but issues persist, adjustments may be needed within GTM's Tag Sequencing or Prioritisation settings. Detailed instructions can be found in the manual under the "Tag Sequencing / Prioritisation" section [**here**](https://manual.eskimi.com/books/tracking/page/eskimi-pixel-implementation-via-gtm#bkmrk-tag-sequencing-%2F-pri).
---
##### Contacting Eskimi Technical Support
If you require technical assistance, please submit a ticket through Zendesk with the following relevant information:
- Provide detailed information about the client's page flow and pixel implementation setup, as mentioned in the previous sections.
- If the client is utilising Google Tag Manager (GTM) for pixel implementation, it is crucial to request that the client grants view or edit permissions to eskimi.analytics@gmail.com. This will allow for quicker and more efficient issue resolution.
# How to check that Eskimi Pixel is Implemented: Monitoring extension for Google Chrome
You can find the extension in the attached files to that article (top left corner)
[CHECK THIS VIDEO WHICH DESCRIBES THE WHOLE PROCESS OF EXTENSIONS IMPLEMENTATION AND USAGE](https://drive.google.com/file/d/1GBThD1gG-v6HpBkchftTsbRa2Vfo23uh/view?usp=drive_link)
#### **Instructions:**
1. Go to this URL: [chrome://extensions/](chrome://extensions/) and turn on Developer Mode (top right corner button)
2. Unpack the ZIP, and in the Extensions Page, click on the “Load Unpacked” and select the folder where the extension zip was unpacked.
3. Once that is done, the extension will be added to the browser.
4. Open Chrome Dev tools ( Inspect Section ), and look for the “EskimiSE-GA” tab
5. And browse! The panel will automatically detect pixel events.
***\*CLEAR LOG\*** Button clears the log, so the list wouldn’t clutter. Alternatively, you can close and reopen the “Inspect” pane*l
---
#### **What does this browser extension do ?**
- It monitors if the base pixel is implemented and shows base pixel ID
- It monitors if Eskimi session is being called and shows session ID
- Monitors for conversion events, audience events, custom conversion events
- Monitors GA and GA4 calls(sessions/events/etc)
---
#### **Why & When to use?**
- Check when GA/GA4/Eskimi calls(sessions/events) are made (chronological order)
- Check if Cookies consent “Approve/disapprove” impacts GA/Eskimi calls
- Check which GA/GA4 account ID is used in website and check with report you got from client
---
#### **Tips & Notes:**
- Use it only with one tab and do not load other pages in the background. It might record all calls, from any tab.
- For “chronological order” use a new tab/session to track instead a refresh. When doing a refresh, GA4 always fires first (prob to track pageview).
- You can enable the extension to work in Incognito. Go to Extentions and next to Eskimi there is “Details” and enable “Allow in Incognito”.
- Don't delete the extracted file from your computer once it is installed in your browser, otherwise the extension might not work anymore.