Eskimi Tracking Pixel - Introduction & Implementation
Integrating tracking pixels into your digital marketing campaigns is crucial for effective measurement and optimization. If you're using Eskimi DSP for your advertising needs, this manual article will guide you through the introduction and implementation process of Eskimi DSP tracking pixels.
It is important to note that when implementing pixels, testing should be conducted in collaboration with the Eskimi support team. This will ensure accurate data collection, and validate whether the pixel is properly integrated with your website.
Eskimi DSP provides the following tracking pixels for:
- Audience
- Campaign
- Conversion
- Custom Conversion
- Custom Event
Audience and Conversion pixels
The most commonly used tracking pixels are audience and conversion pixels as they allow implementing new advertising strategies and optimization possibilities.
In order to track retargeting (site first party) audience, engaged sessions and conversions it is necessary to implement Eskimi tracking pixels on the landing page.
Implemented pixels allows you not only to see the metrics but also optimize on them which is significantly important. With implemented pixels you can see (just a few examples):
- From which websites or apps the conversions was made and based on that optimize the inventory
- What is the conversion rate of particular creative which allows to optimize on creatives
- Which browsers generate the most sessions which gives opportunity to optimize on browsers.
Audience and conversion pixels give you multiple opportunities to optimize on better performance therefore it is strongly recommended to implement them for multiple campaigns' objectives.
Eskimi DSP Tracking Pixels Implementation
Each account on the Eskimi DSP platform is equipped with a unique and highly customizable tracking pixel codes.
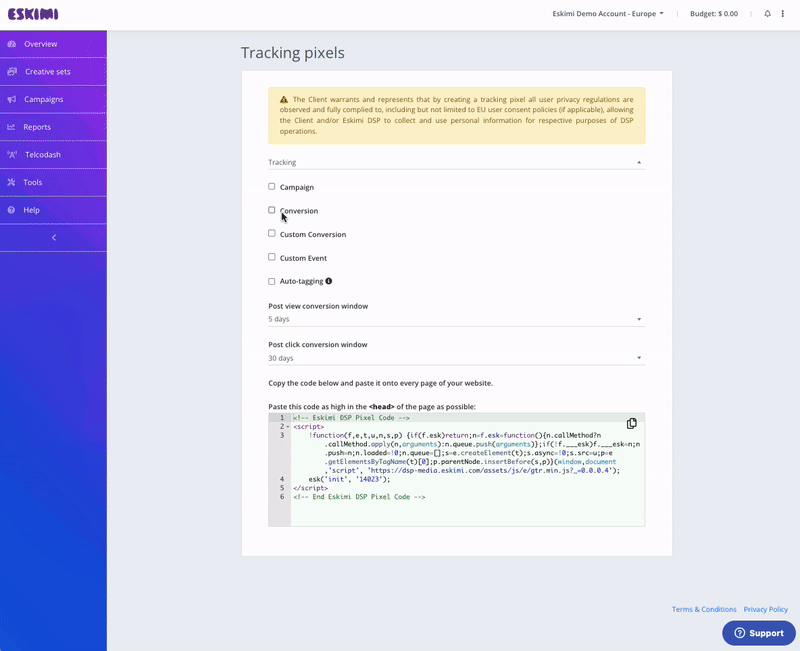
To access the pixel code, go to your account and locate the three-dot icon in the top right corner of the page. Click on it and select the "Tracking Pixels" option from the drop-down menu. In the "Tracking Pixels" section, the first code you see corresponds to the audience code, which is utilized for Site First Party audience collection.
For a visual reference, please consult the accompanying image below.
To properly implement this Audience pixel, it must be initialized on every page of your website. You can either place it between the <body> </body> tags or inside the <head> </head> tags, depending on the consistent structure of your site.
As previously mentioned, implementing the Audience pixel will enable you to:
- Collect Site First Party Audience data from your webpage
- Track and report Sessions and Session Rate metrics
Conversion Pixel
To access the Conversion pixel code, select the Conversion option, and the code for conversion tracking will be displayed below.
go to your account and locate the three-dot icon in the top right corner of the page. Click on it and select the "Tracking Pixels" option from the drop-down menu. In the "Tracking Pixels" section, the first code you see corresponds to the audience code, which is utilized for Site First Party audience collection.
For a visual reference, please consult the accompanying image below.