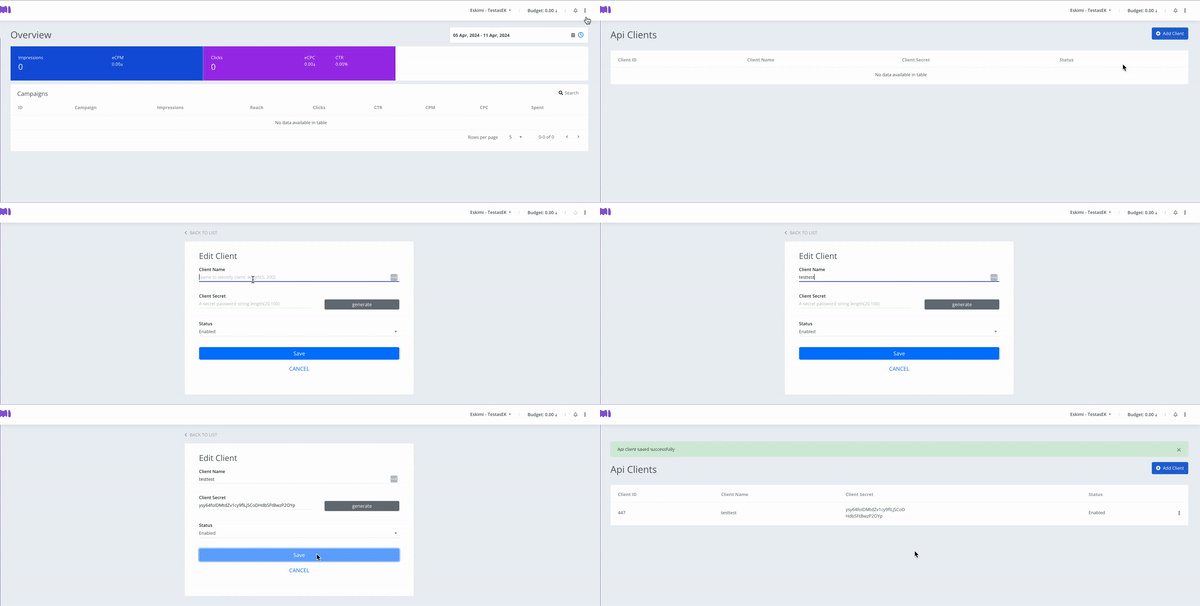
Steps of using API
Using API one can get analytics of Eskimi platform as well as do other operations like creating campaigns etc. In this article the steps of using API is described.
- Create API client from Eskimi profile:
-
- In the dashboard UI page, in the top right corner click the three dot icon.
- Click on "API Clients".
- In API Clients UI page, in the top right corner click "Add Client".
- Enter the Client name (The name does not matter, it won't be used for the access token), and click on "Generate" for Client Secret.
- Save the changes and the API client will be created that will be used for getting Access Token.
- Get access token. For getting access token the documentation is provided here: https://dsp-api.eskimi.com/docs/api/auth/
For the access token we recommend using postman, as it's show in the video. Here is a JSON format request for the authentication endpoint:
{
  "grant_type": "eskimi_dsp",
  "username": "dsp_username",
  "password": "Password",
  "client_id": client_id,
  "client_secret": "client_secret"
}
A request example for a reporting endpoints:
{
  "campaignIds": [
    000000
  ],
  "dateFrom": "2023-05-08",
  "dateTo": "2023-05-12",
  "byDate": true,
  "byCampaign": false
}
From your parent account, you can access your child account data via API.
- After getting the access token API can be used using the access token. The API documentation: https://dsp-api.eskimi.com/docs/api/v1/
- Please watch the video to understand the process better:
API Limitations:
- Currently you're able to create only Banner or Native type campaigns via API, currently we do not have functionality to create Video type campaigns.
- Not all reporting splits are available in the reporting API endpoints, you can see all available splits here.
- Total reach numbers will be different from the reports and the API, as dashboard reporting using different logic for counting reach (This is being worked on, so total reach numbers would match API and dashboard reporting part).
- Currently there is no current endpoint, everything is being reported with $.

