
🎸"Mock & Roll" AI Mockup Tool
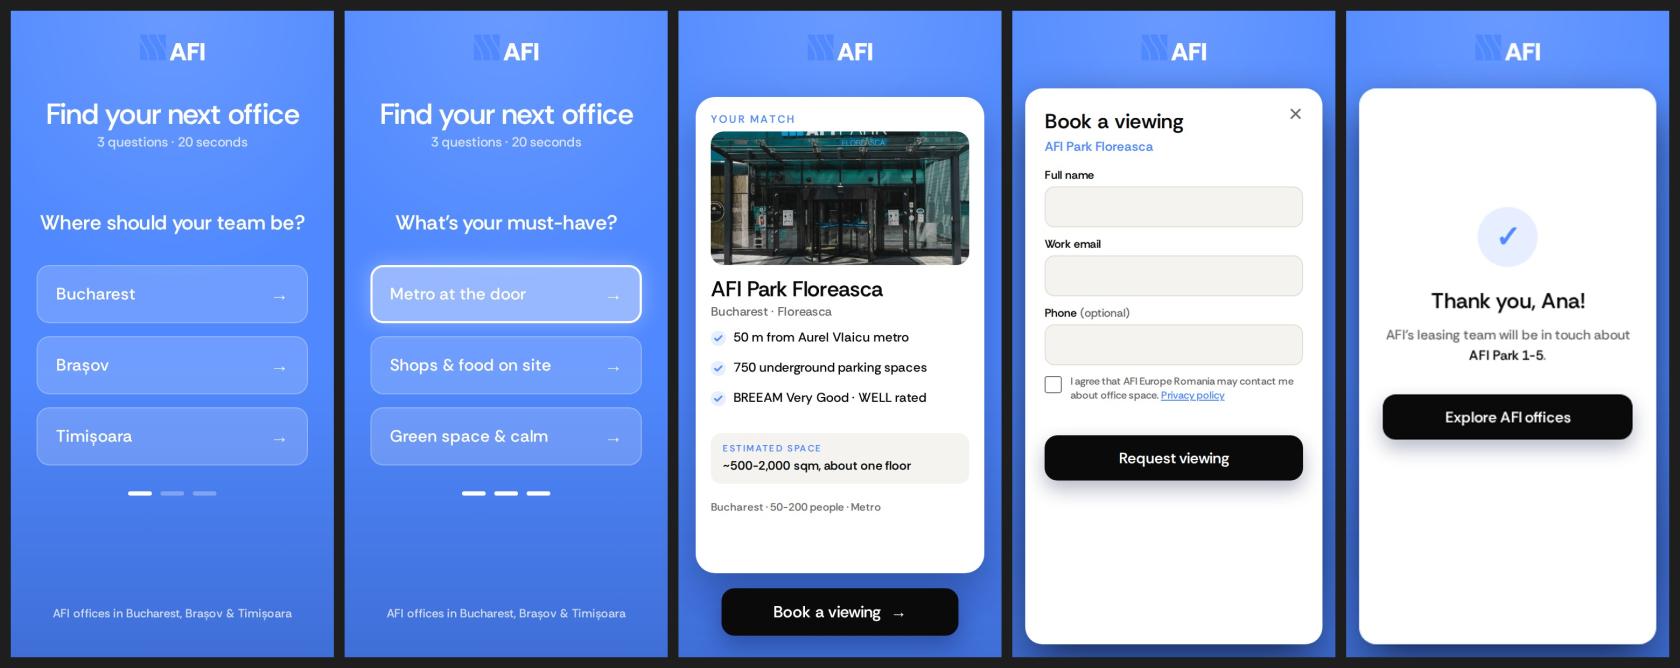
HOW TO USE THE AI MOCKUP TOOL
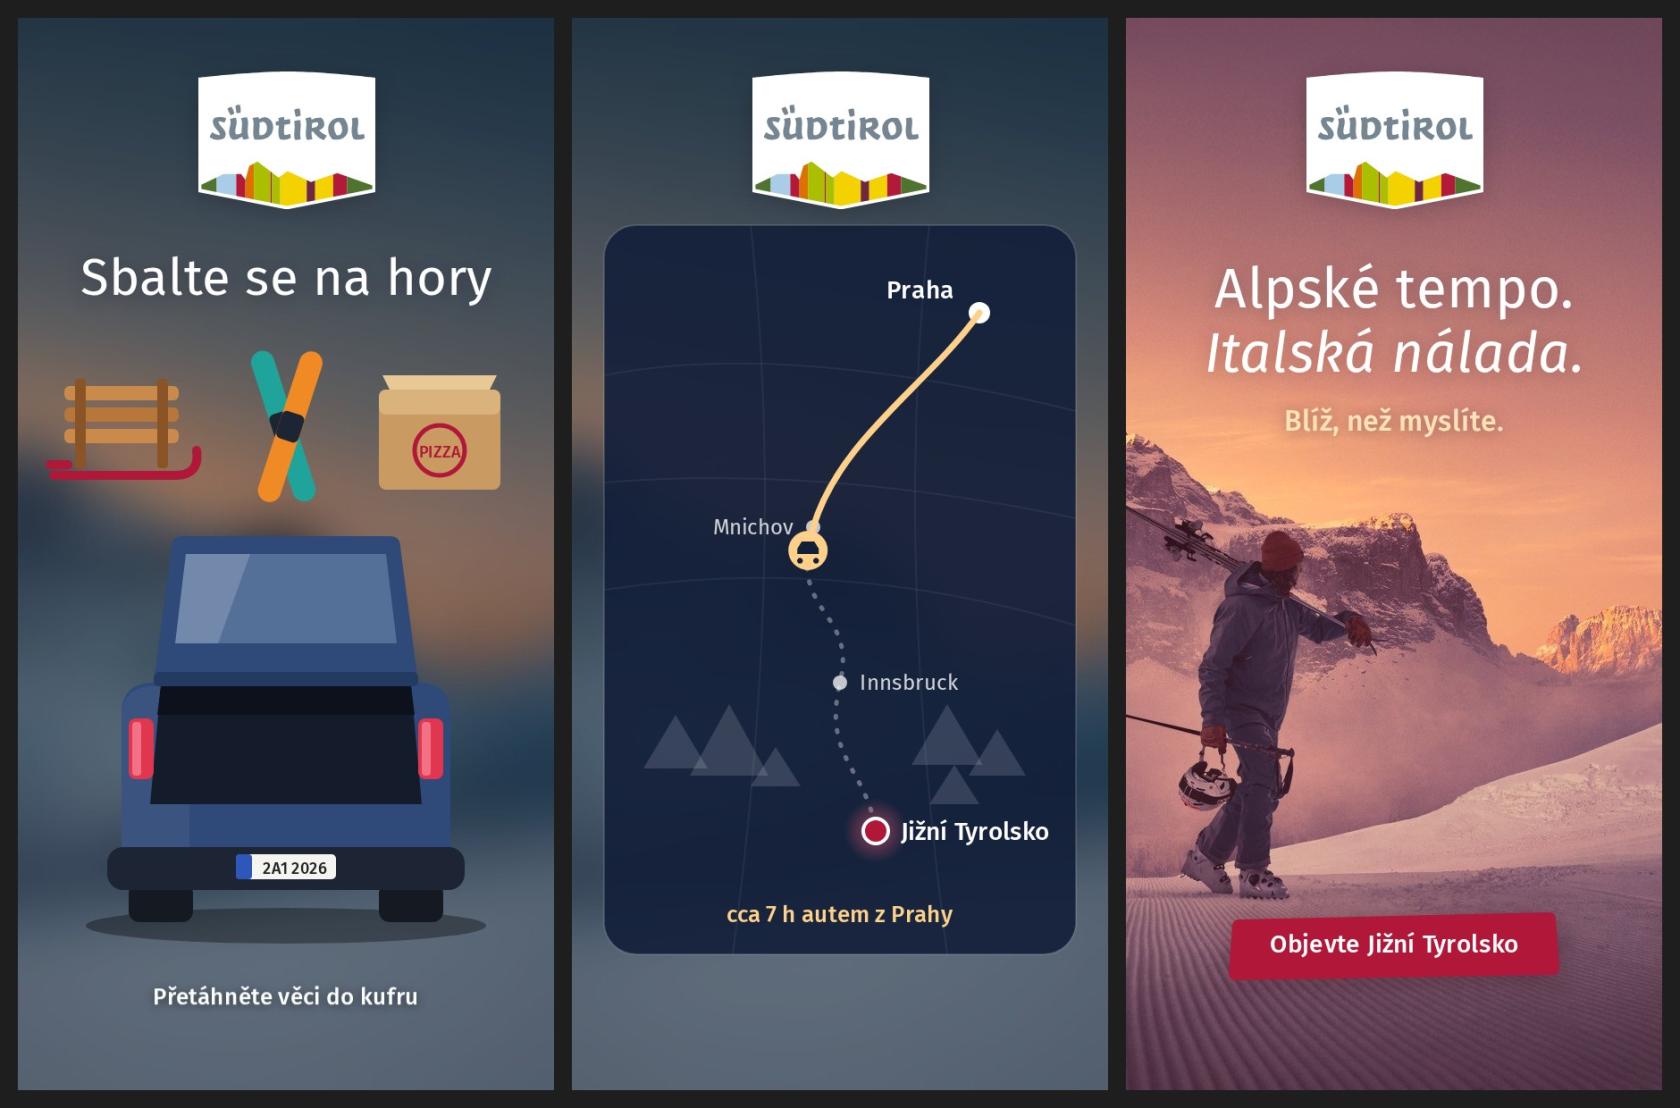
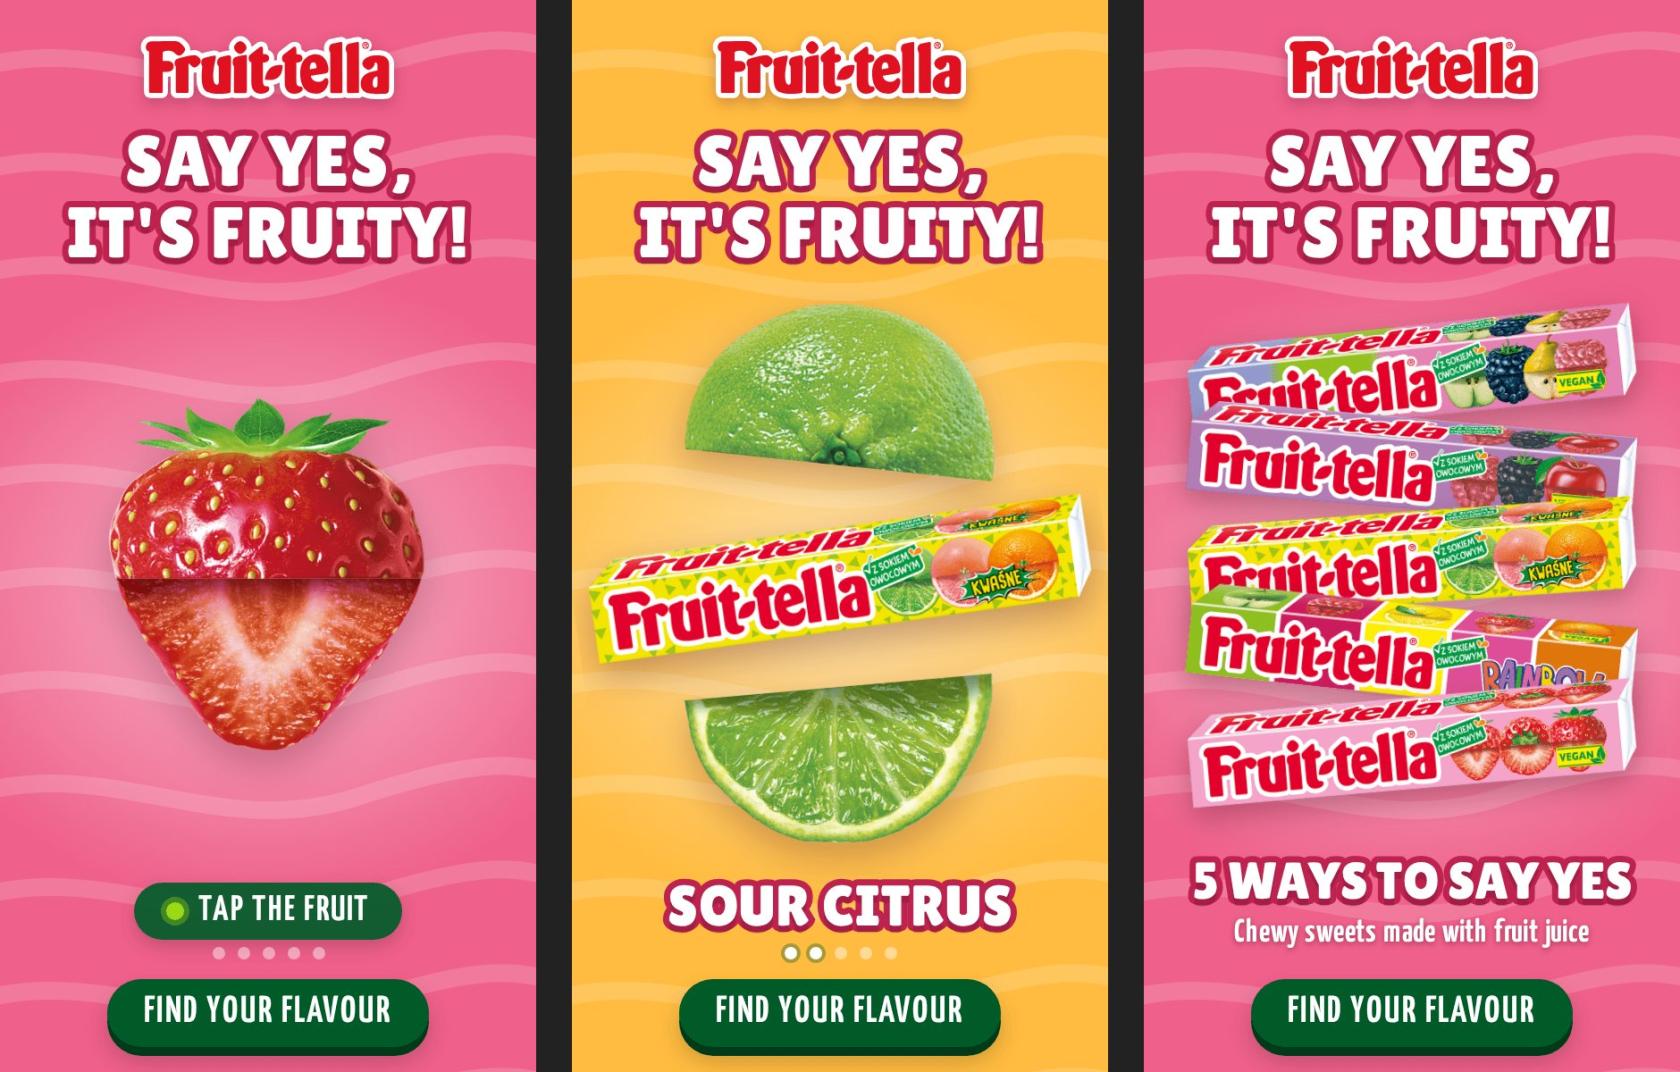
The AI Mockup Tool helps you quickly create working examples of Eskimi creative formats for pitches, proactive proposals and client conversations.
Unlike a previous AI-generated image or video mockups, this tool creates:
-
A working, interactive 300 x 600px banner
-
A .ZIP file prepared for upload to the Eskimi DSP
-
An editable, layered Figma file
-
Built-in Eskimi tracking codes
-
Files optimised for banner size limits
This means an approved mockup can be edited, resized, translated and prepared for a live campaign without rebuilding everything from the beginning.
The tool currently includes 25+ new and popular Eskimi rich media banner formats. Ask the tool to show you the available formats before you begin.
QUICK ANSWER
| IF YOU NEED TO… | THE TOOL CAN HELP YOU… |
|---|---|
| Show a client how a format could look | Create a visual, interactive example |
| Support a proactive pitch | Build a branded mockup quickly |
| Explain an idea that is difficult to describe | Show the proposed layout or interaction |
| Confirm that you understood a brief | Create an example for the client to review |
| Suggest a creative refresh | Show the client a possible new direction |
| Prepare an approved idea for production | Supply editable Figma files to Creative Studio |
TRAINING VIDEO
*Training was for AM's, but logic applies to everyone.
HOW TO INSTALL THE MOCKUP TOOL
HOW TO INSTALL THE MOCKUP TOOL
BEFORE YOU START: INSTALL THE TOOL
The AI Mockup Tool is added to your Claude account once. After that it stays available in every new chat.
You need to be logged into Claude with your Eskimi work account.
There are two ways to install it. Use Option A. Only use Option B if Option A does not work for you.
OPTION A: INSTALL FROM THE LINK (RECOMMENDED)
This is the standard route. The tool stays connected to the Creative Studio version, so improvements and new formats reach you automatically.
STEP 1: OPEN THE INSTALL LINK
- Open this link in a browser where you are already logged into Claude with your Eskimi account:
🔗 Mock & Roll Skill link share
STEP 2: INSTALL AND TURN IT ON
- Click Install
- Items shared with you may arrive switched off. If you see a toggle, switch it on
STEP 3: START A NEW CHAT AND OPEN THE TOOL
- Open a new Claude chat.
- Open a new Claude chat, type / and select eskimi-rm-mockup
- The tool will open with its first question and guide you from there
IF THE LINK DOESN'T WORK
| PROBLEM | WHAT TO DO |
|---|---|
| The link opens a login page | Log in with your Eskimi account, then open the link again |
| "This item isn't available" | You are logged into a personal Claude account rather than your Eskimi one. Switch accounts and try again |
| The page loads but shows nothing | Open Customise in the left sidebar, go to Plugins, and look under Shared with you |
| You find it but it looks greyed out | Shared items stay switched off until you enable them. Switch it on |
| It is installed but does not appear when you type "/" | Start a new chat. It will not appear in chats you opened before installing it |
| Still nothing | Use Option B below, or contact Creative Studio |
OPTION B: INSTALL THE SKILL FILE MANUALLY
Use this only if Option A does not work.
A manually installed version does not update. When Creative Studio adds formats or fixes problems, your copy stays as it is. You will need to download the new file and repeat these steps each time. Switch to Option A as soon as it works for you.
STEP 1: DOWNLOAD THE SKILL FILE
- Save it somewhere you can find it
- Do not unzip it
STEP 2: OPEN THE SKILLS PAGE
- In Claude, click Customize in the left sidebar, then open the Skills tab
STEP 3: UPLOAD THE FILE
- Click Add in the top right, then select Upload skill
- Choose the file you downloaded
STEP 4: CHECK IT IS ON
- The tool will appear in your Skills list
- If there is a toggle, make sure it is switched on
STEP 5: START A NEW CHAT AND OPEN THE TOOL
- Open a new Claude chat, type / and select eskimi-rm-mockup
KEEPING A MANUAL INSTALL UP TO DATE
If you installed using Option B, check this page occasionally for a newer file. To update, download the current file and repeat Steps 1 to 3. Remove the old version from your Skills list first so you do not end up with two copies.
WHAT DO I NEED TO GET STARTED?
WHAT DO I NEED TO GET STARTED?
You can create a mockup using only the client’s official website. However, the more useful information and assets you provide, the closer the result can be to your intended direction.
MINIMUM INFORMATION
Provide:
-
Client or brand name
-
Official website
-
Product or service
OPTIONAL ASSETS
You can also upload:
-
Logos
-
Product images
-
Campaign artwork
-
Brand guidelines
-
Copy or campaign messages
-
Fonts
-
Reference images
- A short explanation of the idea
-
Examples of the style you want
- Market or country
-
Campaign goal
You do not need to write a long prompt. A short, clear description and the correct website or assets are normally more useful than several pages of detailed instructions.
HOW TO CREATE A MOCKUP
HOW TO CREATE A MOCKUP
STEP 1: OPEN THE TOOL
Open the AI Mockup Tool in Claude.
If you do not know which format to use, ask:
“Show me the available creative formats.”
Review the list and choose the format that best supports your idea.
STEP 2: UPLOAD AVAILABLE ASSETS
Upload any suitable client assets you already have. If you do not have assets, provide the client’s official website. The tool can use it to identify possible:
-
Brand colours
-
Logos
-
Product imagery
-
Fonts
-
Visual style
You may be asked to accept website cookies or allow access to Figma while the tool is working.
STEP 3: DESCRIBE WHAT YOU NEED
Tell the tool what you want to create. For example:
“Create a Gallery 360 mockup for this beer brand. The campaign will run in Zambia and should focus on the new product packaging. Use the brand’s website for its colours and visual style.”
Or it can be as simple as:
"I want to create a banner for this brand, using their website as a reference: https://localbrewery.co/"
The tool may ask for additional information. Answer the questions as clearly as possible.
*See outcome of localbrewery.co mockups here.
STEP 4: LET THE TOOL BUILD THE MOCKUP
The tool will gather the relevant information and create the banner.
Generation time will depend on the selected format, supplied assets and complexity of the request. A mockup may take approximately 20 minutes, but this is not a guaranteed turnaround time. If you make multiple banners, the next banners generally don't take as long as the assets have already been set up from the first mockup.
The tool should explain what it is doing, such as which colours or visual references it identified from the website.
STEP 5: REVIEW THE RESULT CAREFULLY
Always check the complete mockup before showing it to a client. Review:
-
Logo quality
-
Product accuracy
-
Spelling and copy
-
Brand colours
-
Image quality
-
Shadows, gradients and backgrounds
-
Buttons and calls to action
-
Animation and interaction
-
Click-through behaviour.
-
Overall suitability for the client.
AI can produce damaged logos, unusual shadows, incorrect details or other visual mistakes. If something is wrong, ask the tool to correct it or request help from Creative Studio.
Never assume that an AI-generated result is correct simply because it looks finished.
WHAT FILES WILL I RECEIVE?
WHAT FILES WILL I RECEIVE?
1. WORKING BANNER .ZIP
The .ZIP contains the functional banner files, including the standard tags and tracking used by Creative Studio.
The banner can include working interactions such as:
-
Clickable buttons
-
Spinning or rotating elements
-
Gallery interactions
-
Other functionality included in the chosen format
The files are built with Eskimi DSP requirements and file-size optimisation in mind.
2. EDITABLE FIGMA FILE
Figma is a web-based design platform. The tool creates the design in separate, editable layers rather than combining everything into one flat image.
This allows Creative Studio to:
-
Update the copy
-
Replace products or images
-
Correct design details
-
Change languages
-
Create additional sizes
-
Prepare further campaign adaptations
The link to the Figma file should be included with the generated files or supporting README document.
If the client approves the mockup but requests changes, provide Creative Studio with the Figma link.
3. PREVIEW
The preview lets you test how the banner looks and behaves on the DSP before it's shared or uploaded. You can upload it to the DSP as usual.
Test every interaction. Do not rely only on a still screenshot.
COMMON QUESTIONS & LIMITATIONS
COMMON QUESTIONS & LIMITATIONS
The AI Mockup Tool:
-
Does not guarantee that every generated design will be visually correct
-
May produce low-quality or inaccurate brand elements
-
May need help when a website blocks access or contains limited assets
-
Does not replace Creative Studio for detailed design improvements
-
Does not replace a strategist when original campaign thinking is required
-
Does not replace client approval
-
Does not replace the normal quality-checking process
-
Works best with the supported formats already included in the tool
- DO I NEED CLIENT ASSETS?
- No; you can begin with the client’s official website only
- Supplying good-quality logos, product images and campaign assets will normally produce a more accurate result
- CAN I EDIT THE MOCKUP LATER?
- Yes; the tool creates a layered Figma file that Creative Studio can use for updates and adaptations
- CAN CREATIVE STUDIO CREATE OTHER SIZES?
- Yes; share the Figma link and approved design with Creative Studio when briefing the additional work
- CAN I CHANGE THE LANGUAGE?
- Yes; the editable Figma file allows the copy to be replaced for localisation
- CAN I UPLOAD THE .ZIP TO THE DSP?
- The .ZIP is built for the Eskimi DSP; however, it must still be reviewed, approved and checked through the normal campaign process before going live
- DO I HAVE TO COME UP WITH THE CREATIVE IDEA MYSELF?
- No; use the tool when you already have a direction you want to demonstrate or clarify
- If you need help developing the idea itself, speak to a Creative Project Manager or request the appropriate proactive or strategic support
- WHAT IF THE RESULT LOOKS WRONG?
- Ask the tool to correct the problem; if the issue needs design judgement or manual editing, share the Figma link with Creative Studio
REMEMBER
Use the tool to make ideas easier to see, understand and approve. It supports the creative process - it does not replace the people, judgement and approvals required to deliver a successful campaign.
The AI Mockup Tool is an optional resource. It does not mean that the sales team must become designers or develop creative ideas for every brief.
If the client needs original creative thinking, strategic campaign ideas or expert recommendations, use the appropriate Creative Studio support:
-
Speak to a Creative Project Manager for initial guidance
-
Use a Creative Token for proactive concepts or demos
-
Request Creative Strategy support for qualifying opportunities
-
Submit a full brief when Creative Studio production is required
*Read about how to get proactive creative support.
The tool helps you communicate or demonstrate an idea. It does not replace creative strategy or professional creative judgement.